Lesson 5: Text, Translation, Scaling, Rotation
Lesson 5: Introduction
Learning Outcomes
By the end of this lesson, you should be able to:
- Write a program involving interactive typography
- Write a program that involves translate() and scale(), rotate(), pushMatrix(), and popMatrix()
What is due for Lesson 5?
This lesson will take us one week to complete. 16-22 June 2021. This lesson involves the following graded items:
- Teaching/Learning discussion, detailed on the next page
- Programming exercises, detailed on the pages after that
| Assignment | Description | Submitted for Grading? |
|---|---|---|
| Discussion | Teaching/Learning Discussion #2 | yes -- participate throughout the week in a Canvas discussion board |
| Exercise 5.1 | write your own paragraph in a font you like | no |
| Exercise 5.2 | write a program with words that move up and down | no |
| Exercise 5.3 | modify the program you wrote in 5.2 so that the words also change color while they move | either submit this OR submit Exercise 5.4 |
| Exercise 5.4 | tell a story with moving words | either submit this OR submit Exercise 5.3 |
| Exercise 5.5 | experiment with translations to see what happens when you use more than one pushMatrix() popMatrix() pair | no |
| Exercise 5.6 | use translate() and rotate() to change a square into a diamond | no |
| Exercise 5.7 | use translate() and rotate() to change the coordinate system so that the origin is on the bottom left and increases to the right and upwards | no |
| Exercise 5.8 | write a function that uses a combination of scale(), rotate(), or translate() and then do something interactive with it such as having it plot to the display window when the mouse is clicked, or have it move by itself | yes - submit this. |
Questions?
If you have any questions, please post them to our Questions? discussion forum (not e-mail) in Canvas. I will check that discussion forum daily to respond. While you are there, feel free to post your own responses if you, too, are able to help out a classmate.
Lesson 5: Teaching/Learning Discussion
Directions
For this activity, I want you to reflect on what we've covered so far and consider, not necessarily how you might adapt these materials to your own classroom, but more like how any of this gets at the spatial visualization and various other cognitive skills discussed in some of the papers we read. Is your grey matter changing?! Since this is a discussion activity, you will need to enter the discussion forum more than once to read and respond to others' postings. This discussion will take place over the whole week of this lesson.
Submitting your work
- Enter the Lesson 5 Teaching and Learning 2 Discussion Forum
- Post your thoughts.
- Read postings by your fellow students, too, and respond to at least one other posting by asking for clarification, asking a follow-up question, expanding on what has already been said, etc.
Grading criteria
You will be graded on the quality of your participation. See the grading rubric [1] for specifics on how this assignment will be graded.
Lesson 5: Text
New syntax introduced: Font, loadFont, textFont, textAlign, text, String, char, textLeading
Loading a font, writing text to the display window
If you want to write text to the screen, Processing has many fonts to choose from. You can pick one by choosing “Create Font” from the Tools drop-down menu. Then in your program, you declare the font variable, load the font, and use the text() function to write text to the screen using the font you created.
Note: Even though Processing itself is platform independent, different operating systems have different fonts. I am a Mac user. If you are a PC user, you might not have the exact fonts I demo in my examples below, but the point is that there are lots to choose from and the way you work them into a program is the same.
Example 5.0
Here is an example of a short program I wrote at the end of the 2011 baseball season using text():
// Load a font// Write text to the screenPFont font1;void setup() { size(400, 200); font1 = loadFont("Futura-CondensedExtraBold-36.vlw"); textFont(font1); textAlign(CENTER);}void draw() { background(252, 143, 143); fill(160, 8, 8); text("Cards win!", width/2, height/2);} |

 Here's a screencast walk-through of the program above [2]. (and a captioned version [3].) In the program in Example 5.0, I created the font called “Futura-CondensedExtraBold-36.vlw” by choosing it with the Create Font tool. I have to declare the variable of type PFont at the beginning before the setup() block. Inside the setup() block, I load the font. The function text(data,x,y) in the draw() block takes three arguments: data, which is the thing it will write, and x, and y, which are the coordinates that tell it where to write the data. If you want the text to be colored something other than black, specify the color with fill(). It is a little counterintuitive to some folks that fill(), not stroke(), is how this is accomplished, but that's the way it is. Roll with it. Note that in my program, the sentence, “Cards win!” is enclosed in double quotes because it is a String. The text() function doesn’t need to take String data, it can also be a char, int, or float. You can also have more than one font per program.
Example 5.1
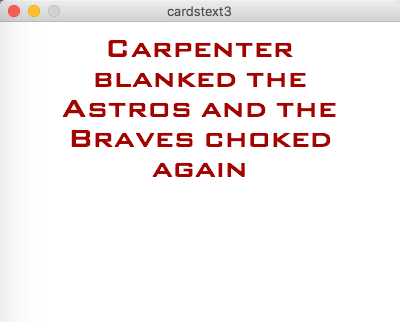
Here’s an example with multiple fonts.
// Load more than one font// Write text to the screenPFont font1;PFont font2;PFont font3;void setup() { size(600, 200); font1 = loadFont("BankGothic-Medium-32.vlw"); font2 = loadFont("Baskerville-BoldItalic-32.vlw"); font3 = loadFont("CenturyGothic-Bold-32.vlw");}void draw() { background(252, 143, 143); textFont(font1); textAlign(CENTER); fill(160, 8, 8); text("Carpenter blanked the Astros", width/2, 50); textFont(font2); fill(0); text("and", width/2, 80); textFont(font3); fill(22, 8, 160); text("The Braves choked again", width/2, 110);} |

Notice that in the program in Example 5.1 I placed each line of text by hand because I specified its x and y coordinates. An alternative to doing this is to define all the text you want to display as a String and then use optional parameters in text() to define a box within which the text is written. This is a nice option because you don’t have to mess with the spacing manually. The syntax for setting text in a box is text(string, xTopLeftCoordinate,yTopLeft Coordinate,width,height).
Example 5.2
Here is an example of setting the text within a box.
// load a font//write text to the screen in a textboxPFont font1;void setup(){ size(400,300); font1 = loadFont("BankGothic-Medium-32.vlw"); }void draw(){ background(255); textFont(font1); textAlign(CENTER); textLeading(30); fill(160,8,8); String s = "Carpenter blanked the Astros and the Braves choked again"; text(s, 50,20,300,200); } |
Notice how in the above program, the text was automatically broken up over several lines to fit into a box. Processing is also smart enough to break things up at the blank spaces instead of in the middle of words. I set the vertical spacing between lines of text with textLeading(dist) in which dist sets the number of pixels between each line. That keeps the text from being squished too much. Sometimes you just have to use trial and error to get things to look the way you want.
Exercise
5.1: Modify any of my examples to write your own paragraph in a font you like.
Turning in your work
Nothing yet. Stay tuned.
Lesson 5: Text that changes or is responsive
syntax introduced: +=
It’s a little more fun to do something with the text you draw to the screen instead of having it just sit there. Since Processing draws text as an image, you can treat a word just like any other shape.
Example 5.3
Here’s an example in which a word follows the mouse around on the screen (code modified from Reas and Fry, 2007).
// The word "follow" follows the mouse// its position is tied to the mouse position.PFont font1;void setup() { size(300, 300); font1 = loadFont("AcademyEngravedLetPlain-48.vlw"); textFont(font1); textAlign(RIGHT); fill(0);}void draw() { background(124, 194, 250); text("follow", mouseX, mouseY);} |

Example 5.4
Here’s an example of a word changing color frame by frame:
// The word "embarrassed" changes color from neutral to red.PFont font1;int opacity = 0;int direction = 1;void setup() { size(400, 200); font1 = loadFont("AmericanTypewriter-Bold-48.vlw"); textFont(font1); textAlign(CENTER);}void draw() { background(175, 124, 124); opacity += 1 * direction; if ((opacity < 0) || (opacity > 255)) { direction = -direction; } fill(255, 0 , 0, opacity); text("embarrassed", width/2,height/2);} |

The program in Example 5.4 makes use of the new piece of syntax += which is a compact way to combine addition with assignment. Let's say you have two values: x and y. In Processing,x += y is the same as x = x + y. You are adding the value of y to x and reassigning x the new resulting value all in one step.
Example 5.5
Here’s an example of words that move across the screen
PFont font;float x1 = 0;float x2 = 200;int x1speed = 1;float x2speed = 0.73;void setup() { size(800, 200); font = loadFont("Trebuchet-BoldItalic-48.vlw"); textFont(font); fill(0);}void draw() { background(204); x1 += x1speed; x2 += x2speed; if (x1 >= 550) { x1=550; x2speed=0; strokeWeight(3); line(765,0,765,height); } fill(68,143,232); text("Braves",x2,100); fill(160,8,8); text("Cardinals",x1, 50);} |

 The program in Example 5.5 (screencast walk-through here [4]) (and a captioned version [5]) is meant to demonstrate visually my interpretation of how the last month of the 2011 major league baseball season went for the St Louis Cardinals and the Atlanta Braves. With about a month to go, the Braves had a huge lead in terms of the number of games they had won and seemed to be certain to get into the playoffs. However, they collapsed and lost most of their games over the last month of the season while the Cardinals won so many games that they finished with a better record -- by just one game -- and they got into the playoffs instead. So in the program above, both teams are moving in the same direction, which is kind of like a proxy for time passing. The Cardinals are moving faster because they are catching up, and at the end when both words stop moving, you see that the Cardinals are just a little bit ahead. I added a black vertical line to draw your attention to that fact.
This is an example of a visual representation of an idea or a time-dependent process, which is something that this programming language is good at doing. My guess is that you can be more creative than I am. See if you can come up with moving, changing, or interactive words that represent some kind of idea or process and illustrate it with your program!
Exercises
5.2 Write a program with words that move up and down instead of right and left.
5.3 Modify the program in 5.2 with words that also change color as they move.
5.4 Tell a story with moving words
Turning in your work
Turn in either 5.3 OR 5.4 to the Lesson 5 dropbox. ** Please zip your whole folder when you turn it in instead of just including your .pde file for this exercise. The reason is that your loaded font is included as a file in your folder where your .pde file also lives. If you don't include the whole thing then I have to go digging around to load the font when I run your program.
What I'm looking for
In your program I want to see that you can successfully load a font and use it, and I'd ideally like to see some kind of creative thinking about what you want to do with the words or letters that you have decided to draw to the display window.
Lesson 5: Translating the coordinate system
New syntax introduced: translate(), pushMatrix(), popMatrix()
You know that the default coordinate system has (0,0) in the upper left corner and increases to the right and downwards. You can change this system by calling the function translate(). The translate() function takes two arguments: the number of pixels added to x and the number of pixels added to y. All shapes drawn after translate() will adhere to the new coordinate structure.
The tricky thing to remember about translation is that you aren't really moving the shapes you draw. Instead you are moving the entire coordinate system relative to the display window. Consider the hand-drawn sketch below in which there is a heart whose top cusp is at (3,2), shown by the black dot.

Now if I translate the coordinate system 2 over and 1 down, the display window stays where it is and the heart stays where it is relative to the coordinate mesh, but the coordinate mesh itself has been shifted. So in pseudo-code this would be like:
translate(2,1);heart(3,2); |

Translations are cumulative, so the third panel can be achieved either by translating (-5,1) from the second panel, or by translating (-3,2) directly from the first panel. If we had really drawn the third version in Processing, you'd only see the right half of the heart because the other side is out of the display window. Philosophers can tell us whether it exists or not, but in any case we can't see it.
So in pseudo-code this would be:
translate(2,1);translate(-5,1);heart(3,2); |
Or it could have been
translate(-3,2);heart(3,2); |
Note how I'm always drawing the heart itself with the same coordinates it had in the first place.

Example 5.6
Here is an example in an actual program. Notice in this program that rectangle is always specified by the same coordinates. You can see how translation is cumulative and can be negative, too.
// Demonstrate Translationsize(200, 200);rect(10, 10, 50, 20); // Draw a rectangle translate(100, 100); // Move the origin to (100, 100)rect(10, 10, 50, 20); // Draw the same rectangle, but now it is shiftedtranslate(50, 50); // Move the origin to (150, 150)rect(10, 10, 50, 20); // Same rectangle shifted moretranslate(0, -75); // Translations can be negativefill(255, 0, 0); rect(10, 10, 50, 20); // Same rectangle shifted up and colored red |

To change the coordinate system temporarily and then have it go back to the way it was before you made a transformation without having to manually make a negative translation, use pushMatrix() and popMatrix(). These functions always have to be used together. The way it works is that you stick in a pushMatrix() before you write the transformation and then you stick in a popMatrix() just before you want to revert back. The coordinate system will revert back to the way it was before pushMatrix().
Example 5.7
// Use pushMatrix and popMatrix to revert the translationsize(200, 200);pushMatrix();for (int i = 1; i < 200; i++) { translate(i, i); rect(1, 1, 50, 20); // Draw a rectangle}popMatrix();ellipse(100, 100, 20, 20); |

Note how in the code in Example 5.7 the circle draws in the center of the screen because the for loop was enclosed by a pushMatrix() popMatrix() pair, meaning that all those accumulated translations didn’t affect the circle.
Quiz Yourself!
Exercises
5.5: Experiment with translations. See what happens when you make multiple translations and use more than one pushMatrix() popMatrix() pair
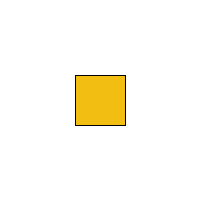
Lesson 5: Changing the scale
Syntax Introduced: scale()
You can use the function scale() to zoom the coordinate system. It can can take either one argument, or else two arguments if you want to zoom the x and y coordinates differently. In the example below, pay attention to the fact that it's the coordinates that are being stretched, not the shapes. In effect, this means that the position of the shape will change as well as its size.
Example 5.8
size(200, 200);ellipse(20, 20, 10, 10);pushMatrix();scale(1.5); // Zoom axes by 1.5Xellipse(20, 20, 10, 10);scale(1.5); // Scale is cumulative, so now things will be stretched by 2.25Xellipse(20, 20, 10, 10);popMatrix();// The ellipse below is the same size as the one inside the push/pop// pair that had been stretched by 2.25Xellipse(70, 70, 22.5, 22.5);scale(1.5, 1); // Only scaling xellipse(70, 70, 10, 10); |

In the program in Example 5.8, when the coordinate system got stretched, the strokeWeight got thicker, too. The strokeWeight is also affected by scale(). If you don’t want this to happen, you can get around it by dividing the strokeWeight by the scale factor, like this:
Example 5.9
// Demonstrate the uses of scale// Fix the strokeWeightsize(200, 200);float s = 1.5;ellipse(20, 20, 10, 10);scale(s); // Makes things 150% biggerstrokeWeight(1/s); // Divide by scaleellipse(30, 30, 10, 10);scale(s); // Scale is cumulativestrokeWeight(1/(2*s)); // Divide by the total scaleellipse(40, 40, 10, 10);scale(s, 1); // Only scaling xstrokeWeight(1/(3*s));ellipse(50, 50, 10, 10); |

Lesson 5: Rotation
Syntax introduced: rotate(), PI, ++, --
You can rotate the coordinate system with the rotate() function. The rotate() function takes one argument, which is an angle in radians. (360 degrees = 2pi radians, so if you don’t like thinking in radians you can specify degrees and then multiply by pi/180 to convert to radians). The rotate() function will by default rotate clockwise around the origin of the coordinate system, so if you want the rotation to occur around a different point, you have to use translate() first to move the origin.
Let's start with the hand-drawn heart from the discussion of translation. Its top cusp is at (3,2).
Now let's rotate by 45 degrees and then draw the heart. In pseudo-code, this would be
rotate(PI/4);heart(3,2); |
Here's what that looks like:

But what if you wanted to rotate the heart itself? The key is to remember that all rotations occur around (0,0). So to make a shape rotate around its own center of gravity, you basically have to draw the shape so that its center is at (0,0). Then you can do whatever rotation you want and it will appear that the shape rotates around itself. But you probably don't want to draw the shape up in the top corner where you can't see most of it! So you translate the coordinate system, thereby putting the origin in the place on the display window that you want, then draw the shape there.
In pseudo-code:
translate(3,2);rotate(PI/4);heart(0,0); |

Example 5.10
Here’s an example program that uses translate() and rotate().
// Demonstrate translate and rotatesize(200, 200)background(255);stroke(247, 117, 10);translate(100, 100);strokeWeight(3);line(0, 0, 55, 0); // A horizontal orange linerotate(60 * PI/180); // How to write 60 degrees in radiansline(0, 0, 55, 0); // Orange line rotated |
 A screencast explanation of how translate and rotate work in Example [6]5.10, above (and a captioned version [7]).
Do them all! Order matters!
Combining skills!
Example 5.11
Here’s an example of a shape I made with translate and rotate. I turned it into a function and I’m having it move across the screen.
//the sun rises and setsfloat x = 10; float y . 190; float speed = 1.0; int direction = 1; int g = 10;void setup(){size(400, 200);}void draw(){ background(10, g, 247); //I'm going to change the green so it has a variable smooth(); sun(x, y); // calls the sun function x = x + .5*speed; //moves to the right y = y - (.5*speed*direction); //moves up if (x > width || x < 0){ x=1; // if it hits the right side, start over y=190; direction =1; } if(y ‹ 0){ direction *= -1; // if it hits the top, go down } if (x==1){ g=10; //resets the green value } if (direction == 1){ g=g+1; //make the sky lighter as the sun goes up } else{ g=g-1; //make sky darker as the sun goes down }}// This is my sun function// Notice the use of push, pop, translate, and rotatevoid sun(float x, float y) ( pushMatrix(); translate(x,y); stroke(247, 117, 10, 120); fill(247, 200, 10); ellipse(0, 0, 30, 30); for (int i = 0; i < 24; i++) { strokeWeight(3); rotate(PI/12); line(30, 30, 10, 0);}popMatrix();} |
 A screencast explanation of the sunrise/sunset program [8] (captioned version here [9]). This screencast also provides an introduction to the syntax "++" and "--", which haven't come up before. ++ means increment by 1 and -- means decrement by one. If you write x++ it is equivalent to writing x = x + 1. Similarly, x-- is the same as x = x - 1.
Exercises
5.6 Use translate() and rotate() to change a square into a diamond.
5.7: Use a combination of translate() and rotate() to change the coordinate system so that its origin is at the bottom left corner and increases to the right and upwards.
5.8: write a function that uses some combination of scale(), rotate(), or translate(), and then do something with it such as having it plot to the screen with a mouse click, or having it move by itself.
Turning in your work
Turn in 5.8 to its assignment dropbox in Canvas.
What I am looking for
In 5.8 I want to see you use new skills such as scale, rotate, and translate, combined with previously-learned skills such as function-writing, and/or mouse/keyboard interactivity.
Lesson 5: Simulating rotating movement
In order to make a shape look like it is continuously rotating we can take advantage of the automatic looping inherent in draw(). The key is that instead of specifying an x or y coordinate that increments with time, we instead specify a rotation angle and have it increment with every run through draw().
For example, let's draw a square and rotate it about its own center of gravity. Remember that angles are in radians, so you have to choose a fairly small increment if you want your shape to spin slowly.
//twirling squarefloat rotAngle=0;void setup(){ size(200,200);}void draw(){ background(255); translate(width/2,height/2); rotate(rotAngle); rectMode(CENTER); fill(242,190,17); rect(0,0,50,50); rotAngle += 0.05;} |
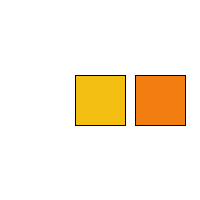
Let's draw two squares now and see what that looks like:
//2 twirling squaresfloat rotAngle=0;void setup(){ size(200,200);}void draw(){ background(255); translate(width/2,height/2); rotate(rotAngle); rectMode(CENTER); fill(242,190,17); rect(0,0,50,50); rotAngle += 0.05; fill(242,126,17); rect(0,60,50,50);} |
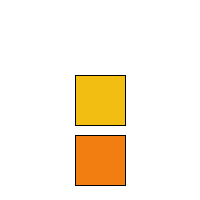
It looks like the orange square is pinned to the yellow one since they are both rotating about the same point at the same speed. Let's say we want to make them rotate independently, with different speeds and directions. We can do that simply by using some more variables to define different rotation speeds and directions. If we want them to rotate about different origin points, then we need to put the calls to translate() and rotate() inside some pushMatrix() / popMatrix() pairs. Let's do that. I am going to change the program so that the orange square spins about its own center, counter-clockwise, and slower than the yellow square.
//2 twirling squares. Yellow goes clockwise. Orange counterclockwisefloat rotAngle1=0;float rotAngle2=0;void setup(){ size(200,200);}void draw(){ background(255); rectMode(CENTER); pushMatrix(); translate(width/2,height/2); rotate(rotAngle1); fill(242,190,17); rect(0,0,50,50); rotAngle1 += 0.05; popMatrix(); pushMatrix(); translate(width/2+60,height/2); fill(242,126,17); rotate(rotAngle2); rect(0,0,50,50); rotAngle2 -= 0.025; popMatrix();} |
Lesson 5: Another example of rotation
Probably the most important thing to remember about rotation is the following: First translate, then rotate. I will say it again. First translate, then rotate. When you get unexpected results from a rotate() command, it is usually because you forgot to translate first, so your shape flies off the display window where you can't see it anymore.
Here's another example of a program that uses scale(), translate(), and rotate().
Example 5.11 Gear program
//interlocking gearsfloat x = 100;float y = 100;float gearAngle1 = 0;float gearAngle2 = 0;float gearAngle3 = 0;void setup(){size(400,300);}void draw(){ background(10,10,247); smooth(); pushMatrix(); translate(x,y); rotate(gearAngle1); gear(0,0); popMatrix(); gearAngle1 += .01; pushMatrix(); translate(x+125,y+20); rotate(gearAngle2); scale(2); gear(0,0); popMatrix(); gearAngle2 -=.005; pushMatrix(); translate(x+133,y+135); rotate(gearAngle3); scale(0.75); gear(0,0); popMatrix(); gearAngle3 +=.015;}void gear(float x, float y) { pushMatrix(); translate(x,y); stroke(247,117,10,120); fill(247,200,10); ellipse(0,0,30,30); for (int i = 0; i < 12; i++) { strokeWeight(5); rotate(PI/6); line(0,0,30,30);}popMatrix();} |

Lesson 5: Combining Lesson 5 Skills
This is a short program that combines skills from this lesson. I import a font and write a word to the screen. I also translate the coordinate system and rotate continuously so that the word spins around its own center.
// the word "pinwheel" spins aroundPFont font1;float rotAngle = 0;void setup(){ size(200,200); font1 = loadFont("Herculanum-48.vlw"); textFont(font1); textAlign(CENTER);}void draw(){ background(11,139,1); translate(width/2,height/2); rotate(rotAngle); text("pinwheel",0,0); rotAngle += 0.01;} |

Quiz yourself
Quiz yourself again
Lesson 5: Summary and Exercises
Exercises
(this is a repeat from the various pages where these were written.)
5.1: Modify any of my examples to write your own paragraph in a font you like.
5.2 Write a program with words that move up and down instead of right and left.
5.3 Modify the program in 5.2 with words that also change color as they move.
5.4 Tell a story with moving words
5.5: Experiment with translations. See what happens when you make multiple translations and use more than one pushMatrix() popMatrix() pair
5.6 Use translate() and rotate() to change a square into a diamond.
5.7: Use a combination of translate() and rotate() to change the coordinate system so that its origin is at the bottom left corner and increases to the right and upwards.
5.8: write a function that uses some combination of scale(), rotate(), or translate(), and then do something with it such as having it plot to the screen with a mouse click, or having it move by itself.
Reminder!
You should have turned in either Exercise 5.3 or Exercise 5.4 to its assignment dropbox and also Exercise 5.8 to its assignment dropbox. You should also have been participating in the Teaching/Learning discussion throughout the week.
Remember that in your Exercise 5.3 or 5.4 where you practiced with typography, you need to zip your whole folder and turn that into the dropbox so that I have the font you used and I can run your program.