Lesson 2 GUI Development with PyQt5 and Package Management
2.1 Overview and Checklist
Lesson 2 is two weeks in length. We will look at some more advanced Python concepts and how to access data on the web from within a Python program. Then we will focus on how write Python programs with a graphical user interface based on the QT5 library and PyQt5 package. Finally, we will discuss Python package management and package managers, and how they can be used to disseminate Python code.
Please refer to the Calendar for specific time frames and due dates. To finish this lesson, you must complete the activities listed below. You may find it useful to print this page out first so that you can follow along with the directions.
| Step | Activity | Access/Directions |
|---|---|---|
| 1 | Engage with Lesson 2 Content | Begin with 2.2 List Comprehension |
| 2 | Programming Assignment and Reflection | Submit your code for the programming assignment and 400 words write-up with reflections |
| 3 | Quiz 2 | Complete the Lesson 2 Quiz |
| 4 | Questions/Comments | Remember to visit the Lesson 2 Discussion Forum to post/answer any questions or comments pertaining to Lesson 2 |
2.2 List Comprehension
Like the first lesson, we are going to start Lesson 2 with a bit of Python theory. From mathematics, you probably are familiar with the elegant way of defining sets based on other sets using a compact notation as in the example below:
M = { 1, 5 ,9, 27, 31}
N = {x2, x ∈ M ∧ x > 11}
What is being said here is that the set N should contain the squares of all numbers in set M that are larger than 11. The notation uses { … } to indicate that we are defining a set, then an expression that describes the elements of the set based on some variable (x2) followed by a set of criteria specifying the values that this variable (x) can take (x ∈ M and x > 11).
This kind of compact notation has been adopted by Python for defining lists and it is called list comprehension. A list comprehension has the general form
[< new value expression using variable> for <variable> in <list> if <condition for variable>]
The fixed parts are written in bold here, while the parts that need to be replaced by some expressions using some variable are put into angular brackets <..> . The if and following condition are optional. To give a first example, here is how this notation can be used to create a list containing the squares of the numbers from 1 to 10:
squares = [ x**2 for x in range(1,11) ]
print(squares)
Output:
[1, 4, 9, 16, 25, 36, 49, 64, 81, 100]
In case you haven’t seen this before, ** is the Python operator for a to the power of b.
What happens when Python evaluates this list comprehension is that it goes through the numbers in the list produced by range(1,11), so the numbers from 1 to 10, and then evaluates the expression x**2 with each of these numbers assigned to variable x. The results are collected to form the new list produced by the entire list comprehension. We can easily extend this example to only include the squares of numbers that are even:
evenNumbersSquared = [ x**2 for x in range(1,11) if x % 2 == 0 ]
print(evenNumbersSquared)
Output:
[4, 16, 36, 64, 100]
This example makes use of the optional if condition to make sure that the new value expression is only evaluated for certain elements from the original list, namely those for which the remainder of the division by 2 with the Python modulo operator % is zero. To show that this not only works with numbers, here is an example in which we use list comprehension to simply reduce a list of names to those names that start with the letter ‘M’ or the letter ‘N’:
names = [ 'Monica', 'John', 'Anne', 'Mike', 'Nancy', 'Peter', 'Frank', 'Mary' ]
namesFiltered = [ n for n in names if n.startswith('M') or n.startswith('N') ]
print(namesFiltered)
Output:
['Monica', 'Mike', 'Nancy', 'Mary']
This time, the original list is defined before the actual list comprehension rather than inside it as in the previous examples. We are also using a different variable name here (n) so that you can see that you can choose any name here but, of course, you need to use that variable name consistently directly after the for and in the condition following the if. The new value expression is simply n because we want to keep those elements from the original list that satisfy the condition unchanged. In the if condition, we use the string method startswith(…) twice connected by the logical or operator to check whether the respective name starts with letter ‘M’ or the letter ‘N’.
Surely, you are getting the general idea and how list comprehension provides a compact and elegant way to produce new lists from other lists by (a) applying the same operation to the elements of the original list and (b) optionally using a condition to filter the elements from the original list before this happens. The new value expression can be arbitrarily complex involving multiple operators as well as function calls. It is also possible to use several variables, either with each variable having its own list to iterate through corresponding to nested for-loops, or with a list of tuples as in the following example:
pairs = [ (21,23), (12,3), (3,11) ]
sums = [ x + y for x,y in pairs ]
print(sums)
Output:

[44, 15, 14]
With “for x, y in pairs” we go through the list of pairs and for each pair, x will be assigned the first element of that pair and y the second element. Then these two variables will be added together based on the expression x + y and the result will become part of the new list. Often we find this form of a list comprehension used together with the zip(…) function from the Python standard library that takes two lists as parameters and turns them into a list of pairs. Let’s say we want to create a list that consists of the pairwise sums of corresponding elements from two input lists. We can do that as follows:
list1 = [ 1, 4, 32, 11 ]
list2 = [ 3, 2, 1, 99 ]

sums = [ x + y for x, y in zip(list1, list2)]
print(sums)
Output:
[4, 6, 33, 110]
The expression zip(list1,list2) will produce the list of pairs [ (1,3), (4,2), (32,1), (11,99) ] from the two input lists and then the rest works in the same way as in the previous example.
You may remember the list and loop that we used to create the jobs list in the first assignment:
jobs = []
for id in idList:
    jobs.append((clipper, tobeclipped, field, id))
These three lines can be condensed to one using list comprehension to create the jobs list of tuples:
jobs = [(clipper, tobeclipped, field, id) for id in idList]
Most of the examples of list comprehensions that you will encounter in the rest of this course will be rather simple and similar to the examples you saw in this section. We will also practice writing list comprehensions a bit in the practice exercises of this lesson.
If you'd like to read more about them and see more examples, there are a lot of good tutorials and blogs out there on the web if you search for Python + list comprehension, like this List Comprehensions in Python page for example. As a last comment, we focussed on list comprehension in this section but the same technique can also be applied to other Python containers such as dictionaries. If you want to see some examples, check out the section on "Dictionary Comprehension" in this article here.
2.3 Accessing and working with web data
There is a wealth of geographic (and other) information available out there on the web in the form of web pages and web services, and sometimes we may want to make use of this information in our Python programs. In the first walkthrough of this lesson, we will access two web services from our Python code that allow us to retrieve information about places based on the places’ names. Another common web-based programming task is scraping the content of web pages with the goal of extracting certain pieces of information from them, for instance links leading to other pages. In this section, we are laying the foundation to perform such tasks in Python by showing some examples of working with URLs and web requests using the urllib and requests packages from the standard Python library, and the BeautifulSoup4 (bs4) package, which is a 3rd party package that you will have to install.
Urllib in Python 3 consists of the three main modules urllib.requests for opening and reading URLs, urllib.error defining the exceptions that can be raised, and urllib.parse for parsing URLs. It is quite comprehensive and includes many useful auxiliary functions for working with URLs and communicating with web servers, mainly via the HTTP protocol. Nevertheless, we will only use it to access a web page in this first example here, and then we will switch over to using the requests package instead, which is an easy-to-understand wrapper of the Python package urllib3 for the high-level tasks we are going to perform.
In the following example, we use urllib to download the start page from Lesson 1 of this course:
import urllib.request

url = "https://www.e-education.psu.edu/geog489/l1.html"
response = urllib.request.urlopen(url)
htmlCode = response.read()
print(htmlCode)
After importing the urllib.request module, we define the URL of the page we want to access in a string variable. Then in line 4, we use function urlopen(…) of urllib to send out an HTTP request over the internet to get the page whose URL we provide as a parameter. After a successful request, the response object returned by the function will contain the html code of the page, and we can access it via the read() method (line 5). If you run this example, you will see that the print statement in the last line prints out the raw html code of the Lesson 1 start page.
Here is how the same example looks using the requests package rather than urllib:
import requests

url = "https://www.e-education.psu.edu/geog489/l1.html"
response = requests.get(url)
htmlCode = response.text
print(htmlCode)
As you can see, for this simple example there really isn’t a big difference in the code. The function used to request the page in line 4 is called get(…) in requests and the raw html code can be accessed by using a property called text of the response object in line 5 not a method, that’s why there are no parentheses after text.
The most common things returned by a single web request, at least in our domain, are:
- html code
- plain text
- an image (e.g. JPEG or PNG)
- XML code
- JSON code
Most likely you are at least somewhat familiar with html code and how it uses tags to hierarchically organize the content of a page including semantic and meta information about the content as well as formatting instructions. Most common browsers like Chrome, Firefox, and Edge have some tools to inspect the html code of a page in the browser. Open the first lesson page in a new browser window and then do a right-click -> Inspect (element) on the first bullet point for “1.1 Overview and Checklist” in the middle of the window. That should open up a window in your browser showing the html code with the part that produces this line with the link to the Section 1.1 web page highlighted as in the figure below.

The arrows indicate the hierarchical organization of the html code, the so-called Document Object Model (DOM), and can be used to unfold/fold in part of the code. Also note how most html tags (‘body’,‘div’, ‘a’, ‘span’, etc.) have an attribute “id” that defines a unique ID for that element in the document as well as an attribute “class” which declares the element to be of one or several classes (separated by spaces) that, for instance, affect how the element will be formatted. We cannot provide an introduction to html and DOM here but this should be enough background information to understand the following examples. (These topics are addressed in more detail in our GEOG 863 class.)
Unless our program contains a browser component for displaying web pages, we are typically downloading the html code of a web page because we are looking for very specific information in that code. For this, it is helpful to first parse the entire html code and create a hierarchical data structure from it that reflects the DOM structure of the html code and can be used to query for specific html elements in the structure to then access their attributes or content. This is exactly what BeautifulSoup does.
Go ahead and install the beautifulsoup4 package in the Python Package Manager of ArcGIS Pro as you did with Spyder in Section 1.5. Once installed, BeautifulSoup will be available under the module name bs4. The following example shows how we can use it to access the <title> element of the html document:
import requests
from bs4 import BeautifulSoup

url = "https://www.e-education.psu.edu/geog489/l1.html"
response = requests.get(url)
soup = BeautifulSoup(response.text, 'html.parser')

print(soup.find('title'))
Output:
<title>Lesson 1 Python 3, ArcGIS Pro & Multiprocessing | GEOG 489: GIS Application Development</title>
In line 6, we are taking the raw html code from response.text and create a BeautifulSoup object from it using an html parser and store it in variable soup. Parsing the html code and creating the hierarchical data structure can take a few seconds. We then call the find(…) method to get the element demarcated by the title tags <title>…</title> in the document. This works fine here for <title> because an html document only contains a single <title> tag. If used with other tags, find(…) will always return only the first element, which may not be the one we are looking for.
However, we can provide additional attributes like a class or id for the element we are looking for. For instance, the following command can be used to get the link element (= html tag <a>) that is of the class “print-page”:
print(soup.find('a', attrs = {'class': 'print-page'}))
The output will start with <a class=”print-page” href…” and include the html code for all child elements of this <a> element. The “attrs” keyword argument takes a dictionary that maps attribute names to expected values. If we don’t want to print out all this html code but just a particular attribute of the found element, we can use the get(…) method of the object returned by find(…), for instance with ‘href’ for the attribute that contains the actual link URL:
element = soup.find('a', attrs = {'class': 'print-page'})
print(element.get('href'))
Output:
https://www.e-education.psu.edu/geog489/print/book/export/html/1703
You can also get a list of all elements that match the given criteria, not only the first element, by using the method find_all(…) instead of find(…). But let’s instead look at another method that is even more powerful, the method called select(…). Let’s say what we really want to achieve with our code is extract the link URLs for all the pages linked to from the content list on the page. If you look at the highlighted part in the image above again, you will see that the <a> tags for these links do not have an id or class attribute to distinguish them from other <a> tags appearing in the document. How can we unambiguously characterize these links?
What we can say is that these are the links that are formed by a <a> tag within a <li> element within a <ul> element within a <div> element that has the class “book-navigation”. This condition is only satisfied by the links we are interested in. With select(…) we can perform such queries by providing a string that describes these parent-child relationships:
elementList = soup.select('div.book-navigation > ul > li > a')
for e in elementList:
	print(e.get('href'))
Output:
/geog/489/l1_p1.html
/geog/489/l1_p2.html
/geog/489/l1_p3.html
…
The list produced by the code should consist of ten URLs in total. Note how in the string given to select(…) the required class for the <div> element is appended with a dot and how the > symbol is used to describe the parent-child relationships along the chain of elements down to the <a> elements we are interested in. The result is a list of elements that match this condition and we loop through that list in line 2 and print out the “href” attribute of each element to display the URLs.
One final example showing the power of BeautifulSoup: The web page www.timeanddate.com, among other things, allows you to look up the current time for a given place name by directly incorporating country and place name into the URL, e.g.
http://www.timeanddate.com/worldclock/usa/state-college
… to get a web page showing the current time in State College, PA. Check out the web page returned by this request and use right-click -> Inspect (element) again to check how the digital clock with the current time for State College is produced in the html code. The highlighted line contains a <span> tag with the id “ct”. That makes it easy to extract this information with the help of BeautifulSoup. Here is the full code for this:
import requests
from bs4 import BeautifulSoup

url = "http://www.timeanddate.com/worldclock/usa/state-college"

response = requests.get(url)
soup = BeautifulSoup(response.text, 'html.parser')
time = soup.find('span', attrs= { 'id': 'ct'})

print('Current time in State College: ' + time.text)
Output:
Current time in State College: 13:32:28
Obviously, the exact output depends on the time of day you run the code. Please note that in the last line we use time.text to get the content of the <span> tag found, which is what appears between the <span> and </span> tags in the html.
We are intentionally only doing this for a single place here because if you ever do this kind of scraping of web pages on a larger scale, you should make sure that this form of usage is not against the web site’s terms of use. In addition, some things can be done to keep the load on the server produced by web scraping as low as possible, e.g. by making sure the results are stored/cached when the program is running and not constantly being queried again unless the result may have changed. In this example, while the time changes constantly, one could still only run the query once, calculate the offset to the local computer’s current time once, and then always recalculate the current time for State College based on this information and the current local time.
The examples we have seen so far all used simple URLs, although this last example was already an example where parameters of the query are encoded in the URL (country and place name), and the response was always an html page intended to be displayed in a browser. In addition, there exist web APIs that realize a form of programming interface that can be used via URLs and HTTP requests. Such web APIs are, for instance, available by Twitter to search within recent tweets, by Google Maps, and by Esri. Often there is a business model behind these APIs that requires license fees and some form of authorization.
Web APIs often allow for providing additional parameters for a particular request that have to be included in the URL. This works very similar to a function call, just the syntax is a bit different with the special symbol ? used to separate the base URL of a particular web API call from its parameters and the special symbol & used to separate different parameters. Here is an example of using a URL for querying the Google Books API for the query parameter “Zandbergen Python”:
https://www.googleapis.com/books/v1/volumes?q=Zandbergen%20Python
www.googleapis.com/books/v1/volumes is the base URL for using the web API to perform this kind of query and q=Zandbergen%20Python is the query parameter specifying what terms we want to search for. The %20 encodes a single space in a URL. If there would be more parameters, they would be separated by & symbols like this:
<parameter 1>=<value 1>&<parameter 2>=<value 2>&…
We also mentioned above that one common response format is JSON (JavaScript Object Notation) code. If you actually click the link above, you will see that Google sends back the response as JSON code. JSON is intended to be easily readable by computers not humans, but the good thing is that we as Python programmers are already used to reading it because it is based on notations for arrays (=lists) and objects (=dictionaries) that use the same syntax as Python.
Study the JSON response to our Zandbergen query from above for a moment. At the top level we have a dictionary that describes the response. One entry “totalItems” in the dictionary says that the response contains 16 results. The entry “items” contains these results as a list of dictionaries/objects. The first dictionary from the list is the one for our course textbook. One attribute of this dictionary is “volumeInfo”, which is again a dictionary/object whose attributes include the title of the book and name of the author. Please note that the “authors” attribute is again a list because books can have multiple authors. If you scroll down a bit, you will see that at some point the dictionary for the Zandbergen book is closed with a “}” and then a new dictionary for another book starts which is the second item from the “items” list, and so on.
After this explanation of web APIs and JSON, here is the Python code to run this query and process the returned JSON code:
import requests, urllib.parse

url = "https://www.googleapis.com/books/v1/volumes"
query = "Zandbergen Python"

parameterString = "?q=" + urllib.parse.quote(query)

response = requests.get(url + parameterString)
jsonCode = response.json()

print(jsonCode['items'][0]['volumeInfo']['title'])
Output:
Python Scripting for Arcgis
We here define the base URL for this web API call and the query term string in different variables (lines 3 and 4). You saw above that certain characters like spaces appearing in URLs need to be encoded in certain ways. When we enter such URLs into a browser, the browser will take care of this but if we construct the URL for a request in our code we have to take care of this ourselves. Fortunately, the urllib.parse module provides the function quote(…) for this, which we use in line 6 to construct the correctly encoded parameter list which is then combined with the base url in the call of requests.get(…) in line 8.
By using the json() method of the response object in line 9, we get a Python data structure that will represent the JSON response and store it in variable jsonCode. In this case, it is a dictionary that under the key “items” contains a Python list with dictionaries for the individual book items returned. In line 11, we use this data structure to access the 'title' attribute of the first book item in the list: With ['items'] we first get the “items” list, then we take the first element from that list with [0], then we access the 'volumeInfo' property of the resulting dictionary, and finally with ['title'] we get the 'title' attribute from the volume info dictionary.
The code from above was supposed to show you how you to explicitly encode parameters for web API requests (with the help of urllib.parse.quote(...)) and build the final URL. The great thing about the requests module is that it can take care of all these things for you: You can simply provide an additional parameter for get(…) that contains a dictionary of parameter names for the web request and what values should be assigned to these parameters. Requests then automatically encodes these values and builds the final URL. Here is the version of the previous example that uses this approach.
import requests

url = "https://www.googleapis.com/books/v1/volumes"
query = "Zandbergen Python"

response = requests.get(url, {'q': query})
jsonCode = response.json()

print(jsonCode['items'][0]['volumeInfo']['title'])
The dictionary with parameters for the web request that we use in line 6 says that the value assigned to parameter 'q' should be the string contained in variable query. As said, requests will automatically take care of encoding special characters like spaces in the parameter values and of producing the final URL from them.
You will see more examples of using web APIs and processing the JSON code returned in the first walkthrough of this lesson. These examples will actually return GeoJSON code which is a standardized approach for encoding spatial features in JSON including their geometry data.
2.3.1 Parsing JSON and Accessing GIS Data via REST
Python includes several built in methods for handling JSON (or json). As you remember from Lesson 1, json is widely used to transfer data from one language to another or from one data source to another. For this section we will demonstrate loading it into a Python Dictionary and dumping it to a json string. The official documentation can be found here.
Loading json means to convert a formatted string into a json object. This is useful for converting string representations of dictionaries that come from various sources, or from API’s results. It is important to note that there is also json.load(…) which takes an file or bytes like object as an input parameter whereas json.loads(…) takes a json string. The s at the end of loads denotes that the method is for a string input, whereas the load method without the s is for objects such as files. The dump and dumps follows the same convention, except it outputs to a file writer type object or a json string so beware of what type of data you are working with. If you do forget, the Python interpreter will kindly let you know.
A simple json loads example:
import json

# JSON string:Multi-line string
x = '{"City": "Cheyenne", "State": "Wyoming", "population": "Very Little", "Industries":["Mining", "Restaurants", "Rodeos"]}'

# parse x:
y = json.loads(x)

print(type(y))
print(y)
To write the python dictionary back to a json string, you would use the .dumps() method.
And a simple json dumps example:
# Creating a dictionary
wyo_hi_dict = {1:'Welcome', 2:'to', 3:'Cheyenne', 4:'Wyoming'}

# Converts input dictionary into
# string and stores it in json_string
json_string = json.dumps(wyo_hi_dict)
print('Equivalent json string of input dictionary:', json_string)
Equivalent json string of input dictionary: '{"1": "Welcome", "2": "to", "3": "Cheyenne", "4": "Wyoming"}'
You will notice that the JSON dumps converts the keys and values to strings. The deserialization process converts the value to its datatype, but it doesn't always get it right, so sometimes we are left with adding custom casting.
Accessing the properties of the json object when loaded from json.loads() is the same as accessing them via Python dictionary.
print(json_string["1"])
Now that we know some methods for requesting data from the web and parsing JSON data, let’s look at a REST service from esri and how we can use it to generate an url for our code. There are four parameters that we need to fill out for it to return a result. Using the query UI endpoint for the service at 2023_BLM_AZ_Fire_Restrictions_view. These four parameters we will work with are the Where, Out Fields, Return Geometry, and Return format. If you need a more specific result, you can enter more parameters as needed.
The base url for the query will start out as:
https://services3.arcgis.com/T4QMspbfLg3qTGWY/ArcGIS/rest/services/2023_BLM_AZ_Fire_Restrictions_view/FeatureServer/0/query?
With the '?' added at the end of the url. The ? separates the url into sections. This ? is starting of the passing of the parameters, which are separated by & sign. Note that the url and the parameters we are passing does not contain spaces.
The complete request’s parameters are added to the URL when the request is submitted:
?where=1=1&objectIds=&time=&geometry=&geometryType=esriGeometryEnvelope&inSR=&spatialRel=esriSpatialRelIntersects&resultType=none&distance=0.0&units=esriSRUnit_Meter&relationParam=&returnGeodetic=false&outFields=*&returnGeometry=true&featureEncoding=esriDefault&multipatchOption=xyFootprint&maxAllowableOffset=&geometryPrecision=&outSR=&defaultSR=&datumTransformation=&applyVCSProjection=false&returnIdsOnly=false&returnUniqueIdsOnly=false&returnCountOnly=false&returnExtentOnly=false&returnQueryGeometry=false&returnDistinctValues=false&cacheHint=false&orderByFields=&groupByFieldsForStatistics=&outStatistics=&having=&resultOffset=&resultRecordCount=&returnZ=false&returnM=false&returnExceededLimitFeatures=true&quantizationParameters=&sqlFormat=none&f=json&token=
Building our query that will return all features and all fields in json format will look like:
https://services3.arcgis.com/T4QMspbfLg3qTGWY/ArcGIS/rest/services/2023_BLM_AZ_Fire_Restrictions_view/FeatureServer/0/query?where=1=1&outFields=*&returnGeometry=true&f=json
With this url string, we can use requests to retrieve data from services and save them locally. There are a few ways of doing this such as using pandas to read the url, converting the json to a dataframe and then to a featureclass, converting the JSON result to a dictionary and using an insert/update cursor, or creating a new featureclass using the arcpy method JSONToFeatures_conversion(…) method. It is important to note an important aspect of this method noted in the Summary section of the documentation:
Converts feature collections in an Esri JSON formatted file (.json) or a GeoJSON formatted file (.geojson) to a feature class.
This means that the method is expecting a file as the input and trying to pass the response json will results in an error and if you do not need to manipulate the data before outputting to a featureclass, this method might be the simplest to implement with the least amount of packages. If you need to work on the data, such as convert the datetimes for a field, converting the JSON to a dataframe or dictionary would be the preferred process.
Below is an example of the process.
import arcpy
import requests
import json

arcpy.env.overwriteOutput = True

url = "https://services3.arcgis.com/T4QMspbfLg3qTGWY/ArcGIS/rest/services/2023_BLM_AZ_Fire_Restrictions_view/FeatureServer/0/query?where=1=1&returnGeometry=true&outFields=*&f=json"

# send the request to the url and store the reply as response
response = requests.get(url)

# Get result as json
jsonCode = response.json()

jsonFile = r"C:\GEOG489\Lesson 2\response.json"

# write the response json to a file
with open(jsonFile, "w") as outfile:
    json.dump(jsonCode, outfile)

# JSONToFeatures requires a file as input
arcpy.JSONToFeatures_conversion(jsonFile, r'C:\GEOG489\Lesson 2\Geog489.gdb\Boulder_Fire_Tax_Dist', 'POLYGON')

# Clean up
if os.path.exists(jsonFile):
    os.remove(jsonFile)
You can also separate the parameters into a dictionary and let requests do the url formatting, making for a cleaner code and this method seems to also format the returned date fields, if there are any:
params = {'where': '1=1', 'outFields': '*', 'f': 'pjson', 'returnGeometry': True}
response = requests.get(url, params)
As we said earlier about searching for packages that perform an ETL process, we saved a hidden gem for last. Compared to the previous methods of retrieving data from a service that we went over, the few lines of code this process requires is welcoming from a managerial and readability standpoint.
A hidden capability of arcpy’s conversion FeatureclassToFeatureclass is that it can take a service endpoint as an input and make short work of this conversion to a Featureclass. However, as promising as it seems, some services do not transform. Since it is only a few lines of code, it is worth giving it a try and saving some time.
url = 'https://services3.arcgis.com/T4QMspbfLg3qTGWY/ArcGIS/rest/services/2023_BLM_AZ_Fire_Restrictions_view/FeatureServer/0'

out_location = r"C:\GEOG489\TestingExportData\output.gdb"
out_featureclass = "Fire_Tax_District"

# Run FeatureClassToFeatureClass
arcpy.conversion.FeatureClassToFeatureClass(url, out_location, out_featureclass)
To add the definition query, you can set the parameter of the method.
## Adding Expression
delimitedField = arcpy.AddFieldDelimiters(arcpy.env.workspace, "NAME")
expression = delimitedField + " = 'Post Office'"
arcpy.conversion.FeatureClassToFeatureClass(url, out_location, out_featureclass, expression)
2.4 GUI programming basics
By now you probably already have a very good idea of how one can write longer and more complex Python programs including standalone programs that work outside of the ArcGIS script tool environment (for example running code from the command prompt or IPython). Functions and modules are two of the main constructs for splitting the code into smaller units and keeping it readable, manageable, and reusable. However, there is one key component of standalone programs that we have not really discussed in GEOG485 and this course so far, and that is the design and creation of graphical user interfaces (GUIs) for your Python programs. These days we are all used to working with a mouse or other pointing device to interact with the different windows, buttons, and other interactive elements that make up the GUI of most of the software applications we are using. Maybe you have already wondered about how to create such GUI-based software with Python.

When writing script tools for ArcGIS, we mainly relied on the script tool dialog box provided by ArcGIS for a GUI that allows the user to provide values for the input variables of our script tool in a convenient way. In our Python code, we didn’t have to worry about the dialog box; this was all automatically taken care of by ArcGIS based on the parameters we declared for our script tool. However, even in the context of more advanced script tools, being able to create and use your own GUIs in Python can be very useful, for instance when you want to create a script tool that requires a lot of interaction with the user and additional input while the tool is being executed (an example of such a tool will be discussed later in this lesson). Therefore, it is really getting time for us to talk a bit about GUI development in general, and in Python in particular!
To create a GUI in a given programming language and for a given platform, you often can choose between different GUI libraries (also called GUI toolkits) available for that language and platform. These GUI libraries define classes and auxiliary functions that allow for creating, combining, connecting, and managing the different components of a GUI such as windows, buttons, etc. with a minimal amount of code. Often, GUI libraries are also simply referred to as GUIs, so the term can either mean a particular software library or package used for creating graphical interfaces or the concrete interface created for a particular application. Moreover, some libraries contain much more than just the GUI related classes and components. For instance, the QT5 library we are going to talk about and use later on is actually a cross-platform application development framework with support for non-GUI related things like database and network access.
A GUI library is often complemented by additional tools for supporting the creation of graphical interfaces with that library. Some languages provide a GUI library as part of their standard library, so it is directly available on all platforms the language is available for without having to install additional 3rd party packages. There also exist GUI libraries that have been made available for different languages like the already mentioned QT library that is written in C++ but can be used with a large number of different programming languages. Wrapper packages, also called bindings, make the components and functionality of the library available in the respective other programming language. In the case of QT, there exist two commonly used wrapper packages for Python, PyQT and PySide (see Section 2.5.2.1). In the following, we provide a brief overview on the main concepts and techniques related to GUI development that we encounter in most GUI libraries.
2.4.1 GUI widgets
We already mentioned some of the main visible components that serve as the construction blocks for building GUIs in typical GUI libraries, like windows and buttons. The image below shows a few more that we commonly encounter in today’s software applications including group boxes, labels, check boxes, radio buttons, combo boxes, line input fields, text input areas, tab views, and list views. Others that you are probably familiar with are tool bars, tool buttons, menu bars, context menus, status bars, and there are many, many more!

Typically, the GUI library contains classes for each of these visible elements, and they are often referred to as the widgets. Certain widgets can serve as containers for other widgets and, as a result, widgets tend to be organized hierarchically within a concrete graphical interface. For instance, a dialog box widget can contain many other widgets including a tab widget that in turn contains labels and buttons on each of its tab areas. If a widget A directly contains another widget B, we say that B is a child of A and A is B’s parent. A widget without a parent is a window that will be displayed independently on the screen. Widgets can have many different attributes for controlling their visual appearance, their layout behavior, and how they operate. Methods defined in the respective widget class allow for accessing and modifying these attributes. The most common operations performed with widgets in program code are:
- Creating the widget
- Adding the widget to another widget (widget becomes the child of that other widget)
- Adding another widget to the widget (the widget becomes the parent containing the other widget)
- Changing an attribute of the widget (for instance, you may change the text displayed by a label widget)
- Reading an attribute of the widget (for instance, you may need to get the text that a user entered into a line input widget)
- Setting the layout management method for the widget; this determines how the child widgets of that widget will be arranged to fill the widget’s content area
- Linking an event that the widget can trigger to event handler code that should be executed in that case (for instance, you may want that a particular function in your code be called when a particular button is clicked)
We will explain the ideas of layout management and event handling hinted at in the last two bullet points above in more detail in the next sections. From the user's perspective, widgets can be interacted with in many different ways depending on the type of the widget, including the following very common forms of interactions:
- The user can click on the widget with the mouse to start some action, change the state of the widget, or open a context menu.
- The user can give focus to a widget either by clicking it or using the TAB key for moving the focus to the next widget in a specified order. At any time, only a single widget can have focus, meaning it will receive keyboard input which allows for typing into a text input widget or "clicking" a button by pressing ENTER. Similarly, the user makes a widget lose focus when giving focus to another widget.
- The user can enter some text into the widget.
- The user can drag the widget and drop it onto another widget, or drop something on the widget.
In addition, there are complex widgets that allow the user to interact with them and change their state by clicking on particular parts of a widget. Examples are the user unfolding a combo box to select a different value, the user clicking on a menu in the menu bar to open that menu and select an item in it, the user moving the slider component of a widget to adapt some value, or the user selecting a color by clicking on a particular location in a widget with a chromatic circle. The events caused by such user interactions are what drives the order of code execution in the underlying program code as will be further explained in Section 2.4.3.
2.4.2 Layout management
Widgets can be freely arranged within the content area of their parent widget (for instance a window widget). This can be done with the help of pixel coordinates that are typically measured from the top left corner of the content area. However, it would be very cumbersome to create GUIs by specifying the x and y coordinates and width and height values for each widget. More importantly, such a static layout will only look good for the particular size of the parent it has been designed for. When the containing window is resized by the user, you would expect that the dimensions and positions of the contained widgets adapt accordingly which will not be the case for such a static coordinate-based layout.
Therefore, in modern GUI libraries the task of arranging the child widgets within the parent widget is taken care of by so-called layout managers. This happens dynamically, so if the window is resized, all content will be rearranged again down the hierarchy of widgets by the different layout managers involved. The GUI library defines different layout classes to create the layout manager objects from. The three most common layout types are:
- Horizontal layout: All child widgets are arranged horizontally in the order in which they have been added to the parent
- Vertical layout: All child widgets are arranged vertically in the order in which they have been added to the parent
- Grid layout: Child widgets are arranged in a table or grid layout consisting of columns and rows. The child widgets are added to a particular cell in the layout by providing row and column indices and can potentially span multiple rows and/or columns.
The images below illustrate these three basic layout types for a set of three label and three push button widgets. Because of their layout preferences, both labels and buttons remain at their preferred height in the horizontal layout, but are expanded to fill the available space horizontally in the vertical layout. In the grid layout, the labels have been set up to form the first column of a grid with 3 rows and 2 columns, while the buttons have been set up to occupy the cells in the second column.


In many cases, these three layout types are already sufficient to arrange the widgets as desired because of the way layouts can be nested. For instance, you can have the components of a window organized in a grid layout and then use a vertical layout to arrange several widgets within one of the cells of the grid. As indicated above, widgets have attributes that affect their layout behavior and, as a result, how much space the layout manager will assign to them in the vertical and horizontal dimensions taking into account the other child widgets of the same parent and their attributes. These attributes can, for instance, define the minimum, preferred, and/or maximum dimensions or general size policies for width and height. For instance, as we saw in the examples from the previous figures, a standard push button widget often has a size policy for its height that says that the height should not be increased beyond its default height even if there is space available, while in the horizontal dimension the button may be expanded to fill available space that the layout manager would like to fill. We will talk more about layout management when we will start to work with the QT library later on in this lesson.
2.4.3 Events and event handling, signals and slots
So far, we are used to the code in a script file being executed line-by-line from the top to the bottom with the order of execution only being affected by loops, if-else and function calls. GUI based applications operate a bit differently. They use what is called an event-driven programming approach. In event-driven programming, the code is organized as follows:
- Initalization phase:
- The GUI is created by instantiating the widgets (= creating objects of the widget classes) and organizing them in parent-child hierarchies using suitable layout manager objects to achieve the desired arrangement.
- Event handling code is defined for dealing with events from user interactions (like clicking a button) or other types of events.
- Different events are associated with the corresponding event handling code.
- Execution phase:
- An infinite loop is started that waits for GUI events and only terminates if the application is closed. In the loop, whenever an event occurs, the respective event handling code is executed, then the waiting continues until the next event happens.
The order of the first two points of the initialization phase can sometimes be swapped. The code for running the event processing loop is something you do not have to worry about when programming GUI based applications because that part is being taken care of by the GUI library code. You just have to add a command to start the loop and be aware that this is happening in the background. Your main job is to produce the code for creating the GUI and defining the event handlers in the initialization part of the program.
As indicated above, widgets can be interacted with in different ways and such interactions cause certain types of events that can be reacted on in the code. For instance, a button widget may cause a “button pressed” event when the user presses the left mouse button while having the mouse cursor over that button and a “button released” event when the mouse button is released again. In addition, it will cause a “button triggered” event after the release but this event can also be triggered by pressing the RETURN key, while the button has focus (e.g. when the button is hovered over with the mouse). The functionality of the GUI is realized by setting up the event handler code. That code typically consists of the definitions of event handler functions that are invoked when a certain event is caused and that contain the code that determines what should happen in this case. For instance, we may set up an event handler function for the “button triggered” event of the mentioned button. The code of that function may, for example, open a dialog box to get further information from the user or start some computations followed by displaying the results.
Precisely how events are linked to event handling functions depends on the GUI library used. We will see quite a few examples of this later in this lesson. However, we already want to mention that in the QT library we are going to use, the event-based approach is covered under what QT calls the signals & slots approach. When an event occurs for a particular QT widget (e.g., user clicks button), that widget emits a signal specific for that event. A slot is a function that can be called in response to a signal (so essentially an event handler function). QT’s widgets have predefined slots so that it is possible to directly connect a signal of one widget to a slot of another widget. For instance, the “clicked” signal of a button can be connected to the “clear” slot of a text widget, such that the text of that widget is cleared whenever the button is clicked. In addition, you can still write your own slot functions and connect them to signals to realize the main functionality of your application. No worries if this all sounds very abstract at the moment; it will get clear very quickly as soon as we look at some concrete examples.
2.5 GUI options for Python
We already mentioned in Section 2.4 that often there exist different options for a GUI library to use for a project in a given programming language. This is also the case for Python. Python includes a GUI package called Tkinter in its standard library. In addition, there exist 3rd party alternatives such as the PyQT and PySide wrappers for the QT library, Kivy, Toga, wxPython, and quite a few more. Have a quick look at the overview table provided at this GUI Programming in Python page to get an idea of what’s out there. In contrast to Tkinter, these 3rd party libraries require the installation of additional packages. This can be seen as a downside since it will make sharing and installation of the developed software a bit more complicated. In addition, there are quite a few other factors that affect the choice for a GUI library for a particular project including:
- For which platforms/operating systems is the library available?
- Does the library draw its own widgets and have its own style or use the operating system's native look & feel?
- How large is the collection of available widgets? Does it provide the more specialized widgets that are needed for the project?
- How easy is the library to use/learn?
- How easy is it to extend the library with our own widgets?
- How active is the development? How good is the available support?
- Is the library completely free to use? What are the license requirements?
In the rest of this section, we will focus on Tkinter and QT with its two Python wrappers PySide and PyQT. We will have quick looks at Tkinter and QT individually, but using the same example of a simple GUI tool to convert miles to kilometers. In the following parts of the lesson, we will then focus solely on writing GUI-based Python programs with PyQT.
2.5.1 Tkinter
As we already mentioned, Tkinter is the standard GUI for Python, but only in the sense that it is a package in the Python standard library, so it is available for all platforms without requiring any additional installation. Its name stands for “Tk interface”. It is certainly possible that you have not heard about Tk and Tcl before but Tk is one of the oldest free and open-source, cross-platform GUI toolkits (written in the Tcl scripting language and initially released in 1991) and has been adopted for building GUIs in many programming languages. Tkinter has been written by Fredrik Lundh and is essentially a set of wrapper classes and functions that use a Tcl interpreter embedded into the Python interpreter to create and manage the Tk GUI widgets.
To get an impression of how tkinter is used to build a GUI in Python, let us look at the example of creating a simple miles-to-kilometers conversion tool. The tool is shown in the figure below. It has a single window with five different widgets: two label widgets, two widgets for entering or displaying single lines of text, and a button in the middle. The user can enter a number of miles into the line input field at the top, then press the button, and then the entered number of miles will be converted and displayed as kilometers in the line input field at the bottom.

We are using a line input field to display the resulting distance in kilometers just to make things more symmetrical. Since we do not want the user to be able to enter anything into this text field, it has been disabled for input and we could just as easily have used another label widget. The Python code to create this tool with the help of tkinter is shown below and the explanation of the code follows.
from tkinter import Tk, Label, Entry, Button, DISABLED, StringVar

def convert():
    """Takes miles entered, converts them to km, and displays the result"""
    miles = float(entryMiles.get())
    kilometers.set(str(miles * 1.60934))

# create the GUI

rootWindow = Tk() # create main window
rootWindow.title("Miles to kilometers")
rootWindow.geometry('500x200+0+0')
rootWindow.grid_columnconfigure(1, weight = 1)

labelMiles = Label(rootWindow, text='Distance in miles:') # create label for miles field
labelMiles.grid(row=0, column=0)

labelKm = Label(rootWindow, text='Distance in kilometers:') # create label for km field
labelKm.grid(row=2, column=0)

entryMiles = Entry(rootWindow) # create entry field for miles
entryMiles.grid(row=0, column=1, sticky='w,e')

kilometers = StringVar() # create entry field for displaying km
entryKm = Entry(rootWindow, textvariable = kilometers, state=DISABLED)
entryKm.grid(row=2, column=1, sticky='w,e')

convertButton = Button(rootWindow, text='Convert', command = convert) # create button for running conversion
convertButton.grid(row=1, column=1)

# run the event processing loop

rootWindow.mainloop()
Let us ignore the first few lines of Python code for a moment and first look at lines 10 to 29. This is where the GUI of our little program is produced starting with the root window widget in lines 10 to 13. The widget is created by calling the function Tk() defined in tkinter and the created object is stored in variable rootWindow. We then use different methods of the widget to set its title, initial size, and some properties for its grid layout that we are going to use to arrange the child widgets within the content area of the root window.
Next, the label saying “Distance in miles:” is created. The tkinter widget class for labels is called Label and we provide rootWindow as a parameter to Label(…), so that the widget knows what its parent widget is. As mentioned, we will be using a grid layout, namely one with three rows and two columns. We place the created label in the cell in the first row and first column of its parent by calling the grid(…) method with row = 0 and column = 0. We then take the exact same steps to create the other label and place it in the third row of the first column.
In the next steps, the two text input fields are created as widget objects of the tkinter Entry class. An additional parameter sticky=’w,e’ is used for placing these widgets in the grid. This parameter says that the widgets should expand horizontally (west and east) to fill the entire cell. This is required to make the layout fill out the window horizontally and have the text field grow and shrink when the window is resized. Moreover, the Entry widget for displaying the distance in kilometers is set to DISABLED so that the user cannot enter text into it, and it is associated with a variable kilometers of tkinter class StringVar which is needed for us to be able to change the text displayed in the widget from code.
Finally, the button is created as a widget of tkinter class Button. What is new here is what happens with the ‘command’ parameter given to Button(…) in line 28. Here we are saying that if this button is clicked, the function convert() that we are defining at the top of our code should be executed to deal with this event. So this is an example of connecting an event to an event handler function. What happens in convert() is very simple: With the help of the get() method, we get the current text from the Entry widget for the distance in miles, multiply it with a constant to convert it to kilometers, and then use the set() method of the StringVar object in variable kilometers to change the text displayed in the Entry widget to the distance in kilometers associated with that variable.
In the last line of the code, we call the mainloop() method of our root window to start the infinite event processing loop. The program execution will only return from this call when the user closes the root window, in which case the program execution will be terminated.
The only part of the code we haven’t talked about is the first line where we simply import the widget classes and other auxiliary classes from tkinter that we need in our code.
Hopefully, it is clear that this is just a very prototypical implementation of a miles-to-kilometers conversion tool focusing on the GUI. We have neither implemented any sort of checking whether input values are valid nor any sort of error handling. It is therefore very easy to make the tool crash, e.g. by entering something that is not a number into the field for distance in miles. If you haven’t already done so, we suggest you create a Python script with the code from above and try out the tool yourself and see how the layout adapts if you resize the window. Feel free to experiment with making small changes to the code, like adapting the text shown by the labels or adding another button widget to the currently still empty second row of the first column; then make the button call another event handler function you write to, for instance, just print some message to the console.
Don’t worry if some of the details happening here don’t seem entirely clear at the moment. A real introduction to creating GUIs with Python will follow later in this lesson. Here we just wanted to give you a general idea of how the different concepts we discussed in Section 2.4 are realized in tkinter: You saw how different widgets are created, how they were arranged in a grid layout by placing them in different cells of the layout, how to connect an event (button clicked) with a self-defined event handler function (convert()), and how to execute the application by starting the event processing loop (rootWindow.mainloop()). Now let’s move on and talk about QT as an alternative to tkinter and see how this same example would look like when produced with the PyQt instead of tkinter.
2.5.2 QT
We already mentioned a few things about QT in this lesson. It is a widely used cross-platform library written in C++, modern and under very active development. In addition to the GUI functionality, the library provides support for internationalization, Unicode, database and network access, XML and JSON code processing, thread management, and more. That’s why it is also called an application framework, not just a GUI library. QT was originally developed by the company Trolltech and its initial release was in 1995. KDE, one of the early GUIs for the Linux operating system, was based on QT and that triggered a lot of discussion and changes to the license and organization QT was published under. These days, the company developing QT is called The QT Company, a successor of Trolltech, and QT is published in four different editions, including the Community edition that is available under different open source licenses GPL 3.0, LGPL 3.0, and LPGL 2.1 with a special QT exception. QT is very commonly used for both open source and commercial software, and if you have worked with QT in one programming language, it is typically relatively easy to learn to use it in a different language. QT5 was released in 2012 and the current version of QT at the time of this writing is 5.10.
2.5.2.1 PyQt vs. PySide
You may wonder why there exist two different Python wrappers for QT and how different they are? The short answer is that the reason lies mainly in license related issues and that PyQt and PySide are actually very similar, so similar that the code below for a QT based version of the miles-to-kilometers converter works with both PyQt and PySide. For PySide you only have to replace the import line at the beginning.
PyQt is significantly older than PySide and, partially due to that, has a larger community and is usually ahead when it comes to adopting new developments. It is mainly developed by Riverbank Computing Limited and distributed under GPL v3 and a commercial license. Releases follow a regular schedule and the software is generally considered very robust, mature, and well supported.
PySide is developed by Nokia and had its initial release in 2009, in a time when Nokia was the owner of QT. As can be read on the PySide web page, PySide has been developed and published in response to a lack of a QT wrapper for Python that has a suitable license for FOSS and proprietary software development. Without going too much into the details of the different license models involved, if you want to develop a commercial application, PyQt requires you to pay fees for a commercial license, while the LGPL license of PySide permits application in commercial projects.
From an educational perspective, it doesn’t really matter whether you use PySide or PyQt. As we already indicated, the programming interfaces have over the recent years converged to be very similar, at least for the basic GUI based applications we are going to develop in this course. However, we have some specific reasons to continue with PyQt that will be listed at the end of the next section. If you are interested to learn more about the differences between PyQt and PySide and when to pick which of the two options, the following blog post could serve as a starting point:
2.5.2.2 Installing PyQt5 from ArcGIS Pro
Since in contrast to tkinter, PyQt5 is not part of the Python standard library, we may need to install the PyQt5 package before we can use it from our code. We are currently using the Python installation that comes with ArcGIS Pro. Therefore, we will use the conda installation manager from within ArcGIS Pro to check whether PyQt5 is installed and if not, install it with all the packages it depends on. This will also automatically install the binary QT5 library that the PyQt5 package is a wrapper for.
Go ahead and open the package manager in Pro (Project -> Python) and check the Installed Packages list to see if "pyqt" is installed. If not, go to Add Packages and install "pyqt"; the process is identical to our installation of spyder back in Lesson 1.
You probably will now have version 5.9.2 or later of pyqt installed. Next, try to run the test code on the next page. If this code gives you an error of...
This application failed to start because it could not find or load the Qt platform plugin "windows".
...then you will need to come back to this page and set the QT_QPA_PLATFORM_PLUGIN_PATH environmental variable to the path of the plugin folder of PyQt5 (as explained in the blog post Developing Python GUI in ArcGIS Pro with PyQt). This can be done with the Windows tool for setting environmental variables by following the instructions below:
- Go to the Windows "Settings" and type “environmental” into the "Find a setting" search field and then pick “Edit the system environment variables”.
 Figure 2.8 Windows "Settings" dialog
 - Click on “Environment variables…” at the bottom.
 Figure 2.9 System Properties dialog with "Environment Variables..." button at the bottom right
 - Click on "New..." to add the environment variable at the bottom for "System variables".
 Figure 2.10 Variables dialog with "New..." button at the bottom
 - Fill out the dialog for adding a new variable. If the folder for your cloned ArcGIS Pro Python environment is something like "C:\Users\<username>\AppData\Local\ESRI\conda\envs\arcgispro-py3-clone", then use this to fill out the "Variable value" as shown in the figure below (see Section 1.5 explaining how opening Python Command Prompt will show the default folder). If you are using an older version of Pro and the default Python environment at "C:\Program Files\ArcGIS\Pro\bin\Python\envs\arcgispro-py3", then use this for the Variable value instead. Then press Ok and you are done.
 Figure 2.11 System Environment Variables dialog shown with variable name and variable value populated
2.5.2.3 Miles to kilometers with PyQT
Here is how the code for our miles-to-kilometers conversion tool looks when using PyQt5 instead of tkinter. You will see that there are some differences but a lot also looks very similar. We kept the names of the variables the same even though the widgets are named a little differently now. Since you now have PyQt5 installed, you can immediately run the code yourself and check out the resulting GUI. The result should look like the figure below.
Important note: When you run PyQt5 code in Spyder directly (here or in later sections), you may run into the situation that the program won't run anymore when you start it a second time and instead you get the error message "Kernel died, restarting" in the Spyder Python window. This can be resolved by going into the Spyder Preferences and under "Run" select the option "Remove all variables before execution" to make sure that everything from the previous run is completely cleaned up before the script code is executed again.

Source code:
from PyQt5.QtWidgets import QApplication, QWidget, QLabel, QGridLayout, QLineEdit, QPushButton

def convert():
    """Takes miles entered, converts them to km, and displays the result"""
    miles = float(entryMiles.text())
    entryKm.setText(str(miles * 1.60934))

app = QApplication([])

rootWindow = QWidget()
rootWindow.setWindowTitle("Miles to kilometers")
rootWindow.resize(500, 200)

gridLayout = QGridLayout(rootWindow)

labelMiles = QLabel('Distance in miles:')
gridLayout.addWidget(labelMiles, 0, 0)

labelKm = QLabel('Distance in kilometers:')
gridLayout.addWidget(labelKm, 2, 0)

entryMiles = QLineEdit()
gridLayout.addWidget(entryMiles, 0, 1)

entryKm = QLineEdit()
gridLayout.addWidget(entryKm, 2, 1)

convertButton = QPushButton('Convert')
gridLayout.addWidget(convertButton, 1, 1)

convertButton.clicked.connect(convert)

rootWindow.show()

app.exec_()
Let’s look at the main differences between this code and the tkinter based code from Section 2.5.1.
Obviously, we are now importing classes from the module PyQt5.QtWidgets and the widgets are named differently (all starting with ‘Q’).
While with tkinter, we only created one object for the application and root window together and then called its mainloop() method to start the execution of the event processing loop, the application and its main window are two different things in QT. In line 8, we create the application object and then at the very end we call its exec_() method to start the event processing loop. The window is created separately in line 10, and before we call exec_(), we invoke its show() method to make sure it is visible on the screen.
The creation of the widgets looks very similar in both versions. However, with tkinter, we didn’t have to create a grid layout explicitly; it was already available after the main window had been created. With PyQt5, we create the grid layout for the root window explicitly in line 14. To add widgets to the grid layout, we call the addWidget(…) method of the layout providing numbers for the row and column as paramters.
In the tkinter version, we had to set up a special variable to change the content of the entryKm line input field. This is not required with PyQt5. We can simply change the text displayed by the corresponding QLineEdit widget by calling its setText(…) method from the convert() function in line 6.
Finally, connecting the “clicked” event of the button with our convert() event handler function happens as a separate command in line 31 rather than via a parameter when creating the button object. By writing "convertButton.clicked.connect(convert)" we are saying, in QT terminology, that the “clicked” signal of convertButton should be connected to our convert() function.
It seems fair to say that from the perspective of the code, the differences between tkinter and PyQt5 are rather minor with, in some cases, one of them needing a bit more code, and in other cases, the other. However, this is partially due to this example being very simple and not involving more advanced and complex widgets and layouts.
When you tried out both versions of our little tool or just closely compared the two figures above with screenshots of the produced GUIs, you may also have noticed that, in addition to the differences in the code, there are some differences in the produced layout and behavior. We didn’t make use of all available options to make the two versions appear very similarly and it is certainly possible to do so, but our personal impression is that just based on the default look and behavior, the layout produced by PyQt5 is a bit more visually appealing. However, the main reason why we are going to continue with QT5/PyQt5 for the remainder of this lesson are the following:
- QT5 is a modern and widely used cross-platform and cross-language library; knowledge and skills acquired with QT can be applied in languages other than Python.
- QT5 is efficient and smooth because of the compiled core library written in C++.
- QT5 and PyQt5 provide a large collection of available widgets and can be expected to be under active development for the foreseeable future.
- There exists very good tool support for the combination of QT5 and PyQt5
- Finally and very importantly: In lesson 4 we will continue with the GUI development started in this lesson in the context of QGIS 3. QGIS and its interface for plugins have been developed for PyQt5.
As a final note, if you want to run the converter tool code with PySide, you have to replace the import line with the following line:
from PySide2.QtWidgets import QApplication, QWidget, QLabel, QGridLayout, QLineEdit, QPushButton
Of course, you will first have to install the PySide2 package in the ArcGIS Pro package manager to be able to run the code.
2.6 GUI development with QT5 and PyQt5
It is now time for a more systematic introduction to Python GUI development with QT5 and PyQt5. We will split this introduction into two parts, first showing you how to create GUI programmatically from Python code and then familiarizing you with the QT Designer tool for visually building GUIs and then translating them to Python code. In the walkthrough from Section 2.7, you will then work through a larger example of creating a GUI based application.
2.6.1 The manual approach
To familiarize ourselves with PyQT5 and get to know the most common QT5 widgets, let’s go through three smaller examples.
2.6.1.1 Example 1
Let’s start by just producing a simple window that has a title and displays some simple text via a label widget as shown in the image below.

Thanks to PyQt5, the code for producing this window takes only a few lines:
import sys
from PyQt5.QtWidgets import QWidget, QApplication, QLabel

app = QApplication(sys.argv)

window = QWidget()
window.resize(400,200)
window.setWindowTitle("PyQt5 example 1")

label = QLabel("Just a window with a label!", window)
label.move(100,100)

window.show()

sys.exit(app.exec_())
Try out this example by typing or pasting the code into a new Python script and running it. You should get the same window as shown in the image above. Let’s briefly go through what is happening in the code:
- First of all, for each Python program that uses PyQT5, we need to create an object of the QApplication class that takes care of the needed initializations and manages things in the background. This happens in line 4 and we store the resulting QApplication object in variable app. At the very end of the program after setting up the different GUI elements, we use app.exec_() to call the exec_() method of the application object to run the application and process user input. The return value is used to exit the script by calling the sys.exit(…) function from the Python standard library. These are things that will look identical in pretty much any PyQT application.
- Most visible GUI elements (windows, button, text labels, input fields, etc.) in QT are derived in some way from the QWidget class and therefore called widgets. Widgets can be containers for other widgets, e.g. a window widget can contain a widget for a text label as in this example here. We are importing the different widgets we need here together with the QApplication class from the PyQt5.Widgets module in line 2. For our window, we directly use a QWidget object that we create in line 6 and store in variable window. In the following two lines, we invoke the resize(…) and setWindowTitle(…) methods to set the size of the window in terms of pixel width and height and to set the title shown at the top to “PyQt5 example 1”. After creating the other GUI elements, we call the show() method of the widget in line 13 to make the window appear on the screen.
- The content of the window is very simple in this case and consists of a single QLabel widget that we create in line 10 providing the text it should display as a parameter. We then use a fixed coordinate to display the label widget at pixel position 100,100 within the local reference frame of the containing QWidget. These coordinates are measured from the top left corner of the widget’s content area.
That’s all that’s needed! You will see that even if you resize the window, the label will always remain at the same fixed position.
If you have trouble running this script (e.g., you get a "Kernel died, restarting" error), try this version of the code (modified lines highlighted):
import sys
from PyQt5.QtWidgets import QWidget, QApplication, QLabel
from PyQt5.QtCore import Qt, QCoreApplication

app = QCoreApplication.instance()
if app is None:
    app = QApplication(sys.argv)

app.aboutToQuit.connect(app.deleteLater)

window = QWidget()
window.resize(400,200)
window.setWindowTitle("PyQt5 example 1")

label = QLabel("Just a window with a label!", window)
label.move(100,100)

window.show()

sys.exit(app.exec_())
This version of the code checks to see if there's already a QApplication object left existing in the current process -- only one of these objects is allowed. If an object exists, it's used; else, a new one is created. Line 9 then ensures that the application is deleted upon quitting.
As we already pointed out in Section 2.4.2, using absolute coordinates has a lot of disadvantages and rarely happens when building GUIs. So let’s adapt the example code to use relative layouts and alignment properties to keep the label always nicely centered in the middle of the window. Here is the code with the main changes highlighted:
import sys
from PyQt5.QtWidgets import QWidget, QApplication, QLabel, QGridLayout
from PyQt5.QtCore import Qt

app = QApplication(sys.argv)

window = QWidget()
window.resize(400,200)
window.setWindowTitle("PyQt5 example 1")

layout = QGridLayout(window)

label = QLabel("Just a window with a label (now perfectly centered!)")
label.setAlignment(Qt.AlignCenter)
layout.addWidget(label,0,0)

window.show()

sys.exit(app.exec_())
Try out this modified version and see whether you notice the change. Here is an explanation:
- For this simple example, different layouts would have worked, but we here use a QGridLayout for the window content that allows for arranging the child elements in a table–like way with the rows and columns being resized automatically to arrange everything in an optimal way given the available space. The grid layout object is created in line 11 and stored in variable layout. By providing window as the parameter, it is directly applied to manage the child elements of our window widget.
- The cells in the grid are accessed via their row and column indices starting from zero. In this example, we only have a single cell that will span the entire window. We add the label widget to this cell by calling the addWidget(…) method of the grid layout in variable layout and providing the coordinates 0,0 of the top left cell.
- Without any further changes, the label would now appear vertically centered in the window because that is the default policy for the cells in a grid layout, but horizontally adjusted to the left. To also make the label appear horizontally centered, we use its setAlignment(…) method with the constant Qt.AlignCenter that is defined in the PyQt5.QtCore module which we are also importing at the beginning.
If you tried out the modified example, you will have noticed that the label now always remains in the center independent of how you resize the window. That is the result of the grid layout manager working in the background to rearrange the child elements whenever the size is changed.
As a further extension of this example, let us make things a bit more interesting and bring in some interactions by adding a button that can be used to close the application as an alternative to using the close icon at the top. The widget needed to implement such a button is called QPushButton. We will add the button to cell 1,0 which is the cell in row 1 and column 0, so below the cell containing the label. That means that the grid layout will now consist of one column and two rows. Here is the modified code with the main changes highlighted:
import sys
from PyQt5.QtWidgets import QWidget, QApplication, QLabel, QGridLayout, QPushButton
from PyQt5.QtCore import Qt

app = QApplication(sys.argv)

window = QWidget()
window.resize(400,200)
window.setWindowTitle("PyQt5 example 1")

layout = QGridLayout(window)

label = QLabel("Just a window with a label (now perfectly centered!)")
label.setAlignment(Qt.AlignCenter)
layout.addWidget(label,0,0)

button = QPushButton("Close me")
button.setToolTip('This is a QPushButton widget. Clicking it will close the program!')
layout.addWidget(button,1,0)

button.clicked.connect(app.quit)

window.show()

sys.exit(app.exec_())
Please note how the push button widget is created in line 17 providing the text it will display as a parameter. It is then added to the layout in line 19. In addition, we use the setToolTip(…) method to specify the text that should be displayed if you hover over the button with the mouse. This method can be used for pretty much any widget to provide some help text for the user. The interesting part happens in line 21: Here we specify what should actually happen when the button is pressed by, in QT terminology, “connecting a signal (button.clicked) of the button to a slot (app.quit) of the application object”. So if the button is clicked causing a “clicked” event, the method quit(…) of the application object is called and the program is terminated as a result. Give this example a try and test out the tooltip and button functionality. The produced window should look like in the image below:

As you probably noticed, the button right now only takes up a fixed small amount of space in the vertical dimension, while most of the vertical space is taken by the cell containing the label which remains centered in this area. Horizontally, the button is expanded to always cover the entire available space. This is the result of the interplay between the layout policies of the containing grid layout and the button object itself. By default, the vertical policy of the button is set to always take up a fixed amount of space but the horizontal policy allows for expanding the button. Since the default of the grid layout is to expand the contained objects to cover the entire cell space, we get this very wide button.
In the last version of this first example, we are therefore going to change things so that the button is not horizontally expanded anymore by adding a QHBoxLayout to the bottom cell of the grid layout. This is supposed to illustrate how different widgets and layouts can be nested to realize more complex arrangements of GUI elements. In addition, we change the code to not close the application anymore when the button is clicked but instead call our own function that counts how often the button has been clicked and displays the result with the help of our label widget. A screenshot of this new version and the modified code with the main changes highlighted are shown below.

Source code:
import sys

from PyQt5.QtWidgets import QWidget, QApplication, QLabel, QGridLayout, QPushButton, QHBoxLayout
from PyQt5.QtCore import Qt

def buttonClickedHandler(c):
     global counter
     counter += 1
     label.setText('Thank you for clicking the button ' + str(counter) + ' times!')

app = QApplication(sys.argv)

window = QWidget()
window.resize(400,200)
window.setWindowTitle("PyQt5 example 1")

layout = QGridLayout(window)

label = QLabel("Just a window with a label (now perfectly centered!)")
label.setAlignment(Qt.AlignCenter)
layout.addWidget(label,0,0)

button = QPushButton("Click me")
button.setToolTip('This is a QPushButton widget. Click it!')

horLayout = QHBoxLayout()
horLayout.addStretch(1)
horLayout.addWidget(button)
horLayout.addStretch(1)
layout.addLayout(horLayout,1,0)

button.clicked.connect(buttonClickedHandler)

counter = 0

window.show()

sys.exit(app.exec_())
In addition to the highlighted changes, there are a few very minor changes to the text displayed on the button and its tooltip. Let us first look at the changes made to implement the counting when the button is pressed. Instead of directly connecting the button.clicked signal to the slot of another QT element, we are connecting it to our own function buttonClickedHandler(…) in line 32. In addition, we create a global variable counter for counting how often the button has been clicked. When it is clicked, the buttonClickedHandler(…) function defined in lines 6 to 9 will be called, which first increases the value of the global counter variable by one and then uses the setText(…) method of our label object to display a message which includes the number of button presses taken from variable counter. Very simple!
Now regarding the changes to the layout to avoid that the button is expanded horizontally: In principle, the same thing could have been achieved by modifying the horizontal layout policy of the button. Instead, we add a new layout manager object of type QHBoxLayout to the bottom cell of the grid layout that allows for arranging multiple widgets in horizontal order. This kind of layout would also be a good choice if, for instance, we wanted to have several buttons at the bottom instead of just one, all next to each other. In line 26, we create the layout object and store it in variable horLayout. Later in line 30, we add the layout to the bottom cell of the grid layout instead of adding the button directly. This is done using the addLayout(…) method rather than addWidget(…).
In between these two steps, we add the button to the new horizontal layout in horLayout in line 28. In addition, we add horizontal stretch objects to the layout before and after the button in lines 27 and 29. We can think of these objects as springs that try to take up as much space as possible without compressing other objects more than these allow. The number given to the addStretch(…) method is a weight factor that determines how multiple stretch objects split up available space between them. Since we use 1 for both calls of addStretch(…), the button will appear horizontally centered and just take up as much space as needed to display its text. If you want to have the button either centered to the left or to the right, you would have to comment out line 27 or line 29, respectively. What do you think would happen if you change the weight number in line 27 to 2, while keeping the one in line 29 as 1? Give it a try!
2.6.1.2 Example 2
We are now moving on to example 2, a completely new example that focuses on the menu bar and status bar widgets as well as on defining user actions that can be associated with different input widgets and some other useful features of QT5 that are commonly used in GUI-based programs. Often GUI-based programs provide many ways in which the user can trigger a particular action, e.g. the action for saving the currently opened file can typically be performed by choosing the corresponding entry from the menu bar at the top, by a keyboard shortcut like CTRL+S for instance, and potentially also by a tool button in a toolbar and by some entry in a so-called context menu that shows up when you click the right mouse button. PyQT5 provides the QAction class for defining actions and these actions can then be associated with or added to different GUI elements that are supposed to trigger the action. For instance, in the following example we will create an action for exiting the program with the following four lines of code:
exitAction = QAction(app.style().standardIcon(QStyle.SP_DialogCancelButton’), '&Exit', mainWindow)

exitAction.setShortcut('Ctrl+Q')

exitAction.setStatusTip('Exit application')

exitAction.triggered.connect(app.quit)
The QAction object for our exit action is created in the first line and then stored in variable exitAction. The first two parameters given to QAction(…) are an icon that will be associated with that action and the name. For the icon we use the SP_DialogCancelButton icon from the set of icons that comes with QT5. Of course, it is possible to use your own set of icons but we want to keep things simple here. The & symbol in the name of the action (&Exit) signals that it should be possible to use ALT+E as a keyboard shortcut to trigger the action when using the application’s menu bar. The last parameter is the parent object which needs be another QT object, the one for the application’s main window in this case (more on this in a moment).
In the following two lines we define the keyboard shortcut (Ctrl+Q) that can be used at any moment to trigger the action and a message that should be shown in the status bar (the bar at the bottom of the application’s main window that is typically used for showing status messages) when hovering over a GUI element that would trigger this action. Finally, in the last line we connect the event that our exit action is triggered (by whatever GUI element) to the quit slot of our application. So this is the part where we specify what the action should actually do and as we have seen before, we can either connect the signal directly to a slot of another GUI element or to a function that we defined ourselves.
We already briefly mentioned the “main window” of the application. In example 1 above, we used the QWidget object for the main window and container of the other GUI elements. In example 2, we will use the QMainWindow widget instead which represents a typical application window with potentially a menu bar and tool bar at the top, a large central area in the middle to display the main content of the app, and potentially a small status bar at the bottom. The image below shows how the main window we are going to create in example 2 will look.

Once a QMainWindow object has been created and stored in variable mainWindow, its menu bar (an object of type QMenuBar that is created automatically) can be accessed via the menuBar() method, so with the expression mainWindow.menuBar(). A menu bar consists of one or more menus (= objects of the QMenu class) which in turn consist of several menu entries. The entries can be actions or submenus which again are QMenu objects. To add a new menu to a menu bar, you call its addMenu(…) method and provide the name of the menu, for instance ‘&File’. The method returns the newly created QMenu object as a result, so that you can use it to add menu entries to it. To add an action to a menu, you invoke a method called addAction(…) of the menu object, providing the action as a parameter. With that explanation, it should be relatively easy to follow the code below. We have highlighted the important parts related to creating the main window, setting up the menu bar, and adding the exit action to it.
import sys

from PyQt5.QtWidgets import QApplication, QMainWindow, QAction, QStyle

app = QApplication(sys.argv)

mainWindow = QMainWindow()
mainWindow.resize(400,200)
mainWindow.setWindowTitle("PyQt5 example 2")

fileMenu = mainWindow.menuBar().addMenu('&File')
optionsMenu = mainWindow.menuBar().addMenu('&Options')

exitAction = QAction(app.style().standardIcon(QStyle.SP_DialogCancelButton), '&Exit', mainWindow)
exitAction.setShortcut('Ctrl+Q')
exitAction.setStatusTip('Exit application')
exitAction.triggered.connect(app.quit)

fileMenu.addAction(exitAction)

mainWindow.statusBar().showMessage('Waiting for your commands...')

mainWindow.show()

sys.exit(app.exec_())
The QMainWindow is created very similarly to the QWidget we used in example 1, meaning we can set the title and initial size of the widget (lines 8 and 9). The two menus ‘File’ and ‘Options’ are added to the menu bar of our main window in lines 11 and 12, and the QMenu objects returned are stored in variables fileMenu and optionsMenu, respectively. In line 19, we add the exit action we created with the code already discussed earlier (lines 14 to 17) to the ‘File’ menu. The icon and name we provided when creating the action will be used for the entry in the menu bar and selecting the entry will trigger the action and result in the quit() method of application being called.
Please note that in line 21, we also added a command to show a message in the status bar at the bottom of the main window when the application is started. The status bar object is accessed via the statusBar() method of the QMainWindow, and then we directly call its showMessage(…) method specifying the text that should be displayed. We suggest that you run the program a few times, trying out the different ways to exit it via the menu entry (either by clicking the entry in the ‘File’ menu or using ALT+F followed by ALT+E) and the action's keyboard shortcut CTRL+Q that we defined.
So far, our 'File' menu only has a single entry and the 'Options' menu is still completely empty. In the following, we are going to extend this example by adding ‘Open’ and ‘Save’ actions to the ‘File’ menu making it appear somewhat similar to what you often see in programs. We also add entries to the 'Options' menu, namely one with a checkbox next to it that we use for controlling whether the label displayed in our main window is shown or hidden, and one that is a QMenu object for a submenu with two additional entries. The two images below illustrate how our menu bar will look after these changes.


In addition to the changes to the menu bar, we will use the QFileDialog widget to display a dialog for selecting the file that should be opened and we use a QMessageBox widget to display a quick message to the user that the user has to confirm. Here is the code for the new version with main changes highlighted. Further explanation will follow below:
import sys

from PyQt5.QtWidgets import QApplication, QMainWindow, QAction, QStyle, QFileDialog, QMessageBox, QWidget, QGridLayout, QLabel, QMenu
from PyQt5.QtCore import Qt

def openFile():
     fileName, _ = QFileDialog.getOpenFileName(mainWindow, "Open file", "", "All files (*.*)")
     if fileName:
         mainWindow.statusBar().showMessage('User has picked file ' + fileName)
     else:
         mainWindow.statusBar().showMessage('User canceled the file dialog.')

def saveFile():
     QMessageBox.information(mainWindow, 'Important information', 'Save file has not been implemented yet, sorry!', QMessageBox.Ok)

def toggleLabel(state):
     if state:
         label.show()
     else:
         label.hide()

app = QApplication(sys.argv)

mainWindow = QMainWindow()
mainWindow.resize(400,200)
mainWindow.setWindowTitle("PyQt5 example 2")
mainWindow.setCentralWidget(QWidget())

layout = QGridLayout(mainWindow.centralWidget())

label = QLabel("Some text ...")
label.setAlignment(Qt.AlignCenter)
layout.addWidget(label,0,0)

fileMenu = mainWindow.menuBar().addMenu('&File')
optionsMenu = mainWindow.menuBar().addMenu('&Options')

openAction = QAction('&Open...', mainWindow)
openAction.triggered.connect(openFile)
fileMenu.addAction(openAction)

saveAction = QAction('&Save', mainWindow)
saveAction.triggered.connect(saveFile)
fileMenu.addAction(saveAction)

exitAction = QAction(app.style().standardIcon(QStyle.SP_DialogCancelButton), '&Exit', mainWindow)
exitAction.setShortcut('Ctrl+Q')
exitAction.setStatusTip('Exit application')
exitAction.triggered.connect(app.quit)
fileMenu.addAction(exitAction)

toggleLabelAction = QAction('&Toggle label', mainWindow, checkable=True)
toggleLabelAction.setChecked(True)
toggleLabelAction.triggered.connect(toggleLabel)
optionsMenu.addAction(toggleLabelAction)

otherOptionsSubmenu = QMenu('&Other options', mainWindow)
otherOption1Action = QAction('Other option &1', mainWindow, checkable=True)
otherOption2Action = QAction('Other option &2', mainWindow, checkable=True)

otherOptionsSubmenu.addAction(otherOption1Action)
otherOptionsSubmenu.addAction(otherOption2Action)
optionsMenu.addMenu(otherOptionsSubmenu)

mainWindow.statusBar().showMessage('Waiting for your commands...')

mainWindow.show()

sys.exit(app.exec_())
In addition to importing some more widgets and other PyQT classes that we need, we define three functions at the beginning, openFile(), saveFile(), and toggleLabel(…). These will serve as the event handler functions for some of the new actions/menu entries that we are adding, and we will discuss them in more detail later.
The next thing to note is that in lines 31 to 33 we are reintroducing our label object from the first example in the center of the main window. Since our window is based on QMainWindow, we first have to create a QWidget to fill the central area of the main window via its setCentralWidget(…) method (line 27), and then we add the needed layouts and QLabel object itself to this central widget exactly as in example 1 (lines 29 to 33).
In lines 38 and 42, we create new QAction objects for the two actions we want to add to the ‘File’ menu in variable fileMenu. To keep the code from getting too long, we don’t set up icons, keyboard shortcuts, and status bar tips for these like we did for the exit action, but these could be easily added. They are set up to call the openFile() and saveFile() functions we defined when they are triggered (lines 39 and 43), and both actions are added to fileMenu via the addAction(…) method in lines 40 and 44.
In lines 52 to 55, the action with the checkbox to toggle the label on and off is created and added to the ‘Options’ menu. The main difference to the other actions is that we use the additional keyword argument checkable=True when creating the action object in line 52, and then set the initial state to being checked in the following line. The "triggered" signal of the action is connected to the toggleLabel(…) function. Note how this function, in contrast to other event handler function we created before, has a parameter state that when called will be given the state of the action, meaning whether it is checked or unchecked, as a boolean. The code in the body of the function in lines 17 to 20 then simply checks whether this state is True for "checked" and if so, makes sure that the label is visible by calling its show() method. If state is False for "unchecked", it will call hide() instead and the label will become invisible.
In lines 57 to 63, we create a submenu for the ‘Options’ menu with two more checkable actions that we simply call ‘Other option 1’ and ‘Other option 2’. This is just for illustrating how to create a submenu in a menu bar, so we don’t bother with linking these actions to some actual functionality as we might in a real-world situation. The important part starts with line 57 where we create a QMenu object called ‘Other options’ that we then add the actions to in line 61 and 62. In line 63, we then add this new menu to our ‘Options’ menu in variable optionsMenu. Since we are not adding an action but a submenu here, we have to use the addMenu(…) method for this.
Now it is time to have a closer look at the openFile() and saveFile() functions that describe what should happen if the open or save actions are triggered. We are keeping things very simple in the saveFile() function, so let us start with that one: Since we are just creating a GUI framework here without real functionality, we only display a warning message to the user that no save file functionality has been implemented yet. We do this with the help of the QMessageBox widget that has the purpose of making, creating, and showing such message boxes as easily as possible. QMessageBox has several methods that can be invoked to display different kinds of messages such as simple information text or questions that require some user input. To just display some text and have an OK button that the user needs to click for confirmation, we use the information(…) method (line 14). We have to provide a parent QT object (mainWindow), a title, the information text, and the kind of buttons we want in the message box (QMessageBox.Ok) as parameters.
Finally, let’s look at the openFile() function in lines 6 to 11: here we illustrate what would typically happen when the action to open a file is triggered. Among other things, you typically want to provide a file browser dialog that allows the user to pick the file that should be opened. Such a dialog is much more complicated than a simple message box, so we cannot use QMessageBox for this, but fortunately QT provides the QFileDialog widget for such purposes. Like QMessageBox, QFileDialog has multiple methods that one can call depending on whether one needs a dialog for opening an existing file, selecting a folder, or saving a file under a name chosen by the user. We here use QFileDialog.getOpenFileName (…) and provide a parent object (mainWindow), a title for the dialog, and a string that specifies what files can be selected based on their file extension as parameters. For the last parameter, we use "*.*" meaning that the user can pick any file.
getOpenFileName (…) has a return value that indicates whether the user left the dialog via the Ok button or whether the user canceled the dialog. In the first case, the return value will be the name of the file selected, and in the second case it will be None. We capture this return value in variable fileName and then use an if-statement to distinguish both cases: In the first case, we use showMessage(…) of our status bar to display a message saying which file was selected. If the condition is False (so if fileName is None), we use the same message to inform that the dialog was canceled.
This second version of example 2 has already gotten quite long and the same applies for our explanation. You should take a moment to run the actual application and test out the different actions we implemented, the message box display, the open file dialog, toggling the label on and off via the entry under the ‘Options’ menu, and so on.
2.6.1.3 Example 3
We are now leaving the world of menu bars behind and moving on to a third and final example of manually creating PyQT5 based programs which has the purpose of showing you the most common widgets used for getting input from the user as well as the following things:
- how to build own dialog boxes from these widgets, similar to the open file dialog for example,
- how to arrange widgets in more complex ways,
- and how to use the created dialog boxes from the main code.
We will keep the actual functionality we have to implement in this example to a minimum and mainly connect signals sent by the different widgets to slots of other widgets. As a result, the dialog box will operate in a somewhat weird way and we, hence, call this example “The world’s weirdest dialog box”. It still serves the purpose of illustrating the different event types and how to react to them.
To understand the example, it is important to know that dialog boxes can be invoked in two different ways, modally and modelessly (also referred to as non-modal). Modal means that when the method for displaying the dialog to the user is called, it will only return from the call once the user closes the dialog (e.g. by pressing an Ok or Cancel button). That means the user cannot interact with any other parts of the program's GUI, only the dialog box. When a dialog is invoked in the modeless approach, the method for displaying the dialog will return immediately and the dialog will essentially be displayed in addition to the other windows of the program that still can be interacted with.
The QDialog widget that we will use to build our own dialog box in this example, therefore, has two methods: exec_() for displaying the dialog modally, and show() for displaying it in the modeless way. In contrast to show(), exec_() has a return value that indicates whether the dialog was canceled or has been closed normally, e.g. by pressing an Ok button. You may wonder how our program would be informed about the fact that the dialog has been closed, and in which way, in the modeless option using show(). This happens via the signals accepted and rejected that the dialog will produce in this case and that we can connect to in the usual way. You will see an example of that later on but we first start with a modal version of our dialog box.
The final version of example 3 will be even longer than that of example 2. We, therefore, added some comments to structure the code into different parts, e.g. for setting up the application and GUI, for defining the functions that realize the main functionality, for wiring things up by connecting signals to slots or functions, and so on. In case you run into any issues while going through the following steps to produce the final code for the example, the final script file can be downloaded here. In the first skeleton of the code shown below, some of the sections introduced by the comments are still empty but we will fill them while we move along. This first version only illustrates how to create an empty QDialog object for our dialog box and show it (modally) when a button located on the main window is clicked. The most important parts of the code are again highlighted.

# imports

import sys
from PyQt5.QtWidgets import QApplication, QMainWindow, QPushButton, QGridLayout, QWidget, QDialog

# set up app and GUI

app = QApplication(sys.argv)

mainWindow = QMainWindow()
mainWindow.resize(400,200)
mainWindow.setWindowTitle("PyQt5 example 3")
mainWindow.setCentralWidget(QWidget())

layout = QGridLayout(mainWindow.centralWidget())

button = QPushButton("Open dialog ...")
layout.addWidget(button,0,0)

dialogBox = QDialog()
dialogBox.setWindowTitle("The world's weirdest dialog box")

# functions for interactions

# functions for modal version

# functions for modeless version

# connect signals and other initializations

button.clicked.connect(dialogBox.exec_) # invoke dialog modal version

# run the program

mainWindow.show()

sys.exit(app.exec_())
The QDialog widget is created in line 21 and it is stored in variable dialogBox. We can now add content (meaning other widgets) to it in a similar way as we did with QWidget objects in previous examples using the addWidget(…) and addLayout(…) methods. In lines 17 and 18, we create a simple push button and add it to our main window. In line 31, we connect the "clicked" signal of this button with the exec_() method of our (still empty) dialog box. As a result, when the button is pressed, exec_() will be called and the dialog box will be displayed on top of the main window in a modal way blocking the rest of the GUI. Run the application now and see whether the dialog shows up as expected when the button is clicked.
We are now going to add the widgets to our dialog box in variable dialogBox. The result should look as in the image below:

Please follow the steps below to create this new version of example 3:
Step 1. Replace all the lines with import statements under the comment “# imports” and before the comment “# set up app and GUI” with the following lines.
import sys, random

from PyQt5.QtWidgets import QApplication, QMainWindow, QPushButton, QGridLayout, QWidget, QDialog, \
   QVBoxLayout, QGroupBox, QLabel, QLineEdit, QTextEdit, QHBoxLayout, QListView, QRadioButton, \
   QCheckBox, QComboBox, QDialogButtonBox
from PyQt5.QtCore import Qt, QVariant
from PyQt5.QtGui import QPixmap, QStandardItemModel, QStandardItem
As you can see, we need to import quite a few more widget classes. In addition, using some of these will require additional auxiliary classes from the PyQt5.QtCore and PyQt5.QtGui modules.
Step 2. Keep the code that is currently under the comment “# set up app and GUI” as this will not change. But then add the following code directly after it, still before the “# functions for interactions” comment.
mainVerticalLayout = QVBoxLayout(dialogBox)

nameGroupBox = QGroupBox("Name") # row 1 of vertical layout
mainVerticalLayout.addWidget(nameGroupBox)
nameGridLayout = QGridLayout(nameGroupBox)
firstNameLabel = QLabel("First name:")
nameGridLayout.addWidget(firstNameLabel, 0, 0)
lastNameLabel = QLabel("Last name:")
nameGridLayout.addWidget(lastNameLabel, 1, 0)
firstNameLineEdit = QLineEdit()
nameGridLayout.addWidget(firstNameLineEdit, 0, 1)
lastNameLineEdit = QLineEdit()
nameGridLayout.addWidget(lastNameLineEdit, 1, 1)

imageHorizontalLayout = QHBoxLayout() # row 2
mainVerticalLayout.addLayout(imageHorizontalLayout)
imageLabel = QLabel()
imageLabel.setPixmap(QPixmap("psu.PNG").scaledToWidth(172))
imageHorizontalLayout.addWidget(imageLabel)
textEdit = QTextEdit()
textEdit.setText("<write whatever you want here>")
imageHorizontalLayout.addWidget(textEdit)

listGridLayout = QGridLayout() # row 3
mainVerticalLayout.addLayout(listGridLayout)
listView = QListView()
listGridLayout.addWidget(listView, 0, 0, 4, 1)
clearPushButton = QPushButton("Clear")
listGridLayout.addWidget(clearPushButton, 0, 1)
hidePushButton = QPushButton("Hide")
listGridLayout.addWidget(hidePushButton, 1, 1)
showPushButton = QPushButton("Show")
listGridLayout.addWidget(showPushButton, 2, 1)
listWordsPushButton = QPushButton("List words")
listGridLayout.addWidget(listWordsPushButton, 3, 1)

widgetGroupBox = QGroupBox() # row 4
mainVerticalLayout.addWidget(widgetGroupBox)
widgetGridLayout = QGridLayout(widgetGroupBox)
greatRadioButton = QRadioButton("I think this dialog box is great!")
greatRadioButton.setChecked(True)
widgetGridLayout.addWidget(greatRadioButton, 0, 0)
neutralRadioButton = QRadioButton("I am neutral towards this dialog box!")
widgetGridLayout.addWidget(neutralRadioButton, 1, 0)
horribleRadioButton = QRadioButton("This dialog box is just horrible!")
widgetGridLayout.addWidget(horribleRadioButton, 2, 0)
checkBox = QCheckBox("Check me out")
widgetGridLayout.addWidget(checkBox, 0, 1)
comboBox = QComboBox()
widgetGridLayout.addWidget(comboBox, 0, 2)
widgetPushButton = QPushButton("I am a push button spanning two columns")
widgetGridLayout.addWidget(widgetPushButton, 2, 1, 1, 2)

buttonBox = QDialogButtonBox() # row 5
buttonBox.setStandardButtons(QDialogButtonBox.Cancel | QDialogButtonBox.Ok)
mainVerticalLayout.addWidget(buttonBox)
This is the code for creating all the different widgets in our dialog box. You should be getting used to reading this kind of code, so we will just explain the most important points here:
- The overall organization of the dialog box is illustrated in the previous figure. The widgets are organized into five rows. This happens with a QVBoxLayout that arranges items vertically, each item below the previous one. The layout is created in line 1 and by using dialogBox as the parameter of QVBoxLayout(…), we are directly adding it to our dialog box. Each of the five following blocks of code create one of the rows in this vertical layout.
- The first block from line 3 to 13 is formed by a single QGroupBox item which in turn contains two QLabel and two QEditLine widgets. QEditLine widgets are used for allowing the user to enter a single line of text. The labels are just for describing what should be entered into the respective line edit widget. To make everything look tidy, we use a QGridLayout as in Example 1 or the miles-to-kilometers converter to arrange these items into two columns with the first one containing the labels and the second one containing the line edit widgets.
- The second row created in lines 15 to 22 is formed by two widgets, a QLabel that we will use to display an image of the PSU logo and a QTextEdit widget that allows for entering multi-line text. The label doesn’t have any text assigned. Instead, we use the method setPixmap(…) to assign it an image that will be displayed instead of text. You will need to download the Penn State logo here and place it in the same folder as the script to be able to run the program. To have these elements placed neatly next to each other, we use a QHBoxLayout as in Example 1 for this row and add the two widgets to it.
- Row 3 (lines 24 to 35) contains a QListView widget on the left and four QPushButtons arranged vertically on the right. The list view is intended for displaying a list of items, one per row, and potentially allowing the user to select one or multiple of these rows/items. We use another grid layout to arrange the items in this row. The grid has two columns and three rows (because of the four buttons) and what is new here is that we are setting up the list view widget to span all four rows. This happens in line 27 by providing two additional parameters to addWidget(…): 4 for the number of rows the widget should span and 1 for the number of columns.
- For row 4 in lines 37 to 52, we again use a group box and a grid layout (3 rows x 4 columns) to arrange the widgets inside the group box, and we add a diverse collection of different widgets to it: The first column is filled by three QRadioButtons. Radio buttons allow for picking one of several choices and it is used here in our dialog box to state your opinion on this dialog box ranging from great over neutral to horrible. The radio buttons inside the same group box are automatically linked so that when you select one, all others will be deselected. In addition, we also add a QCheckBox that can be checked and unchecked and a QComboBox for selecting one item from multiple choices. Finally we have another QPushButton, this time one that spans columns 2 and 3 (see line 52).
- The last row (lines 54 to 56) contains an “Ok” and a “Cancel” button. These are standard elements for a dialog box, so QT provides some easy way to set these up in the form of the QDialogButtonBox widget. We just have to tell the widget which buttons we want via the setStandardButtons(…) method in line 55.
At this point, you can run the script and it should produce the GUI as shown in the previous figure. You can already type things into the different edit fields and use the checkbox and radio buttons. The other elements still need to be connected to some functionality to serve a purpose, which is what we will do next.
Step 3. The next things we are going to add are two functions to put some content into the QListView widget in the third row and the QComboBox widget in the fourth row. Since we want to illustrate how different GUI elements can be connected to play together, we will use the list view to display a list of the words from the text that has been entered into the QTextEdit widget in the second row (variable textEdit). The combo box we will simply fill with a set of randomly generated numbers between 1 and 9. Then we will wire up these widgets as well as the push buttons from the third row and the QDialogButtonBox buttons from the fifth row.
The following code needs to be placed directly under the comment “# functions for interactions”, before the comment “# functions for modal version”.
def populateListView():
     words = textEdit.toPlainText().split()
     m = QStandardItemModel()
     for w in words:
         item = QStandardItem(w)
         item.setFlags(Qt.ItemIsUserCheckable | Qt.ItemIsEnabled)
         item.setData(QVariant(Qt.Checked), Qt.CheckStateRole)
         m.appendRow(item)
     listView.setModel(m)

def populateComboBoxWithRandomNumbers():
     comboBox.clear()
     for i in range(5):
         comboBox.addItem(str(random.randrange(10)))
The function populateListView() calls the method toPlainText() of the QTextEdit widget. The QTextEdit widget can contain rich text with styling but this method only gives us the plain text without styling markups as a string. We then use the string method split() to split this string into a list of strings at each space or other whitespace symbol. The resulting list of words is stored in variable words. The QListView is one of the widgets that needs a model behind it meaning some object that stores the actual list data to be displayed. Since we just need a list of simple string objects here, we use the QStandardItemModel class available for such cases and fill it with QStandardItem objects we create, one for each word in our words list (lines 3 to 8). The model created in this way is then given to the setModel() method of the list view, which will then display these items. In lines 6 and 7 we are setting up the list items to have a check box that is originally checked but can be unchecked by the user to only select a subset of the items.
Populating the combo box with items the user can pick from is much simpler because we can directly add string items to it with the addItem(…) method (line 14). In the populateComboBoxWithRandomNumbers() function, we first clear the current content, then use a for-loop that creates the random numbers and adds them as string items to the combo box.
In addition, you now need to place the following lines of code directly under the comment “# connect signals and other initializations”, before the line that is already there for opening the dialog when the button on the main window is clicked:
radioButtons = [ greatRadioButton, neutralRadioButton, horribleRadioButton ]

populateComboBoxWithRandomNumbers()

buttonBox.accepted.connect(dialogBox.accept)
buttonBox.rejected.connect(dialogBox.reject)
clearPushButton.clicked.connect(textEdit.clear)
hidePushButton.clicked.connect(textEdit.hide)
showPushButton.clicked.connect(textEdit.show)
listWordsPushButton.clicked.connect(populateListView)
The first line will only play a role later on, so we ignore it for the moment. In line 3, we call the populateComboBoxWithRandomNumbers() function to initialize the combo box so that it contains a list of numbers immediately when the dialog box is opened for the first time. Next we wire up the “Ok” and “Cancel” buttons for exiting the dialog (lines 5 and 6). This is not done via the "clicked" signals of the button themselves but via the "accepted" and "rejected" signals of the button box that contains them. We connect these signals to the accept() and reject() methods of our dialog box, and these will take care of producing the corresponding return values or trigger the corresponding signals depending on whether we called the dialog box modally or modeless.
Finally, we connect the four push buttons from the third row (lines 7 to 10). The first three are used to invoke different methods of the text edit widget above them: The first clears the text area, the second hides the widget, and the third shows it again. The fourth button is set up to invoke our populateListView() function, so this is the button that needs to be clicked for a list of words to show up in the list view widget. Go ahead and run the script now. Enter a few lines of text into the text edit field and then click the “List words” button and observe the list of words that can now be selected via the little checkboxes. Then try out the other buttons and the combo box.
Step 4. At this point, we still have a few widgets in our dialog box that do not do anything. Let’s make things really weird by adding the following commands to the “# connect signals and other initializations” section directly following the lines you just added and still before the line for opening the dialog when the button on the main window is clicked.
widgetPushButton.pressed.connect(populateComboBoxWithRandomNumbers)
firstNameLineEdit.textChanged.connect(checkBox.toggle)
lastNameLineEdit.editingFinished.connect(comboBox.showPopup)
Take a brief moment to read these commands and try to understand the functionality they are adding. Do you understand what is happening here? The first line is for finally giving some functionality to the large push button labeled “I am a push button spanning two row”. We connect this button to our function for populating the combo box with random numbers. So every time you click the button, the combo box will show a different selection of random numbers to pick from. Please note that we are not connecting the "clicked" signal here as we did with the other push buttons. Instead, we connect the "pressed" signal. What is the difference? Well, the "clicked" signal will only be sent out when the mouse button is released, while "pressed" is immediately sent when you press down the mouse button. When you run the dialog again, check out whether you notice the difference.
In the second and third line, we do something that you would usually never do in a dialog box: We connect the "textChanged" signal of the line edit widget for entering your first name at the top to the "toggle" slot of our checkbox widget in the fourth row. This signal is emitted whenever the text in the field is changed, e.g. every time you press a key while editing this input field. So if you type in your first name, you will see the checkbox constantly toggle between its checked and unchecked states. We then connect the "editingFinished" signal of the line edit widget for the last name to the "showPopup" slot of our combo box for opening the drop down list with the different choices. The difference between "textChanged" and "editingFinished" is that "editingFinished" will only be emitted when you press TAB or the widget loses focus in another way, for instance when you click on a different widget. So if you enter your last name and press TAB, you will see the drop down list of the combo box appearing. Give this and the other weird things we just implemented a try by running the script!
Step 5. It’s probably best if we stop wiring up our dialog box at this point, but feel free to keep experimenting with the different signals and connecting them to different slots later on after we have completed this example. We now want to focus on what typically happens if the dialog box is closed. Right now, nothing will happen because we have been connecting the push button on our main window directly to the exec_() method, so there is no own code yet that would be executed when returning from this method. Typically, you will have your own function that calls exec_() and that contains some additional code depending on whether the user closed the dialog via the “Ok” or “Cancel” button and the state or content of the different widgets. For this purpose, please first add the following function at the end of the “# functions for interactions” section, directly before “# functions for modal version”:
def printResults():
     for rb in radioButtons:
         if rb.isChecked():
             print("Selected opinion: " + rb.text())
     print("Combo box has current value " + comboBox.currentText())
     print("Checkbox is " + ("checked" if checkBox.isChecked() else "unchecked"))
Then under "#functions for modal version" insert the following code:
def openDialogModal():
     result = dialogBox.exec_()
     if result == QDialog.Accepted:
         printResults()
     else:
         print("Exited dialog via cancel button or closing window")
Finally, change the line in which we set up the main window button to open the dialog from
button.clicked.connect(dialogBox.exec_()) # invoke dialog modal version
to
button.clicked.connect(openDialogModal) # invoke dialog modal version
It should be clear that this last change means that instead of opening the dialog box directly, we are now calling our own function openDialogModal() when the button on the main window is clicked. Looking at the code of that function, the first thing that will happen then is that we call dialogBox.exec_() to open the dialog box, but here we also capture its return value in variable result. When the dialog box is closed, this return value will tell us whether the user accepted the dialog (the user clicked ok) or whether the user rejected the dialog (the user clicked cancel or closed the dialog in another way). The return value is a number but instead of bothering with how accepted and rejected are encoded, we compare result to the corresponding constants QDialog.Accepted and QDialog.Rejected defined in the QDialog class. When the return value is equal to QDialog.Accepted, we call the printResults() function we defined, else we just print out a message to the console saying that the dialog was canceled.
The printResults() function illustrates how you can check the content or state of some of the widgets, once the dialog has been closed. Even though the dialog is not visible anymore, the widgets still exist and we just have to call certain methods to access the information about the widgets.
We first look at the three radio buttons to figure out which of the three is selected and print out the corresponding text. At the beginning of the section “#connect signals and other initializations” in the code, we created a list of the three buttons in variable radioButtons. So we can just loop through this list and use the isChecked() method which gives us back a boolean value. If it is True, we get the label of the radio button via its text() method and print out a message about the user’s opinion on our dialog box.
Next, we print out the item currently selected for our combo box: This is retrieved via the combo box’s currentText() method. The state of the check box widget can again be accessed via a method called isChecked(). The other widgets provide similar methods but the general idea should have gotten clear. You already saw the toPlainText() method of QTextEdit being used, and QLineEdit has a method called text() to retrieve the text the user entered into the widget. We will leave adding additional output for these and the other widgets as an “exercise for the reader”. Please run the script and open/close the dialog a few times after using the widgets in different ways and observe the output produced when dialog is closed.
Change to modeless version. The last thing we are going to do in this section is coming back to the concept of modal and modeless dialog boxes and showing what a modeless version of our dialog box would look like. Please add the following three functions to the section “# functions for modeless version”:
def openDialogModeless():
     dialogBox.show()
     print("We are already back from calling dialogBox.show()")

def dialogAccepted():
     printResults()

def dialogRejected():
     print("Exited dialog via cancel button or closing window")
Now comment out the line
button.clicked.connect(openDialogModal) # invoke dialog modal version
by placing a # in front of it and then insert the following lines below it:
dialogBox.accepted.connect(dialogAccepted) # invoke dialog modeless version
dialogBox.rejected.connect(dialogRejected)
button.clicked.connect(openDialogModeless)
We suggest you try out this new version immediately and observe the change. Note how the main window still can be interacted with after the dialog box has been opened. Also note the message in the console “We are already back from calling dialogBox.show()” appearing directly after the dialog window has appeared. Looking at the code, instead of calling openDialogModal(), we are now calling openDialogModeless(). This function uses dialogBox.show() to open a modeless version of our dialog rather than dialogBox.exec_() for the modal version. The message is produced by the print statement directly after this call, illustrating that indeed we return immediately from the function call, not just when the dialog box is closed.
As a result, we need the two other functions to react when the dialog box has been closed. We connect the function dialogAccepted() to the "accepted" signal of dialogBox that is emitted when the dialog box is closed via the “Ok” button. The function simply calls printResults() and, hence, essentially corresponds to the if-case in function openDialogModal(). Similarly, the dialogRejected() function corresponds to the else-case of openDialogModal() and is connected to the "rejected" signal emitted when the dialog is canceled.
As you can see, the change from modal to modeless is straightforward and involves changing from working with a return value to working with functions for the "accepted" and "rejected" signals. Which version to use is mainly a question of whether the dialog box is supposed to get important information from the user before being able to continue, or whether the dialog is a way for the user to provide input or change parameters at any time while the program is executed.
One interesting observation if you revisit the code from the three examples in this section, in particular examples 2 and 3, is that while the script code can become rather long, most of this code is for creating the different widgets and arranging them in a nice way. Compared to that, there is not much code needed for wiring up the widgets and implementing the actual functionality. Admittedly, our toy examples didn’t have a lot of functionality included, but it still should be obvious that a lot of time and effort could be saved by using visual tools for producing the GUI layouts in an intuitive way and then automatically turning them into Python code. This is exactly what the next section will be about.
2.6.2 Creating GUIs with QT Designer
While it’s good and useful to understand how to write Python code to create a GUI directly, it’s obviously a very laborious and time consuming approach that requires writing a lot of code. So together with the advent of early GUI frameworks, people also started to look into more visual approaches in which the GUI of a new software application is clicked and dragged together from predefined building blocks. The typical approach is that first the GUI is created within the graphical GUI building tool and then the tool translates the graphical design into code of the respective programming language that is then included into the main code of the new software application.
The GUI building tool for QT that we are going to use in this lesson is called QT Designer. QT Designer is included in the PyQT5 Python package. The tool itself is platform and programming language independent. Instead of producing code from a particular programming language, it creates a .ui file with an xml description of the QT-based GUI. This .ui file can then be translated into Python code with the pyuic5 GUI compiler tool that also comes with PyQT5. There is also support for directly reading the .ui file from Python code in PyQT5 and then generating the GUI from its content, but we here will use the approach of creating the Python code with pyui5 because it is faster and allows us to see and inspect the Python code for our application. However, you will see an example of reading in the content of the .ui file directly in Lesson 4. In the following, we will take a quick look at how the QT Designer works.
Since you already installed PyQt5 from the ArcGIS Pro package manager, the QT Designer executable will be in your ArcGIS Pro default Python environment folder, either under "C:\Users\<username>\AppData\Local\ESRI\conda\envs\arcgispro-py3-clone\Library\bin\designer.exe" or under “C:\Program Files\ArcGIS\Pro\bin\Python\envs\arcgispro-py3\Library\bin\designer.exe”. It might be good idea to create a shortcut to this .exe file on your desktop for the duration of the course, allowing you to directly start the application. After starting, QT Designer will greet you as shown in the figure below:

QT Designer allows for creating so-called “forms” which can be the GUI for a dialog box, a main window, or just a simple QWidget. Each form is saved as a single .ui file. To create a new form, you pick one of the templates listed in the “New Form” dialog. Go ahead and double-click the “Main Window” template. As a result, you will now see an empty main window form in the central area of the QT Designer window.

Let’s quickly go through the main windows of QT Designer. On the left side, you see the “Widget Box” pane that lists all the widgets available including layout widgets and spacers. Adding a widget to the current form can be done by simply dragging the widget from the pane and dropping it somewhere on the form. Go ahead and place a few different widgets like push buttons, labels, and line edits somewhere on the main window form. When you do a right-click in an empty part of the central area of the main window form, you can pick “Lay out” in the context menu that pops up to set the layout that should be used to arrange the child widgets. Do this and pick “Lay out horizontally” which should result in all the widgets you added being arranged in a single row. See what happens if you instead change to a grid or vertical layout. You can change the layout of any widget that contains other widgets in this way.
On the right side of QT Designer, there are three different panes. The one at the top called “Object Inspector” shows you the hierarchy of all the widgets of the current form. This currently should show you that you have a QMainWindow widget with a QWidget for its central area, which in turn has several child widgets, namely the widgets you added to it. You can pretty much perform the same set of operations that are available when interacting with a widget in the form (like changing its layout) with the corresponding entry in the “Object Inspector” hierarchy. You can also drag and drop widgets onto entries in the hierarchy to add new child widgets to these entries, which can sometimes be easier than dropping them on widgets in the form, e.g., when the parent widget is rather small.
The “Object” column lists the object name for each widget in the hierarchy. This name is important because when turning a GUI form into Python code, the object name will become the name of the variable containing that widget. So if you need to access the widget from your main code, you need to know that name and it’s a good idea to give these widgets intuitive names. To change the object name to something that is easier to recognize and remember, you can double-click the name to edit it, or you can use “Change objectName” from the context menu when you right-click on the entry in the hierarchy or the widget itself.
Below the “Object Inspector” window is the “Property Editor”. This shows you all the properties of the currently selected widget and allows you to change them. The yellow area lists properties that all widgets have, while the green and blue areas below it (you may have to scroll down to see these) list special properties of that widget class. For instance, if you select a push button you added to your main window form, you will find a property called “text” in the green area. This property specifies the text that will be displayed on the button. Click on the “Value” column for that property, enter “Push me”, and see how the text displayed on the button in the main window form changes accordingly. Some properties can also be changed by double-clicking the widget in the form. For instance, you can also change the text property of a push button or label by double-clicking it.
If you double-click where it says “Type Here” at the top, you can add a menu to the menu bar of the main window. Give this a try and call the menu “File”.

The last pane on the right side has three tabs below it. “Resource browser” allows for managing additional resources, like files containing icons to be used as part of the GUI. “Action editor” allows for creating actions for your GUI. Remember that actions are for things that can be initiated via different GUI elements. If you click the “New” button at the top, a dialog for creating a new action opens up. You can just type in “test” for the “Text” property and then press “OK”. The new action will now appear as actionTest in the list of actions. You can drag it and drop it on the File menu you created to make this action an entry in that menu.

Finally, the “Signal/Slot Editor” tab allows for connecting signals of the widgets and actions created to slots of other widgets. We will mainly connect signals with event handler functions in our own Python code rather than in QT Designer, but if some widgets’ signals should be directly connected to slots of other widgets this can already be done here.
You now know the main components of QT Designer and a bit about how to place and arrange widgets in a form. We cannot teach QT Designer in detail here but we will show you an example of creating a larger GUI in QT Designer as part of the following first walkthrough of this lesson. If you want to learn more, there exist quite a few videos explaining different aspects of how to use QT Designer on the web. For now, here is a short video (12:21min) that we recommend checking out to see a few more basic examples of the interactions we briefly described above before moving on to the walkthrough.
What is goin' on everybody?
Welcome to a tutorial covering the Qtdesigner. So, up until this point, we haven't really covered much in the way of layouts because we've been manually coding everything via pyqt and idol, so we haven't really covered layouts because probably the best way to do layouts is going to be via Qtdesigner. So, it's not so much programming here, as far as the layout is concerned, but this is going to save you tons of time. So it's pretty stupid not to use it, if you ask me.
So, if you have pyqt installed and you did the full installation like I was showing you guys, you should have the Qtdesigner. Now, when you first open up the Qtdesigner, you'll have this choice here - generally, you're going to choose main window or widget.
The main window is like a main window - it comes with the main menu and stuff - so that's kind of what we want most likely but- yeah, so we'll just choose that one. And then what you're given, once it pops up, is just a simple window to work with here. And, just to talk real briefly about how the Qtdesigner is actually laid out itself, on the left hand side here you've got all the widgets, right? So you've got some layout widgets, which we haven't talked about yet, but then a bunch of other stuff like spacers, and push buttons, and checkboxes, and calendar stuff, and labels here- just basically everything, right, that- that is a part of Qt. So, these are all of our options, and it's really as simple as click and drag - bam!: you've got a button. Bam!: you've got a checkbox. Want a horizontal spacer? You got it!
So it’s a nice al-la-cart menus here. And, I don't know… let's add a label, too, while we're at it.
Okay? So, you've got all this kind of stuff- and, so what it's allowing us to do is really just do the layout aspect. So, the functionality and the code of, you know, what happens when I push a button - we still have to handle that, but the layout we do with Qtdesigner, and this is really really great because, especially when we talk about layouts here in a moment, you'll see that, if you want to deal with those, it's going take so much longer to do it manually, especially if you change your mind.
So once you have like a window kind of set up, what you can do is- obviously, like- you can kind of- I mean, this is basically the window- but if you really want to see the window - right? - like your horizontal spacer isn't going to look like that. So, what you can do is you can come to Form, and then Preview - either Preview, which is control r, or you can Preview in, and you can preview, like, the basic styles that you have access to- so you can preview like these specific things like this, or you can just control r and preview it, you know, like this. So we have this window, and, if we resize this window, though, we'll see kind of the same problem that we had had initially- is that the window- the stuff within the window doesn't resize as it ought to. So, that's what we use layouts for. So, you can apply a layout to the entire window itself by just right-clicking somewhere in open space and then coming down to layout and just choose a layout.
So you got- let's do let's do a horizontal layout, so then it’ll just give us, like, columns; so this would be column 1, column 2, 3, and 4. So let's- this divider is basically worthless, so I’m going to delete it... at least I thought I was going to delete it- Get over here! I can't- I can't seem to- there- Oh my goodness- there we go. Okay, deleted it.
Okay, so, we've got those, and then another example here is- actually let's do a layout- let's break that initial layout, and let's give this a grid layout, actually. There we go - layout and grid. Okay? So then we can, like, move things all around and it kind of shows us the valid places that we could stuff stuff.
Now, the other nice thing is you can have the entire window as a grid layout, but then you can throw in another layout like, okay, we want one of the grid spots to be a vertical layout, right, and then we can kind of- well this one isn't going to let us change the size- but then we can, okay, throw in- let's throw in a push button in there, and then let's try to stuff something else in there - see if we get away with it. Yeah. So, as you can see, this is part of that grid layout that we just built, but, then, within that grid layer- layout, we have a vertical layout as well.
So now, though, let's do control r, and we can see here, now, we can resize this, and everything resizes with it, right? And, so, that's pretty nice. So, some of the other things that we might have a problem with is, like, for example, this says text label, and this is push button, and checkbox, and all this stuff. Well, to change that, it's pretty simple - you just double-click on it, and you can put whatever you want. So we'll put 'hello there,' and then ‘push me,’ and then ‘or me,’ and then, 'but not me’ - okay? - something like that, and 'check here.' That's good enough. So, then, on this- that's kind of like this, the stuff that we have on the left-hand side here.
But, now, looking on the right-hand side, we have Object Inspector, we've got a Property Editor, which I didn't mean to move, and then we have Resource Browser. Now, I don't really use Resource Browser - not really sure what its purpose is - but Object Inspector and Property Editor are pretty useful. So, the Object Enspector - this is like for your entire window - you know, what's going on here? You've got the main window, then you've got the central widget, which is this grid layout, you've got the stuff that is within the grid layout, and they've got this new vertical layout and the stuff that's contained within it - so that's kind of the structure of the application. Then, down here, you've got the Property Editor. Depending on what you select, will show up in this Property Editor. So we could click on this button, and we get- oh it's this 'push button'- and, mainly, these are just kind of the settings. You probably won't change these very- very often, but one thing you should definitely always change is the object name. So, the object name - here's 'push-button' - this is the object name, like, in your code, so this button is defined by 'push button.' This, one 'push-button three,' this one, 'push-button two'- that's not very useful, so, before we push this to python code, we definitely want to rename these. So, maybe this one would be, you know, 'but not mel’ right, to be kind of... going along with the name of the button itself, and then we could name this one, you know, ‘push me,’ and then this one could be ‘or me,’ right? Whoops - highlighted a little too much there. ‘or me.’ Okay? So you can do stuff like that. Also, if you ever wanted to change, like, the window's title, you can't- like, you can't really click on the window and it pop-up, but you can come over to the Object Inspector, click on main window, and then you come down here to window title, and you can change the window title. So, I don't know, 'Qt type' - that's what I’ll call it. So there's that. Also, if you want to add, like, a menu, you can totally do that - just double click there, start typing stuff, right? File, open, save, let's add a separator, bam, and then ‘exit.’ Okay? Instantly done. Right? That would have taken us, like, you know, I don't know, three or four minutes to do; we just did it, like, instantly.
And then here, luckily for us, we've got Action Open, this one says Action Save, this one's Action at- Exit, so this one actually makes a little more sense automatically - you don't have to change the name - but you can if you want. So there's that.
And then, obviously, if you wanted to add more items as you, kind of, do stuff here, right, if I added 'edit' here, it gives us a new option later, you know- So, as you add more to this menu bar, it just automatically adds stuff, you know? So, if you wanted to, you could. Now how do we actually get this to python code? So, if you're on windows and you go, say, Form, View Code, you might get this error. This is, like, a known error - it makes no sense to me why this error still is in existence, but it is. So, what we want to do, if that didn't work for you, is you can go File, Save As, and we can save this. I'm going to save it in this really deep directory, in testing, and we're going to call this pyqtdesigner, and it'll be a .ui file - that's just what it's being saved as. We'll go ahead and save that, no problem. So I have that file now - it's just right in here - and, what we want to do now is open up a console in there. So, open command window into there. So, make sure you're in the actual directory of that file, right? So that's where the file is - that's the path to this file. So, if you don't know how to do that, you can always hold shift, and right-click the directory, and you can open a command window there.
So, once you've done that, now we have to enter in some code to get this to convert. So, if you- if you can, you could sometimes get away with just doing py uic - x for executable, and then we can change- we can say pyqtdesigner.ui- that's what I saved it as- yeah, and then dash O for the output file, and we're just- we'll say pyqtdesigner.py, but I don't think this will end up working for me. But it might work for you - we'll try it. Right. So, it's probably gonna come up and say it's not recognized as a command. So now we need to reference that py.uic file - it's like a batch file - so now let's reference that. So, it would be c colon slash python 34, or whatever version you're using, and then lib/ site -packages / pyqt4, or 5, or 6, or whatever is at the time that you're watching this, /piyuic4, or 5, or whatever .bat and then - same thing as before – x for executable - if you don't use the x it won't, like, actually create a window, it'll just be a bunch of definitions - you can run it but, it's not going to do anything, and then we want to do this pyqtdesigner.ui, and then we want to do the -o, and then we'll do the output to pyqtdesigner.py.
Okay? So we'll do that, hit enter, and you should now have a new file there, right? It should be pyqtdesigner. We can open it- edit with idol. Here's all that code. Again, there's no real functionality to it - it's just the layout and just the ui only - but let's go ahead and run that. And,sure enough, here's our window. And that's that. So, you've got all the python code there, you did it in the designer, obviously this isn't really any advanced code, but, hey we built that in, like, 10 minutes, so- that would have taken us a lot longer than ten minutes to build all of that including- especially thinking about, like, the layouts that are involved here- and then, like, what happens when you're like, 'hmm, I want to change layouts' - well, that's a really- kind of a challenge, especially if you have, like, a lot of stuff inside your layouts - to kind of mentally go through what objects need to be moved to what place in your code - that's pretty hard. And, so, having the Qtdesigner there just- it makes it so much simpler. So, anyways, that's just a really quick introduction to Qtdesigner. Obviously there's a whole lot more to - it this was kind of a silly application, but, from here, all we really need to do is, you know, use connect to connect functions to these buttons, but we've already covered how to do that, so I’m not going to waste any time and do these simple connections to the buttons. But, hopefully you can see, now, how powerful just Qtdesigner is, because, really, as far as I know, there's no tk designer - but maybe I’m wrong. If I’m wrong, let me know. But Qtdesigner just makes things so much easier. So, anyways, that's it for this tutorial. If you have any questions or comments, go ahead and leave them below. Otherwise, as always, thanks for watching, thanks for all the support and subscriptions, and until next time.
Once you have created the form(s) for the GUI of your program and saved them as .ui file(s), you can translate them into Python code with the help of the pyuic5 tool, e.g. by running a command like the following from the command line using the tool directly with Python :
"C:\Users\<username>\AppData\Local\ESRI\conda\envs\arcgispro-py3-clone\python.exe" –m PyQt5.uic.pyuic mainwindow.ui –o mainwindow.py
or
"C:\Program Files\ArcGIS\Pro\bin\Python\envs\arcgispro-py3\python.exe" –m PyQt5.uic.pyuic mainwindow.ui –o mainwindow.py
, depending on where your default Python environment is located (don't forget to replace <username> with your actual user name in the first version and if you get an error with this command try typing it in, not copying/pasting). mainwindow.ui, here, is the name of the file produced with QT Designer, and what follows the -o is the name of the output file that should be produced with the Python version of the GUI. If you want, you can do this for your own .ui file now and have a quick look at the produced .py file and see whether or not you understand some of the things happening in it. We will demonstrate how to use the produced .py file to create the GUI from your Python code as part of the walkthrough in the next section.
2.7 Walkthrough: Building a GUI-based tool to create features from querying web services
In this walkthrough, our main goal is to demonstrate how to build a small software application with a reasonably complex GUI in Python with the help of PyQt5 and the QT Designer. The software is supposed to work as a stand-alone application but also as a script tool inside ArcGIS Pro. Furthermore, while part of its functionality will require arcpy, we also want it to provide some functionality if arcpy is not available. Therefore, this walkthrough will also show how one can check whether a Python script is run inside ArcGIS or not, and whether arcpy is available or not. Finally, since the software will query some geographic web services that return JSON code, the walkthrough will be a continuation of what we started in Section 2.3 where you learned about Python packages that support dealing with URLs and web requests as well as working with JSON code.
Note: Unfortunately there currently is an issue with the newest versions of ArcGIS Pro (version 2.8 and above) that will make the application from this walkthrough crash when it is run as a script tool inside ArcGIS. We have not yet been able to find a workaround for this issue that does not require re-designing the GUI of the app. The issue seems to be related to specific QT5 widgets (menu bar, status bar, etc.) used in the program. You will still be able to run the software as a stand-alone application though if you have one of these versions.
2.7.1 Overview of the software tool
The idea of the little software tool we are going to build is that sometimes you would like to be able to quickly create a feature class with points for certain places based on their names. Let’s say you want to produce a shapefile showing a few places in the city you are living in. What you could do is open a basemap in ArcGIS or some other GIS software and then digitize point features for these particular locations. Or you could look up the coordinates of the places in some external application such as Google Maps and then create new point features based on these coordinates manually or by exporting the coordinates in a format that can be imported by your GIS. Both these options are relatively time consuming and require several steps. We therefore want to exploit the fact that there exist many web services that allow for querying for geographic places based on name, type, and other properties, and getting back the coordinates. The two web services we are going to work with are the Nominatim query interface to OpenStreetMaps (OSM) and the place query interface of the online geographic gazetteer GeoNames. We will discuss these services in more detail below. Our tool should allow us to enter a query term such as a place name, pick a query service and set some additional query options, and then run the query to get a list of candidate places with coordinates. We can then look at the result list and pick one or more candidates from the list and either
- add them to a layer currently open in ArcGIS Pro (assuming that the software is run as a script tool inside ArcGIS),
- add them to a shapefile on disk, or
- add the result to a CSV text file (basically an alternative that still works even when arcpy is not available).
Figure 2.20 and the video below show the GUI of the software and further illustrate how the tool works. The use case in the shown example is that we use the tool to populate a layer open in ArcGIS Pro with some of the main sightseeing locations in Paris including the Eiffel Tower, the Louvre, etc.

Please watch the following video, Location from Web Service Tool Overview (5:25min):
Hello. In this video, I'm quickly going to show you, or demonstrate to you, the tool that we are going to build in this walkthrough, the tools for querying different surfaces on the map to create point features, and then add them either to an open layer in ArcGIS, to a shape file on disk, or just to a CSV text file.
And you can see the tool here on the right on the screen, I'm currently running it inside of ArcGIS Pro, and I've already used it to add a few places for different attractions in Paris. And, um, so the GUI is structured into four different parts.
We have the part at the top, where the user can enter a query to a name of a place. Then we have an area where he can choose between different web services to query. Then an area where he will see the results of this query. And then an area where he can add the features he wants to from some data source.
So let's demonstrate this by querying for Eiffel Tower. And I'm going to use the Nominatim query interface to OpenStreetMap. I'm not going to use any of the options for this first query-- just pick the Run Query button. And you see that then the result lists here is updated based on what you get back from this Nominatim web service.
And we have this nice little map, which appear on the right, that shows us the different results on the map, which can also be very handy. Obviously, we are interested in the one here that is located in Paris.
So we can actually click on that one, and then see, OK, this is the one called Eiffel Tower. So, basically the third one here from our list-- so what I can do is use the buttons below the results to clear the selection, and then to say, I just want this entry here. And, here at the bottom, you can see that I'm currently on the tab for adding the features to a layer in ArcGIS Pro. And I've selected the Paris example layer that I set up for this project, and the names of the features should be stored in the field called name of that layer.
So I would just click the Add button now to add this one feature for the Eiffel Tower to this data set. And actually, for having it show up on the map, I need to zoom in and out a bit so the map gets updated. And then you see here now that this new point has been added.
And, just to show you the rest of the interface-- we have another tab here for instead of Nominatim querying the geo name step service, with different options for that. And we have also the tab that allows us for directly entering features with name, latitude, and longitude. So let's say I have created this map for a friend, and now I also want to add my home as a place to that map. I could enter it here, my home, and then I would have to enter some coordinates. So let's hope that I'm going to find something that's at least somewhere in the area of Paris.
It's still-- the button has to run code run query, but in principle it just creates a single point feature from what I entered here, that is shown here on the list. Looks like I actually at least - it's somewhere in Paris. And I can now also add that one to the layer here.
So I'm not sure which one is in the place, I think it's the one up here-- that one here. So that's now-- I can click on it, yes, that's the place, my home. So you see now that the result has indeed been added to the layer.
And just to look at the last steps here-- so the shape file tab would allow us to, instead, add the features a shape file on disk. And there's also the option to create a new shape file for that purpose that opens a separate dialog box, for which you also will have to create the graphical user interface.
And the last one is the CSV tab, where it just can select a file to which the features will be added as, basically, name, latitude, longitude columns. And the buttons with the three dots on it are always for opening a file a dialogue for selecting a particular shape file or CSV file.
OK, so much for this overview, and now we will move on to actually create the graphical user interface for this tool.
The GUI is organized into four main parts:
- The text field for entering the query term. We are currently querying for "Eiffel tower".
- The section where you pick a web query service and set some additional options. The figure shows the interface for the Nominatim OSM service. In addition to Nominatim and GeoNames, we also have a “Direct Input” tab for adding places directly by providing a name and lat/lon coordinates.
- Since the query has already been run, the "Results" section shows different candidate toponyms returned by the Nominatim service for our query. The third one looks like the result we want, so we selected just that one. The selection can be changed with the help of the buttons below or by directly checking or unchecking the checkboxes. Next to the result list is a browser widget that is used to display a Leaflet based web map of the results.
- The final section is for adding the selected features to some dataset. The figure shows the tab for adding them to a currently open layer in ArcGIS Pro.
We can run as many queries as we wish with the tool and collect the results we want to keep in one of the possible output options. While we will only present a basic version of the tool in this walkthrough supporting two different query interfaces and direct input, the tool could easily be extended to provide access to other web portals so that it can be used for running queries to, for instance, get locations of all Starbucks located in a particular city or create locations from a list of addresses.
Before we continue with exploring the GUI and code of the application, let us talk about the two web services we are going to use:
Nominatim – Surely, you know about OpenStreetMaps (OSM) and how it collects geographic data from volunteers all over the world to create a detailed map of the world. OSM data is freely available and can be directly exported from the OSM web site. In addition, there exist quite a few web services built around the OSM data, some of them created with the purpose of allowing for querying the data to only obtain information about particular features in the data. One such example is the Nominatim web service provided by OSM themselves. The website for Nominatim Open Street Maps provides an easy to use interface to the Nominatim query engine. You can type in a search term at the top and then will get to see a list of results displayed on the left side of the page and an OSM based map on the right that shows the currently selected entity from the result list. Give it a try, for instance by running a query for “Eiffel tower, France”.
Note: With some recent changes, it seems Nominatim has become much more restrictive and will often only return a single result rather than multiple options. If you leave out the 'France' in the query, the only result returned will actually not be the Eiffel Tower in Paris. However, you will still get multiple results if you, for instance, enter 'Washington' as the query string. Due to these changes, the results you will get when using Nominatim in the Locations from Web Services Tool will partially deviate from what is shown in the figures and videos in this section (for instance, the list of options shown in Figure 2.25 when only querying for 'Eiffel tower' without country name.
Nominatim provides an HTTP based web API that can be used for running queries from your own code and getting the results back, for instance as JSON or XML data. The web API is explained on this wiki page here. Query terms and additional parameters are encoded in a URL that has the general format:
https://nominatim.openstreetmap.org/search
where parameters are specified as <parameter name>=<parameter value> pairs and multiple parameters have to be separated by an & symbol. The parameter name for the query string is simply 'q' (so q=...). To run the query, the client sends an HTTP GET request with this URL to the Nominatim server who processes the query and parameters, derives the result, and sends back the results to the client. The format parameter controls how the result is presented and encoded. Without specifying that parameter, you will get the kind of HTML page that you already saw above with the result list and map. When using format=json as we will do in the following, we get the result as a list of entities encoded as JSON. Here is an example query URL, querying for “Eiffel tower, France” again, that you can test out simply by clicking on the link to open the URL in your browser:
https://nominatim.openstreetmap.org/search?q=Eiffel%20tower%2c%20France&format=json
Have a look at the result shown in your browser. As we explained at the beginning of the lesson, JSON uses [...] to denote lists of entities
[ <entity1, entity2>, ... ]
where each entity is described by its properties like in a Python dictionary:
{<property1>: <value>, <property2>: <value>, ...}
Due to the changes, we mentioned above, the result will be a list with just a single entity, looking like this ...
[{
    "place_id":115316817,
    "licence":"Data © OpenStreetMap contributors, ODbL 1.0. http://osm.org/copyright",
    "osm_type":"way",
    "osm_id":5013364,
    "lat":"48.8582599",
    "lon":"2.2945006358633115",
    "class":"man_made",
    "type":"tower",
    "place_rank":30,
    "importance":0.5868325701744196,
    "addresstype":"man_made",
    "name":"Eiffel Tower",
    "display_name":"Eiffel Tower, 5, Avenue Anatole France, Quartier du Gros-Caillou, 7th Arrondissement, Paris, Ile-de-France, Metropolitan France, 75007, France",
    "boundingbox":["48.8574753","48.8590453","2.2933119","2.2956897"]
}]
We can see that the most important properties for us will be the ‘display_name’ property and the ‘lat’ and ‘lon’ properties (appearing in bold above) in order to create point features and add them to an existing data set with our tool. Feel free to compare this result to what you get when querying for 'Washington' where you will get a list of multiple results.
The following query uses a few more parameters to query for places called London in Canada (countrycodes=CA) and asking for only a single entity be returned (limit=1).
https://nominatim.openstreetmap.org/search?q=London&format=json&countrycodes=CA&limit=1
If you look at the result, you will see that it lists London in Ontario as the only result. Without using the ‘countrycodes’ parameter the result would have been London in the UK because Nominatim uses a ranking scheme to order entities by likelihood/prominence. Without the 'limit' parameter, we would get a list of multiple options in the JSON result. ‘format’, ‘countrycodes’ and ‘limit’ will be the only parameters we will be using in our tool but please have a look at the other parameters and examples given on the Nominatim wiki page to get an idea of what other kinds of queries could be implemented.
GeoNames – You have already seen the Nominatim examples, so we can keep the section about GeoNames a bit shorter, since the URLs for running queries are somewhat similar. GeoNames is essentially an online geographic gazetteer, so a directory of geographic place names with associated information including coordinates. The main page can be used to type in queries directly but we will be using their REST web API that is documented here. Instead of a parameter for specifying the output format, the API uses a special URL for running queries that are replied to using JSON, as in the following example:
http://api.geonames.org/searchJSON?name=Springfield&maxRows=10&username=demo
Please note that a parameter (name=) is used to specify the query term. In addition, GeoNames requires a user name to be provided with the ‘username’ parameter. In case you tried out the link above, you probably got the reply that the daily request limit for user ‘demo’ has been reached. So you will have to create your own account at http://www.geonames.org/login and then use that user name instead of ‘demo’ in the query. The JSON sent back by GeoNames as the result will start like this:
{
    "totalResultsCount": 3308,
    "geonames": [
        {
            "adminCode1": "IL",
            "lng": "-89.64371",
            "geonameId": 4250542,
            "toponymName": "Springfield",
            "countryId": "6252001",
            "fcl": "P",
            "population": 116565,
            "countryCode": "US",
            "name": "Springfield",
            "fclName": "city, village,...",
            "adminCodes1": {
                "ISO3166_2": "IL"
            },
            "countryName": "United States",
            "fcodeName": "seat of a first-order administrative division",
            "adminName1": "Illinois",
            "lat": "39.80172",
            "fcode": "PPLA"
        },
        {
            "adminCode1": "MO",
            "lng": "-93.29824",
            "geonameId": 4409896,
            "toponymName": "Springfield",
            "countryId": "6252001",
            "fcl": "P",
            "population": 166810,
            "countryCode": "US",
            "name": "Springfield",
            "fclName": "city, village,...",
            "adminCodes1": {
                "ISO3166_2": "MO"
            },
            "countryName": "United States",
            "fcodeName": "seat of a second-order administrative division",
            "adminName1": "Missouri",
            "lat": "37.21533",
            "fcode": "PPLA2"
        }
    ]
}
Here the list of entities is stored under the property called ‘geonames’. Each entity in the list has the properties ‘toponymName’ with the entity name, ‘lng’ with the longitude coordinate, and ‘lat’ with the latitude coordinate. Query parameters we will be using in addition to ‘name’ and ‘username’ are ‘maxRows’ to determine the number of results sent back, ‘country’ to restrict the search to a single country, and ‘featureClass’ to look only for features of a particular type (codes A,H,L,P,R,S,T,U,V of the GeoNames feature class codes defined here).
2.7.2 Creating the GUI in QT Designer
The GUI of our software application is not too complex but still uses many of the most common GUI elements such as a toolbar with a tool button, normal push buttons, group boxes, tabs, labels, text input fields, checkboxes, combo boxes, list views, and a status bar. You already got to know most of these in Section 2.6 but there are also some new ones. The GUI consists of two parts, the GUI for the main window and the GUI for the dialog box that is shown when the user clicks on the “Create new shapefile…” button. Therefore, we will be producing two different .ui files with QT Designer called gui_main.ui and gui_newshapefile.ui. The GUI of the main window uses a vertical layout to organize the different elements into four different rows as shown in the figure below.
Each of the rows is formed by a QGroupBox widget and then other widgets are arranged hierarchically within these group boxes using a combination of grid and horizontal layouts. The tool doesn’t have a menu bar but a toolbar at the top with a button to exit the program and a status bar at the bottom. When creating the GUI in QT Designer, it will be important to name the widgets we need to refer to from our main code as indicated by the orange labels in the two figures below. As we already pointed out, the object names given to the widgets in QT Designer will be the names of the variables used for storing the widgets when the .ui file is compiled into a .py file.


The series of videos linked below shows the process of creating the GUI in QT Designer. A zip file with the resulting .ui files is available for download here. We recommend that you work along with the video, pausing it as needed, to create the GUI yourself to get some more practice with QT Designer. The downloadable .ui files are mainly intended as a fallback position in case you experience any difficulties while creating the GUI or later on when compiling the .ui files and using the produced Python code. If you cannot replicate what is shown in the video, please ask for help on the discussion forums.
Create the GUI along with this series of videos [~45 min of video materials]
At this point, you either have saved your own two .ui files or, if you ran into any issues, will continue with these files downloaded from the link posted above. We now need to compile the files into Python code with pyuic5. We do this by running the ArcGIS Pro python.exe from the Windows command line with the pyuic module. The python.exe file is located in the folder “C:\Users \<username>\AppData\Local\ESRI\conda\envs\arcgispro-py3-clone\" (unless the ArcGIS Pro Python environment you are using is located in a different folder). So open a command shell, navigate to the folder containing the .ui files and then run the following two commands (again picking the correct version depending on where your default Python environment is installed and replacing <username> as needed):
"C:\Users\<username>\AppData\Local\ESRI\conda\envs\arcgispro-py3-clone\python.exe" –m PyQt5.uic.pyuic gui_main.ui –o gui_main.py
"C:\Program Files\ArcGIS\Pro\bin\Python\envs\arcgispro-py3\python.exe" –m PyQt5.uic.pyuic gui_main.ui –o gui_main.py
and
"C:\Users\<username>\AppData\Local\ESRI\conda\envs\arcgispro-py3-clone\python.exe" –m PyQt5.uic.pyuic gui_newshapefile.ui –o gui_newshapefile.py
"C:\Program Files\ArcGIS\Pro\bin\Python\envs\arcgispro-py3\python.exe" –m PyQt5.uic.pyuic gui_newshapefile.ui –o gui_newshapefile.py

The parameters given to pyuic5 are the name of the input .ui file and then –o followed by the name of the output file. You should now have the two files gui_main.py and gui_newshapefile.py in the project folder. Let us have a quick look at the produced code. Open the produced file gui_main.py in your preferred Python IDE and see whether you recognize and understand how the different elements are created and how their properties are set. Without going into the details, the code defines a class Ui_MainWindow with a method setupUi(…). The parameter MainWindow is for passing a QMainWindow widget to the method. The rest of the code of the method then either...
- changes properties of MainWindow,
- creates new widgets and layouts storing them as attributes of the Ui_MainWindow object and sets their properties, or
- adds widgets to MainWindow or to other widgets to create the hierarchical organization of the widgets.
class Ui_MainWindow(object):

    def setupUi(self, MainWindow):
        …
        MainWindow.resize(605, 685)   # changes property of main window widget
        self.centralwidget = QtWidgets.QWidget(MainWindow) # creates child widgets and stores them in attributes of the Ui_MainWindow object
        …
        MainWindow.setCentralWidget(self.centralwidget) # adds widgets to main window
        …
This all means that we can create a new QMainWindow widget in our code with ...
mainWindow = QMainWindow()
... create an object of the UI_MainWindow class with
ui = gui_main.Ui_MainWindow()
... and then create the GUI for the main window by calling ui.setupUi(…) with mainWindow as the parameter:
ui.setupUi(mainWindow)
Whenever we need to access a widget created by setupUi(…), we can do so by using the expression
ui.<object name of the widget>
where the object name is the name we gave the widget in QT Designer, e.g.
ui.queryTermLE
for the QLineEdit widget we created for entering the query term.
2.7.3 Main code of the tool and how it works
Now we are going to develop the main code for our tool that imports the gui_main.py and gui_newshapefile.py files, sets up the application, and connects the different GUI elements with event handler functions and functions that realize the actual functionality of the tool. We will organize the code into several modules. In particular, we will keep the functions that realize the main functionality, such as querying the different web portals, creating a new shapefile, etc. in a separate Python script file called core_functions.py . These functions are completely independent of the GUI of our tool and the few global variables we will need, so we might want to use them in other projects. Separating the project cleanly into GUI dependent and GUI independent code fosters reusability of the GUI independent code. Overall, the project will consist of the following Python files:
- gui_main.py – compiled version of gui_main.ui for setting up the GUI of the main window,
- gui_newshapefile.py – compiled version of gui_newshapefile.ui for setting up the GUI of the dialog box for creating a new shapefile,
- core_functions.py – contains definitions of functions for main functionality that are completely independent of GUI and global variables
- main.py – contains the event handler functions and the code for wiring up the GUI as well as setting up and running the application
In the following, we will focus on the code from main.py but we will start with a brief look at core_functions.py, so please download the file core_functions.py and open it so that you can read the code for the different functions. Most of the functions defined in the script should be rather easy to understand from the comments in the code and from your experience with using arcpy to work with shapefiles. Here is an overview of the functions with a few additional explanations:
- queryNominatim(query, limit=10, countryCodes=''): The purpose of this function is to query the Nominatim query interface of OSM for a query string and parameters for the limit of results returned and country code for the country to search in as discussed in Section 2.7.1. The code should be easy to understand: urllib.parse(…) is used to encode the query string to be used as part of a URL, before the final query URL is put together. The get(…) method of the requests package is used to run the actual query and the returned result is translated into JSON before being returned. Since no error handling is done in this function, we will have to deal with potential exceptions raised within the function in the code that calls this function.
- queryGeonames(query, maxRows = 10, username='', country='', featureClass=''): This function does the same as queryNominatim(...) but for GeoNames and for a different set of query parameters. Since GeoNames returns JSON code with the list of candidate features stored under the attribute 'geonames', we return json['geonames'] at the end.
- getStringFieldsForDescribeObject(desc): This is the first of a few auxiliary functions for getting information from shapefiles and layers. An arcpy.Describe object of a data set needs to be passed to it and it then returns a list of all editable string fields of that layer.
- getValidFieldsForShapefile(fileName): This function is used to get a list of editable string fields for a shapefile whose name is provided as a parameter. It relies on getStringFieldsForDescribeObject(…) to do most of the work but before that checks that the shapefile exists and is a Point vector data set. If not, it will return an empty list.
- createPointWGS1984Shapefile(fileName, fieldName): This function creates a new Point shapefile with the name provided as parameter, using WGS 1984 coordinates, and with a single additional string field whose name is also provided as a parameter.
- getPointLayersFromArcGIS(): This function is for getting a list of Layer objects for the layers currently open in ArcGIS Pro but only including Point layers.
- importArcpyIfAvailable(): This function returns True if arcpy is available for import, else False. It attempts to import arcpy within a try-except construct so that, if the operation fails, the resulting exception is caught and False is returned.
- runningAsScriptTool(): This function returns True if the program is run as a script tool inside ArcGIS, else False. This is accomplished by calling arcpy.mp.ArcGISProject("CURRENT") and catching the resulting exception if this operation fails, meaning the program is run as a standalone program outside of ArcGIS.
- webMapFromDictionaryList(features): This function produces and returns the HTML code for displaying the web map as part of the GUI. It gets the features that should be displayed on the map as parameter in the form of a list of dictionaries with name, lat, and lon attributes.
Now that you know the functions we have available for realizing the different operations that we will need, let’s develop the code for main.py together. Open a new file main.py in your IDE, then follow the steps listed on the next few pages.
2.7.3.1: Step 1
We start by importing the different packages of the Python standard library and PyQt5 that we will need in this project. In addition, we import the gui_main.py and gui_newshapefile.py files so that the Ui_MainWindow and Ui_Dialog classes defined in them are available for creating the GUIs of the main window and dialog for creating a new shapefile, and of course the core_functions module. We are not importing arcpy here because we want the tool to be runnable even when arcpy is not available and that is why we defined the auxiliary function for testing its availability in core_functions.py. In addition, we are including some comments to define sections within the script for different purposes. We will fill in the code for these sections step-by-step in the following steps. At the very end, we already have the by-now-familiar code for showing the main window and starting the event processing loop of our application (even though we are not creating the application and main window objects yet).
import sys, csv

from PyQt5.QtWidgets import QApplication, QMainWindow, QStyle, QFileDialog, QDialog, QMessageBox, QSizePolicy
from PyQt5.QtGui import QStandardItemModel, QStandardItem,  QDoubleValidator, QIntValidator
from PyQt5.QtCore import QVariant
from PyQt5.Qt import Qt

try:
    from PyQt5.QtWebEngineWidgets import QWebEngineView as WebMapWidget
except:
    from PyQt5.QtWebKitWidgets import QWebView as WebMapWidget

import gui_main
import gui_newshapefile
import core_functions

# =======================================
# GUI event handler and related functions
# =======================================

#==========================================
# create app and main window + dialog GUI
# =========================================

#==========================================
# connect signals
#==========================================

#==================================
# initialize global variables
#==================================

#============================================
# test availability and if run as script tool
#============================================

#=======================================
# run app
#=======================================
mainWindow.show()
sys.exit(app.exec_())
You may be wondering what is happening in lines 8 to 10. The reason for the try-except construct there is the web view widget we are using in the "Results" part of the GUI to display a Leaflet-based web map of the results. There have been some changes with regard to the web view widget over the last versions of QT5 with the old class QWebView becoming deprecated and a new class QWebEngineView being added to replace it. The purpose of the code is to use QWebEngineView if it is available (meaning the code is run with a newer version of PyQt5) and otherwise fall back to using QWebView. The alias WebMapWidget is used to make sure that in both cases the imported class is available under the same name.
2.7.3.2: Step 2
In the next step, we add the code for creating the QApplication and the QMainWindow and QDialog objects for the main window and the dialog for creating a new shapefile with their respective GUIs. For this, please paste the following code into your script directly under the comment “# create app and main window + dialog GUI”:
app = QApplication(sys.argv)

# set up main window
mainWindow = QMainWindow()
ui = gui_main.Ui_MainWindow()
ui.setupUi(mainWindow)

ui.actionExit.setIcon(app.style().standardIcon(QStyle.SP_DialogCancelButton))
ui.layerRefreshTB.setIcon(app.style().standardIcon(QStyle.SP_BrowserReload))

ui.directInputLatLE.setValidator(QDoubleValidator())
ui.directInputLonLE.setValidator(QDoubleValidator())
ui.nominatimLimitLE.setValidator(QIntValidator())
ui.geonamesLimitLE.setValidator(QIntValidator())

mapWV = WebMapWidget()
mapWV.page().profile().setHttpAcceptLanguage("en-US")
mapWV.setHtml(core_functions.webMapFromDictionaryList([]))
ui.resultsListAndMapHBL.addWidget(mapWV)
mapWV.setFixedSize(300,200)
mapWV.setSizePolicy(QSizePolicy(QSizePolicy.Fixed,QSizePolicy.Fixed))

# set up new shapefile dialog
createShapefileDialog = QDialog(mainWindow)
createShapefileDialog_ui = gui_newshapefile.Ui_Dialog()
createShapefileDialog_ui.setupUi(createShapefileDialog)
In lines 4 to 6, we are creating the mainWindow object and then its GUI by calling the ui.SetupUi(…) method of an object we created from the Ui_MainWindow class defined in gui_main.py. The same happens in lines 23 to 25 for the dialog box for creating a new shapefile. The rest of the code is for creating some additional elements or setting some properties of GUI elements that we couldn’t take care of in QT Designer:
- Lines 8 and 9: Here we set the icons for the exit and refresh tool buttons in the GUI taking icons from the QT standard icon set.
- Lines 11 to 14: What happens here is something that we did not discuss before. QT provides some way to set up so-called Validator objects for determining what the user is allowed to enter into a line edit widget. We use QDoubleValidator and QIntValidator objects to restrict the input for Latitude and Longitude widgets of the “Direct Input” tab to floating point numbers and for the Limit widgets of the Nominatim and GeoNames query tabs to integer numbers, respectively.
- Line 16 to 20 are for creating the web view widget next to the list view widget in the third row of our main window layout. Remember how we explained in the previous section that we are defining the name WebMapWidget as an alias for the web widget that is available in the version of PyQt5 that is being used. In QT Designer, we created a QHBoxLayout for this row which is now accessible in ui.resultsListAndMapHBL, so we add the new widget to that layout and make some changes to its layout related attributes to give the widget a constant size that matches the size of the web map produced by the function webMapFromDictionaryList(…) from the core_functions.py module.
- At this point, you can actually run the code and it should already produce the desired GUI for the main window. You just won’t be able to do much with it, since we have not defined any event handlers yet.
2.7.3.3: Step 3
We now add some code to initialize some global variables that we will need. Please add the following code directly under the comment “# initialize global variables”:
# dictionary mapping tabs from services tab widget to event handler functions
queryHandler = { ui.nominatimTab: runNominatimQuery, ui.geonamesTab: runGeonamesQuery, ui.directInputTab: runDirectInput }

# dictionary mapping tabs from add feature tab widget to event handler functions
addFeaturesHandler = { ui.layerTab: addFeaturesToLayer, ui.shapefileTab: addFeaturesToShapefile, ui.csvTab: addFeaturesToCSV }

result = []                     # global variable for storing query results as list of dictionaries
arcValidLayers= {}              # dictionary mapping layer names to layer objects

arcpyAvailable = False          # indicates whether is available for import
runningAsScriptTool = False     # indicates whether script is run as script tool inside ArcGIS
The first two variables defined, queryHandler and addFeaturesHandler, are dictionaries that contain the information of which event handler functions should be called when the “Run query” button and “Add features” button are clicked, respectively, depending on which of the tabs of the two different tab widgets are currently selected. Line 2, for instance, says that if currently the tab ui.nominatimTab is open in the Services section, then the function runNominatimQuery(…) should be called. So far we have not defined that function yet, hence, you will not be able to run the program at the moment but it shows you that functions in Python are treated like other kinds of objects, meaning they can, for instance, be stored in a dictionary. You will hear more about this in Lesson 3.
The other global variables we define in this piece of code are for keeping track of the results currently displayed in the Results list view widget of our GUI, of the currently open Point layers in ArcGIS when being run as a script tool, of whether the arcpy module is available, and of whether the program is being run as a script tool or not. We will add code to initialize the last two of these variables correctly in a moment
2.7.3.4: Step 4
To now initialize the variables arcpyAvailable and runningAsScriptTool correctly and potentially disable some GUI elements, please add the following code directly under the comment “# test availability and if run as script tool”:
arcpyAvailable = core_functions.importArcpyIfAvailable()

if not arcpyAvailable:
    ui.addFeaturesTW.setCurrentWidget(ui.csvTab)
    ui.addFeaturesTW.setTabEnabled(ui.addFeaturesTW.indexOf(ui.shapefileTab),False)
    ui.addFeaturesTW.setTabEnabled(ui.addFeaturesTW.indexOf(ui.layerTab),False)
    ui.statusbar.showMessage('arcpy not available. Adding to shapefiles and layers has been disabled.')
else:
    import arcpy
    if core_functions.runningAsScriptTool():
        runningAsScriptTool = True
        updateLayers()
    else:
        ui.addFeaturesTW.setTabEnabled(ui.addFeaturesTW.indexOf(ui.layerTab),False)
        ui.statusbar.showMessage(ui.statusbar.currentMessage() + 'Not running as a script tool. Adding to layer has been disabled.')
What happens here is that we first use importArcpyIfAvailable() from the core_functions module to check whether we can import arcpy. If this is not the case, we make the “CSV” tab the current and only selectable tab from the Add Features tab widget by disabling the “Shapefile” and “Layer” tabs. In the else-part (so if arcpy is available), we further use the runningAsScriptTool() function to check if the program is being run as a script tool inside ArcGIS. If not, we just disable the “Layer” tab and make the “Shapefile” tab the currently selected one. In addition, some warning message in the statusbar is produced if either the “Layer” or both the “Layer” and “Shapefile” tabs had to be disabled.
2.7.3.5: Step 5
Time to get back to the GUI and implement the required event handler functions for the different GUI elements, in particular the different buttons. This will be quite a bit of code, so we will go through the event handler functions individually. Please add each function in the order they are listed below to the section labeled “# GUI event handler and related functions”:
# query and direct input functions

def runQuery():
    """run one of the different query services based on which tab is currently open"""
    queryString = ui.queryTermLE.text()
    activeTab = ui.queryServicesTW.currentWidget()
    queryHandler[activeTab](queryString)   # call a function from the dictionary in queryHandler
This is the event handler function for when the “Run query” button is clicked. We already mentioned the global variable queryHandler that maps tab widgets to functions. So we here first get the text the user entered into the queryTermLE widget, then get the currently selected tab from the queryServicesTW tab widget, and finally in the last line we call the corresponding function for querying Nominatim, GeoNames, or providing direct input. These functions still need to be defined.
def setListViewFromResult(r):
    """populate list view with checkable entries created from result list in r"""
    m = QStandardItemModel()
    for item in r:
        item = QStandardItem(item['name'] + ' ('+item['lat'] + ',' + item['lon'] + ')')
        item.setFlags(Qt.ItemIsUserCheckable | Qt.ItemIsEnabled)
        item.setData(QVariant(Qt.Checked), Qt.CheckStateRole)
        m.appendRow(item)
    ui.resultsLV.setModel(m)
setListViewFromResult(…) is an auxiliary function for populating the resultsLV list view widget with the result from a query or a direct input. It will be called from the functions for querying the different web services or providing direct input that will be defined next. The given parameter needs to contain a list of dictionaries with name, lat, and lon properties that each represent one item from the result. The for-loop goes through these items and creates list items for the QStandardItemModel from them. Finally, the resulting model is used as the list model for the resultsLV widget.
def runNominatimQuery(query):
    """query nominatim and update list view and web map with results"""
    ui.statusbar.showMessage('Querying Nominatim... please wait!')

    country = ui.nominatimCountryCodeLE.text() if ui.nominatimCountryCodeCB.isChecked() else ''
    limit = ui.nominatimLimitLE.text()

    try:
        items = core_functions.queryNominatim(query, limit, country) # run query
        # create result list from JSON response and store in global variable result
        global result
        result = [(lambda x: {'name': x['display_name'],'lat': x['lat'], 'lon': x['lon']})(i) for i in items]
        # update list view and map with results
        setListViewFromResult(result)
        mapWV.setHtml(core_functions.webMapFromDictionaryList(result))
        ui.statusbar.showMessage('Querying done, ' + str(len(result)) + ' results returned!')
    except Exception as e:
        QMessageBox.information(mainWindow, 'Operation failed', 'Querying Nominatim failed with '+ str(e.__class__) + ': ' + str(e), QMessageBox.Ok )
        ui.statusbar.clearMessage()
This is the function that will be called from function runQuery() defined above when the currently selected “Service” tab is the Nominatim tab. It gathers the required information from the line edit widgets on the Nominatim query tab, taking into account the status of the corresponding checkboxes for the optional elements (using the "... if ... else ..." ternary operator). Then it calls the queryNominatim(…) function from the core_functions module to perform the actual querying (line 9) and translates the returned JSON list into a result list of dictionaries with name, lat, and lon properties that will be stored in the global variable result. Note that we are using list comprehension here to realize this translation of one list into another. The resultLV list view and mapWV web map widget will then be updated accordingly. This happens inside a try-except block to catch exceptions when something goes wrong with querying the web service or interpreting the results. Statusbar messages are used to keep the user informed about the progress and a message box is shown if an exceptions occurs to inform the user.
def runGeonamesQuery(query):
    """query geonames and update list view and web map with results"""
    ui.statusbar.showMessage('Querying GeoNames... please wait!')

    username = ui.geonamesUsernameLE.text()
    country = ui.geonamesCountryCodeLE.text() if ui.geonamesCountryCodeCB.isChecked() else ''
    fclass = ui.geonamesFeatureClassLE.text() if ui.geonamesFeatureClassCB.isChecked() else ''
    limit = ui.geonamesLimitLE.text()

    try:
        items = core_functions.queryGeonames(query, limit, username, country, fclass ) # run query
        # create result list from JSON response and store in global variable result
        global result
        result  = [(lambda x: {'name': x['toponymName'],'lat': x['lat'], 'lon': x['lng']})(i) for i in items]
        # update list view and map with results
        setListViewFromResult(result)
        mapWV.setHtml(core_functions.webMapFromDictionaryList(result))
        ui.statusbar.showMessage('Querying done, ' + str(len(result)) + ' results returned!')
    except Exception as e:
        QMessageBox.information(mainWindow, 'Operation failed', 'Querying GeoNames failed with '+ str(e.__class__) + ': ' + str(e), QMessageBox.Ok)
        ui.statusbar.clearMessage()
This function that will be called from runQuery() if the currently selected “Service” tab is the GeoNames tab works exactly like the previous function for Nominatim, just the query parameters extracted in lines 5 to 8 are different and the translation into a result list looks a little bit different because GeoNames uses other property names ("toponymName" instead of "display_name" and "lng" instead of "lon").
def runDirectInput(query):
    """create single feature and update list view and web map with results"""
    name = ui.directInputNameLE.text()
    lon = ui.directInputLonLE.text()
    lat = ui.directInputLatLE.text()

    # create result list with single feature and store in global variable result
    global result
    result = [{ 'name': name, 'lat': lat, 'lon': lon }]
    # update list view and map with results
    setListViewFromResult(result)
    mapWV.setHtml(core_functions.webMapFromDictionaryList(result))
    ui.statusbar.showMessage('Direct input has been added to results list!')
This function will be called from runQuery() if the currently selected “Service” tab is the Direct Input tab. Again, we are collecting the relevant information from the input widgets (line 3 to 5) but here we directly produce the result consisting of just a single item (line 9). The rest works in the same way as in the previous two functions.
These were the functions required for the query section of our tool. So we can now move on to the Results section where we just need the three event handler functions for the three buttons located below the list view widget.
# list view selection functions

def selectAll():
    """select all items of the list view widget"""
    for i in range(ui.resultsLV.model().rowCount()):
        ui.resultsLV.model().item(i).setCheckState(Qt.Checked)

def clearSelection():
    """deselect all items of the list view widget"""
    for i in range(ui.resultsLV.model().rowCount()):
        ui.resultsLV.model().item(i).setCheckState(Qt.Unchecked)

def invertSelection():
    """invert current selection of the list view widget"""
    for i in range(ui.resultsLV.model().rowCount()):
        currentValue = ui.resultsLV.model().item(i).checkState()
        ui.resultsLV.model().item(i).setCheckState(Qt.Checked if currentValue == Qt.Unchecked else Qt.Unchecked)
These three functions all work very similarly: We go through all items in the list model underlying the resultsLV list view widget. In selectAll(), the check state of each item is set to “Checked”, while in clearSelection() it is set to “Unchecked” for each item. In invertSelection(), we take the item’s current state and either change it from “Checked” to “Unchecked” or vice versa (using the ternary "... if ... else ..." operator once more).
# adding features functions

def addFeatures():
    """run one of the different functions for adding features based on which tab is currently open"""
    activeTab = ui.addFeaturesTW.currentWidget()
    addFeaturesHandler[activeTab]() # call a function from the dictionary in addFeatureHandler
We have now arrived at the last row of our main window graphical interface for adding the selected result features to a layer, shapefile, or csv file. The addFeatures() function corresponds to the runQuery() function from the beginning in that it invokes the right function depending on which tab of the addFeaturesTW tab widget is currently selected. This is based on the global variable addFeaturesHandler that map tabs to functions.
def updateShapefileFieldCB():
    """update shapefileFieldCB combo box with field names based on shapefile name"""
    ui.shapefileFieldCB.clear()
    fileName = ui.shapefileAddLE.text()
    ui.shapefileFieldCB.addItems(core_functions.getValidFieldsForShapefile(fileName))
updateShapefileFieldCB() is an auxiliary function for updating the content of the shapefileFieldCB combo box whenever the name of the shapefile in the shapefileAddLE line edit widget changes so that the combo always displays the editable string fields of that shapefile.
def selectShapefile():
    """open file dialog to select exising shapefile and if accepted, update GUI accordingly"""
    fileName, _ = QFileDialog.getOpenFileName(mainWindow,"Select shapefile", "","Shapefile (*.shp)")
    if fileName:
        ui.shapefileAddLE.setText(fileName)
        updateShapefileFieldCB()
When the shapefileOpenFileTB tool button is clicked, we want to display a file dialog for picking the shapefile. Opening the dialog and processing the result happens in the function selectShapefile(). When a file name is returned (meaning the dialog wasn’t cancelled by the user), the name is put into the shapefileAddLE line edit field and updateShapefieldCB() is called to update the combo box with the field names of that file.
def addFeaturesToShapefile():
    """add selected features from list view to shapefile"""
    fieldName = ui.shapefileFieldCB.currentText()
    fileName = ui.shapefileAddLE.text()
    ui.statusbar.showMessage('Adding entities has started... please wait!')

    try:
        with arcpy.da.InsertCursor(fileName, ("SHAPE@",fieldName)) as cursor:
           for i in range(ui.resultsLV.model().rowCount()): # go through all items in list view
               if ui.resultsLV.model().item(i).checkState() == Qt.Checked:
                   point = arcpy.Point( result[i]['lon'], result[i]['lat'])
                   cursor.insertRow( (point, result[i]['name'][:30]) ) # name shortened to 30 chars
        ui.statusbar.showMessage('Adding entities has finished.')
    except Exception as e:
        QMessageBox.information(mainWindow, 'Operation failed', 'Writing to shapefile failed with '+ str(e.__class__) + ': ' + str(e), QMessageBox.Ok )
        ui.statusbar.clearMessage()
This function contains the code for writing the selected features from the results list in global variable result to the shapefile with the help of an arcpy insert cursor. We first read the relevant information from the shapefileAddLE and shapefileFieldCB widgets and then in the for-loop go through the items in the resultsLV list view to see whether they are checked or not. If an item is checked, an arcpy.Point object is created from the corresponding dictionary in variable result and then written to the shapefile together with the name of the location. Statusbar messages are used to inform on the progress or a message box will be shown if an exception occurs while trying to write to the shapefile.
def updateLayerFieldCB():
    """update layerFieldCB combo box with field names based on selected layer"""
    ui.layerFieldCB.clear()
    layer = ui.layerPickLayerCB.currentText()

    try:
        ui.layerFieldCB.addItems(core_functions.getStringFieldsForDescribeObject(arcpy.Describe(arcValidLayers[layer])))
    except Exception as e:
        QMessageBox.information(mainWindow, 'Operation failed', 'Obtaining field list failed with '+ str(e.__class__) + ': ' + str(e), QMessageBox.Ok )
        ui.statusbar.clearMessage()
This is the corresponding function to updateShapefileFieldCB() but for the layerFieldCB combo box widget part of the Layer tab.
def updateLayers():
    """refresh layers in global variable arcValidLayers and layerPickLayerCB combo box"""
    layers = []
    global  arcValidLayers
    arcValidLayers = {}
    ui.layerPickLayerCB.clear()
    ui.layerFieldCB.clear()

    try:
        layers = core_functions.getPointLayersFromArcGIS() # get all point layers
        for l in layers:                                   # add layers to arcValidLayers and GUI
            arcValidLayers[l.name] = l
            ui.layerPickLayerCB.addItem(l.name)
            updateLayerFieldCB()
    except Exception as e:
        QMessageBox.information(mainWindow, 'Operation failed', 'Obtaining layer list from  ArcGIS failed with '+ str(e.__class__) + ': ' + str(e), QMessageBox.Ok )
        ui.statusbar.clearMessage()
        ui.shapefileFieldCB.clear()
This function is for populating the layerPickLayerCB and arcValidLayer global variable with the Point vector layers currently open in ArcGIS. It uses the getPointLayersFrom ArcGIS() function from core_functions.py to get the list of layers and then in the for-loop stores the layer objects under their layer name in the arcValidLayers dictionary and just the names as items in the combo box. If something goes wrong with getting the layers from ArcGIS, the corresponding exception will be caught and a message box will warn the user about the failure of the operation.
def addFeaturesToLayer():
    """add selected features from list view to layer"""
    layer = ui.layerPickLayerCB.currentText();
    fieldName = ui.layerFieldCB.currentText()
    ui.statusbar.showMessage('Adding entities has started... please wait!')

    try:
        with arcpy.da.InsertCursor(arcValidLayers[layer], ("SHAPE@",fieldName)) as cursor:
            for i in range(ui.resultsLV.model().rowCount()): # go through all items in list view
                if ui.resultsLV.model().item(i).checkState() == Qt.Checked:
                    point = arcpy.Point( float(result[i]['lon']), float(result[i]['lat']))
                    cursor.insertRow( (point, result[i]['name'][:30]) ) # name shortened to 30 chars
        ui.statusbar.showMessage('Adding entities has finished.')
    except Exception as e:
        QMessageBox.information(mainWindow, 'Operation failed', 'Writing to layer failed with '+ str(e.__class__) + ': ' + str(e), QMessageBox.Ok )
        ui.statusbar.clearMessage()
This is the analogous function to the previously defined function addFeaturesToShapefile() but for a currently open layer and based on the information in the widgets of the Layer tab.
def selectCSV():
    """open file dialog to select exising csv/text file and if accepted, update GUI accordingly"""
    fileName, _ = QFileDialog.getOpenFileName(mainWindow,"Select CSV file", "","(*.*)")
    if fileName:
        ui.csvAddToFileLE.setText(fileName)
Similarly to selectShapefile(), this function opens a file dialog to select a csv file to append the features to.
def addFeaturesToCSV():
    """add selected features from list view to csv/text file"""
    fileName = ui.csvAddToFileLE.text()
    ui.statusbar.showMessage('Adding entities has started... please wait!')

    try:
        with open(fileName, 'a', newline='') as csvfile:
             csvWriter = csv.writer(csvfile)
             for i in range(ui.resultsLV.model().rowCount()): # go through all items in list view
                if ui.resultsLV.model().item(i).checkState() == Qt.Checked:
                     csvWriter.writerow( [ result[i]['name'], result[i]['lon'], result[i]['lat'] ])
        ui.statusbar.showMessage('Adding entities has finished.')
    except Exception as e:
        QMessageBox.information(mainWindow, 'Operation failed', 'Writing to csv file failed with '+ str(e.__class__) + ': ' + str(e), QMessageBox.Ok )
        ui.statusbar.clearMessage()
Working similarly to addFeaturesToShapefile() and addFeaturesToLayer(), this function writes the selected features as rows to a text file using the csv.writer class from the csv module of the Python standard library.
def selectNewShapefile():
    """open file dialog to creaete new shapefile and if accepted, update GUI accordingly"""
    fileName, _ = QFileDialog.getSaveFileName(mainWindow,"Save new shapefile as", "","Shapefile (*.shp)")
    if fileName:
        createShapefileDialog_ui.newShapefileLE.setText(fileName)
The final two functions are for creating a new shapefile. selectNewShapefile() is called when the newShapefileBrowseTB button that is part of the dialog box for creating a new shapefile is clicked and displays a file dialog for saving a file under a new name. The chosen name is used to set the text of the newShapefileBrowseTB line edit widget.
def createNewShapefile():
    """create new shapefile and adds field based on info in dialog GUI"""
    if createShapefileDialog.exec_() == QDialog.Accepted:
        file = createShapefileDialog_ui.newShapefileLE.text()
        field = createShapefileDialog_ui.fieldForNameLE.text()

        try:
            core_functions.createPointWGS1984Shapefile(file,field)
            ui.shapefileAddLE.setText(file)
            updateShapefileFieldCB()
            ui.shapefileFieldCB.setCurrentIndex(ui.shapefileFieldCB.findText(field))
            ui.statusbar.showMessage('New shapefile has been created.')
        except Exception as e:
            QMessageBox.information(mainWindow, 'Operation failed', 'Creating new shapefile failed with '+ str(e.__class__) + ': ' + str(e), QMessageBox.Ok )
            ui.statusbar.clearMessage()
            ui.shapefileFieldCB.clear()
This function is called when the “Create new shapefile” button on the Shapefile tab is clicked. It first displays the createShapefileDialog dialog box modally by calling its exec_() method. If the dialog is accepted (= closed by clicking Ok), the function creates the new shapefile with the help of the createPointWGS1984Shapefile() function from core_functions.py and based on the input fields in the dialog box for creating a new shapefile (newShapefileLE and fieldForNameLE). If no exception is raised, the file name and field name from the dialog box will be used to change the text of the shapefileAddLE line edit widget and the shapefileFieldCB combo box.
2.7.3.6: Step 6
At this point, we are almost done. The last thing that has to happen is connecting the widgets’ relevant signals to the corresponding slots or event handler functions. For this, please add the following code under the comment “# connect signals”:
ui.runQueryPB.clicked.connect(runQuery)
ui.resultsClearSelectionPB.clicked.connect(clearSelection)
ui.resultsSelectAllPB.clicked.connect(selectAll)
ui.resultsInvertSelectionPB.clicked.connect(invertSelection)
ui.shapefileOpenFileTB.clicked.connect(selectShapefile)
ui.addFeatureAddPB.clicked.connect(addFeatures)
ui.shapefileCreateNewPB.clicked.connect(createNewShapefile)
ui.csvOpenFileTB.clicked.connect(selectCSV)
ui.layerRefreshTB.clicked.connect(updateLayers)
ui.shapefileAddLE.editingFinished.connect(updateShapefileFieldCB)
ui.layerPickLayerCB.activated.connect(updateLayerFieldCB)

createShapefileDialog_ui.newShapefileBrowseTB.clicked.connect(selectNewShapefile)
Lines 1 to 9 and line 13 all connect “clicked” signals of different buttons in our GUI to the different event handler functions defined previously and should be easy to understand. In line 10, the “editingFinished” signal of the text field for entering the name of a shapefile is connected with the updateShapefileFieldCB() function so that, whenever the name of the shapefile is changed, the list of the fields in the combo box is updated accordingly. In line 11, we connect the “activated” signal of the combo box for selecting a layer with the upateLayerFields() function. As a result, the second combo box with the field names will be updated whenever the layer selected in the first combo box on the Layer tab is changed.
That’s it. The program is finished and can be tested and used either as a standalone application (writing features either to a shapefile or to a .csv file) or as an ArcGIS script tool. Give it a try yourself and think about which parts of the code are being executed when performing different operations. In case you want to run it as a script tool inside ArcGIS Pro, setting up the script tool for it should be straightforward. You just have to create a new script tool without specifying any parameters and provide the path to the main.py script for the source. If you have any problems running the code with your own script, the entire code can be downloaded via this link to the Locations from Web Services Complete zip file. If something in the code above is unclear to you, please ask about it on the course forums.
Obviously, the tool is still somewhat basic and could be extended in many ways including:
- providing more query options for the currently implemented query services
- incorporating other web services
- allowing for multiple query terms as input (e.g. list of place names or addresses); it could also be useful to be able to paste some longer text into the tool and then highlight place names in the text that should be queried
- supporting other geometries, not just points
- … (add your own ideas to the list)
Moreover, while we included some basic error handling with try-except, the program is not completely bullet proof and in some cases it would be desirable to provide more direct and specific feedback to the user, for instance if the user enters something into the feature class field of the GeoNames query tab that is not a valid feature class code. We are also quietly assuming that the shapefile or layer we are adding to is using a WGS1984 geographical coordinate system. Adding reprojection of the input features to the CRS of the destination would certainly be a good thing to do.
Still, the tool can be useful for creating point feature classes of locations of interest very quickly and in a rather convenient way. More importantly, this walkthrough should have provided you with a better understanding of how to create Python programs with a GUI by roughly separating the code into a part for setting up the GUI elements, a part for realizing the actual functionality (in this case the part defining the different event handler functions (GUI dependent) with the help of the core functions from core_functions.py (GUI independent)), and a part that makes the connection between the other two parts based on GUI events. You will practice creating GUIs and PyQt5 based Python programs yourself in this lesson’s homework assignment and also again in lesson 4. But for now, we will continue with looking at another aspect of creating and publishing Python applications, namely that of package management and packaging Python programs so that they can easily be shared with others.
2.8 Packages
You have already used a number of packages in Python, primarily the arcpy package, but you are likely to have encountered others, such as sys, csv, which are a part of the Python standard library, or perhaps numpy and matplotlib, which are auxiliary libraries. In the previous section of this lesson, you learned about the tkinter and PyQT libraries as we built a Python graphical User Interface (GUI). In order to use these packages you had to use the import statement to make the additional methods they provide available to your code, for example:
import arcpy
You also created modules of your own that you imported into other scripts. You simply constructed a .py file and used the import statement in order to use it, and that is all Python requires for a module to be created. Creating such a module is straightforward - all your code was contained in a single .py file, you placed the file in the same folder as the program that would use it, and you imported into that program and used its functions. You may be wondering how a module is different from a package, since they are imported the same way. The difference is that a package is a collection of modules set up for easier distribution. While some projects may consist of one simple module, you will find that if you are building a project of any complexity, more than one .py file will be required, and potentially other files as well, such as configuration files or images.
In the next section, we will look at what exactly can be imported into Python. Later in the lesson, we will demonstrate the pip and conda package and environment managers as well as the Anaconda Python distribution based on conda. The section contains several optional subsections in which we package the Locations From Web Services application from the walkthrough and upload it to distribution sites. As in Lesson 1, we recommend that you only perform what is described in these optional sections yourself if you have time left at the end of the lesson.
2.8.1 Packages and the import statement
As was mentioned earlier, when you use the import statement you can import a single .py file. In addition, the import statement can point to a folder containing a set of .py files, or a library written in a different programming language, such as C++.
You may be wondering how Python finds the module or package you specified since you only specify the name. Your own modules may have been in the current directory with the program using it, but arcpy, for example, isn’t. What happens is that Python has a list of locations that it uses in order to find the necessary packages. It traverses the list in the specific order, and, once it finds all the packages it needs, it stops looking. Here is the search order1 that Python uses:
- The home directory where the currently executing .py file is located
- PYTHONPATH directories: PYTHONPATH is a variable that is optionally set in the operating system. For example, on a Windows machine you would set it in Environmental Variables in System Settings.
- Standard library directories: The location where all standard libraries are installed on the local machine – if you have ArcGIS 10.6 Desktop installed to a default location the standard libraries can be found at C:\Python27\ArcGIS10.6\Lib. Browse to the folder, and take a quick look of all the packages that are installed.
- The contents of any .pth files: These are text files that can be created to add additional library paths; this option is used by ArcGIS Desktop 10.6. In a standard installation you can find the .pth file at C:\Python27\ArcGIS10.6\Lib\site-packages\Desktop10.6.pth. ArcGIS pro has its own .pth file: C:\Users\<username>\AppData\Local\ESRI\conda\envs\arcgispro-py3-clone\Lib\site-packages\ArcGISPro.pth or C:\Program Files\ArcGIS\Pro\bin\Python\envs\arcgispro-py3\Lib\site-packages\ArcGISPro.pth depending on your version of Pro.
- The site-package home or third-party extensions: Packages placed in Libs\site-packages directory. In a standard install of ArcGIS 10.6 Desktop that would be in the C:\Python27\ArcGIS10.6\Lib\site-packages folder.
Because of the way Python finds the code it needs to import, you need to be careful how you name your modules and packages, and where you place them. For example, if you were to create an arcpy.py module and put it in the home directory, the ArcGIS arcpy package would not be loaded.
This list above may look intimidating, but the good news is that packages you are likely to need will be packaged with special Python utilities (either pip or conda) and thus setup to place themselves in the appropriate paths without any manual intervention on your part, beyond the installation step. The other good news is that both pip and conda are fairly straightforward to use when it comes to installing packages and managing Python environments. Creating your own pip or conda packages can be a bit more involved though as you will also see in this section but still provides a convenient way for deploying and sharing your own Python applications.
1Mark Lutz: Learning Python, 5th Edition
2.8.2 Python Package Management
There are many Python packages available for use, and there are a couple of different ways to effectively manage (install, uninstall, update) packages. The two package managers that are commonly used are pip and conda. In the following sections, we will discuss each of them in more detail. At the end of the section, we will discuss the merits of the two tools and make recommendations for their use.
We will be doing some more complicated technical "stuff" here so the steps might not work as planned because everyone’s PC is configured a little differently. If you get stuck please check in with the instructor sooner rather than later. A quick troubleshooting / debugging process can involve testing to see if running the command or Command Prompt as Administrator resolves the issue, trying the Windows Command prompt instead of the Python Command prompt (or vice versa), and, if none of that has helped, trying the tech support staple of restarting your PC.
2.8.2.1 Pip
As already mentioned, pip is a Python package manager. It allows for an easier install, uninstall and update of packages. Pip comes installed with Python, and if you have multiple versions of Python you will have a different version of pip for each. To make sure we are using the version of pip that comes installed with ArcGIS Pro, we will go to the directory where pip is installed. Go to the Windows Start Menu and open the Python Command Prompt as before.
In the command window that now opens, you will again be located in the default Python environment folder of your ArcGIS Pro installation. For newer versions of Pro this will be C:\Users\<username>\AppData\Local\ESRI\conda\envs\arcgispro-py3-clone\. Pip is installed in the Scripts subfolder of that location, so type in:
cd Scripts
Now you can run a command to check that pip is in the directory – type in:
dir pip.*
The resulting output will show you all occurrences of files that start with pip. in the current folder, in this case, there is only one file found – pip.exe.
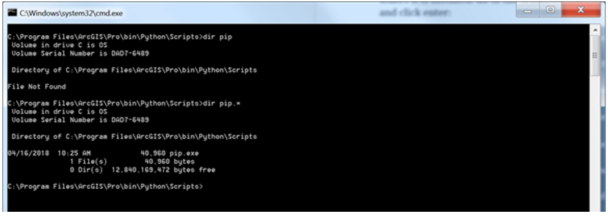
Next, let’s run our first pip command, type in:
pip --version
The output shows you the current version of pip. Pip allows you to see what packages have been installed. To look at the list type in:
pip list
The output will show (Figure 31) the list of packages and their respective versions.

To install a package, you run the pip command with the install option and provide the name of the package, for example, try:
pip install numpy
Pip will run for a few seconds and show you a progress bar as it is searching for the numpy package online and installing it. When you run pip install, the packages are loaded from an online repository named PyPI, short for Python Package Index. You can browse available packages at Python's Package Index page. If the installation has been successful you will see a message stating the same, which you can confirm by running pip list again.
In order to find out if any packages are outdated you can run the pip list with the outdated option:
pip list –-outdated
If you find that there are packages you want to update, you run the install with the upgrade option, for example:
pip install numpy –-upgrade
This last command will either install a newer version of numpy or inform you that you already have the latest version installed.
If you wanted to uninstall a package you would run pip with the uninstall option, for example:
pip uninstall numpy
You will be asked to confirm that you want the package uninstalled, and, if you do (better not to do this or you will have to install the package again!), the package will be removed.
The packages installed with pip are placed in the Lib\site-packages folder of the Python environment you are using. You will recall that that was one of the search locations Python uses in order to find the packages you import.
2.8.2.2 Optional complementary materials: Building a pip package
Important note: While knowing how to create packages from your Python code to disseminate it is an important skill for a Python programmer, the procedure described in this section is a bit complex and error-prone due to system and installation differences. It is also not required to have performed these steps successfully yourself to finish the lesson and the rest of the course. Therefore, this section is provided for interest only. We recommend that you just read through it or skip over it completely and you can then loop back to it at the end of the lesson if you have free time or after the end of the class. If you decide to go through the steps yourself and find yourself stuck with some errors, please feel free to ask about them on the course forums but don't let such issues keep you from reading through the rest of the section and finishing the lesson.
Now that we covered the basic operation of pip, we will create a pip package for the Locations From Web Services you developed in this lesson. Creating the pip package will involve the following steps:
- Creating a __init__.py file
- Creating a setup.py file
- Installing the package
- Creating a source distribution
- Creating an account on PyPI (you need to set up an account only once)
- Publishing the package and the source to PyPI
We will walk through all these steps and create the necessary files and folders. For reference, as you are reading on, your final package folder and file structure should look like this for pip:
<yourinitialsdate>locationsfromwebservices
├── setup.py
└── <yourinitialsdate>locationsfromwebservices
   ├── __init__.py
   ├── core_function.py
   ├── gui_main.py
   ├── gui_main.ui
   ├── gui_newshapefile.py
   ├── gui_newshapefile.ui
   └── main.py
Let’s start by creating a separate folder and copying the existing code files into it. Create a pip directory in a location of your choice. Then create a folder named <yourinitialsdate>locationsfromwebservices within it. Replace the <yourinitialsdate> part of the folder name with the combination of your initials and current date and leave out the <>. From now on in the lesson wherever you see that string, replace it with your own combination. Pip packages have to have unique names, otherwise you will not be able to upload them to the repository. Within that folder create another <yourinitialsdate>locationsfromwebservices folder. Copy all the code files you created (or downloaded) for the GUI walkthrough for the Locations from Web Services example in the previous section into this latest (inner) <yourinitialsdate>locationsfromwebservices folder.
Once the folder is set up use your Python editor or other text editor of choice to create the __init__.py file and place it in the same directory. The file is used by Python to indicate folders that are Python packages. We will leave the file blank – only its presence in the folder is required. The file need not be blank, however. It is a special file that gets executed once the package is imported into another package. It is written in standard Python, so it can contain regular code, and is often used to import other packages, so other modules in the package can import it from the package instead.
Let’s proceed to the second step – creating the setup.py file. The file needs to be located in the folder above the code, in the top level <yourinitialsdate>locationsfromwebservices folder. If that is confusing refer back to the folder tree diagram above. Type in the following content into the file:
from setuptools import setup, find_packages

setup(name='<yourinitialsdate>locationsfromwebservices',
      version='1.0',

description='<yourinitialsdate>locationsfromwebservices',
      url='http://drupal.psu.edu/geog489/',
      author='GEOG489',
      author_email='GEOG489@psu.edu',
      license='BSD',
      packages=find_packages(),
      install_requires=['pyqt5'],
      zip_safe=False)
Now we are ready to install the package. Please make sure that there are no other Python processes running; this includes quitting ArcGIS and/or spyder if they are currently running. In the Python Command Prompt window navigate to the location of your project, specifically the folder containing the setup.py file. Once there, type in and run this command (note the '.' at the end of the command which is important):
pip install .
You will receive some status update messages ending with the notification that the package has been successfully installed. You may get a notification you are using an outdated version of pip. Please do not update pip or any other package, as then your set up would be out of sync with the class material.
In order to upload the source to PyPI, the Python Package Index, we need to create a source distribution. To do so type in and run this command:
python setup.py sdist
The sdist option creates a new folder in your project named dist and packages all the necessary files for upload into a tar.gz file, which is a compressed file type.
Now that we have everything ready for upload, go to the Python Package Index page and click on Register (top right corner), and proceed to create an account. You will need to log into your e-mail account and click the link to verify the account before you can make any uploads. Once you have an account enter the following in the Command Prompt window:
python setup.py sdist upload
You will be asked for your user credentials (or at least your password). Please enter them and the upload will start.
It is very likely you will get an error "error: Upload failed (403): Invalid or non-existent authentication information" that means your username wasn't specified.
The solution to this issue is twofold: First you need to create a file called .pypirc in your home directory (that is c:\Users\<your user name>). You can download this sample configuration file, place it in your home directory, and then edit it to put in your user credentials. Second, you need to install another package called twine:
pip install twine
Once twine is installed:
twine upload dist\*
will use twine to upload the zipped package in the dist folder to your repository (assuming you modified your username and password in the .pypirc file).
Once complete go back to your PyPI account and check the list of your projects to confirm the upload was successful. Please delete the project, as projects need to have unique names and another student attempting this process will get an error if your project remains in PyPI (although our attempt at generating a unique name with the date and our initials should minimize that chance). You need to click on Manage, then Settings and then Delete next to the project name (and type in the project name to confirm).

The package we created is a barebones package, it has absolute minimum elements to be uploaded. Two other elements you should definitely consider adding to your packages are a README and a LICENSE file. The README file would contain some information about the project – who created it, what it does, and any other notes you would like to leave for the users. The LICENSE file should spell out the license agreement for using your package. We will leave the pip package as is but will be adding a LICENSE file to our conda package.
2.8.3 Conda and Anaconda
Another option for packaging and distributing your Python programs is to use conda (we will discuss Anaconda a bit later in the lesson). Just like pip, it is a package manager. In addition, it is also an environment manager. What that means is that you can use conda to create virtual environments for Python, while specifying the packages you want to have available in that environment. A little more about that in a moment. Conda comes installed with ArcGIS Pro. While conda should be installed if you were able to install spyder in Lesson 1, we can doublecheck that it is by opening the Python Command Prompt and then typing in:
cd Scripts
followed by:
conda –-version
The output should show the conda version.
In order to find out what packages are installed type in:
conda list
Your output should look something like Figure 2.34:

The first column shows the package name, the second the version of the package. The third column provides clues on how the package was installed. You will see that for some of the packages installed, Esri is listed, showing they are related to the Esri installation. The list option of conda is useful, not only to find out if the package you need is already installed but also to confirm that you have the appropriate version.
Conda has the functionality to create different environments. Think of an environment as a sandbox – you can set up the environment with a specific Python version and different packages. That allows you to work in environments with different packages and Python versions without affecting other applications. The default environment used by conda is called base environment. We do not need to create a new environment, but, should you need to, the process is simple – here is an example:
conda create -n gisenv python=3.11 arcpy numpy
the –n flag is followed by the name of the environment (in this case gisenv), then you would choose the Python version which matches the one you already have installed (3.10, 3.11 etc.) and follow that up with a list of packages you want to add to it. If you later find out you need other packages to be added, you could use the install option of conda, for example:
conda install –n gisenv matplotlib
To activate an environment, you would run:
activate gisenv
And to deactivate an environment, simply:
deactivate
There are other options you can use with environments – you can clone them and delete them, for example. A great resource for the different options is Conda's Managing Environments page.
2.8.3.1 Optional complementary materials: Installing Conda Build Package
Important note: While knowing how to create packages from your Python code to disseminate it is an important skill for a Python programmer, the procedure described in this section and section 2.8.3.2 is a bit complex and error-prone due to system and installation differences. It is also not required to have performed these steps successfully yourself to finish the lesson and the rest of the course. Therefore, this section is provided for interest only. We recommend that you just read through it or skip over it completely and you can then loop back to it at the end of the lesson if you have free time or after the end of the class. If you decide to go through the steps yourself and find yourself stuck with some errors, please feel free to ask about them on the course forums but don't let such issues keep you from reading through the rest of the section and finishing the lesson.
Before we can create a conda package of our own we do need to install the conda-build package. We will use conda to install the conda Build package, just as you did with the PyQT5 package.
Use the Python Command Prompt and type in:
conda install conda-build
What we are doing is running conda with the install option, and asking it to install the conda-build package. A search and analysis will be performed by conda to find the package, determine its dependencies and you will be informed of all the packages that will be installed. Type in y to allow the install to proceed, and you will get progress messages for the installation of conda-build and all packages it is dependent on.

You could install other packages as well in a similar fashion (just as with pip), by changing the name conda-build to the appropriate package name. In order to know if a package you are looking for is available to be installed from conda, you can run conda with a search option, for example:
conda search pandas
The output will show if the package is available, and if so from which channels. Channels are different repositories that have been set up by users and organizations.
2.8.3.2 Optional complementary materials: Packaging Your Code with Conda
Important note: As the previous section, this section is provided for interest only. We recommend that you just read through it or skip over it completely and you can then loop back to it at the end of the lesson if you have free time or after the end of the class. If you decide to go through the steps yourself and find yourself stuck with some errors, please feel free to ask about them on the course forums but don't let such issues keep you from reading through the rest of the section and finishing the lesson.
Now that we know conda is installed and working, we will proceed to building your first conda package. Before we begin create a copy of your pip folder and rename it to conda. Delete the "dist" and "locationsfromwebservices.egg-info" folders. Creating a conda package will involve the following steps:
- Creating a meta.yaml file
- Creating a LICENSE file
- Creating a build.sh and bld.bat files
- Creating a setup.py file (we already created it while building the pip package)
- Building the project using conda-build
- Creating an account on Anaconda Cloud
- Uploading the project to Anaconda Cloud
We will walk through all these steps and create the necessary files and folders, just as we did for pip. For reference, as you are reading on, your final package folder and file structure should look like this for conda:
<yourinitialsdate>locationsfromwebservices
  ├── bld.bat
  ├── build.sh
  ├── LICENSE
  ├── meta.yaml
  ├── setup.py
  └── <yourinitialsdate>locationsfromwebservices
     ├── __init__.py
     ├── core_function.py
     ├── gui_main.py
     ├── gui_main.ui
     ├── gui_newshapefile.py
     ├── gui_newshapefile.ui
     └── main.py
The next step is to create a file named meta.yaml in the original (outer) <yourinitialsdate>locationsfromwebservices folder. You can create the file in any text editor. Make sure the name and extension match exactly. Type in the following into the file. Some of the elements will be left empty, but it is a good idea to use this template, to make sure all the elements you need are there:
package:
  name: <yourinitialsdate>locationsfromwebservicescomplete
  version: "1.0"

source:
  path: ./

requirements:
  build:
    - python
    - setuptools

  run:
    - python
    - pyqt

about:
  home: https://www.e-education.psu.edu/geog489/node/1867/
  license: BSD
  license_file: LICENSE
The package section of the file simply contains the package name and the version. The name can only contain lowercase letters and dashes.
The source sections point to the source of the data. In this case, we are pointing to the source on the local drive, but the source could be git or a compressed (.zip or .tar file), along with a few other options.
The requirements specify what tools are necessary to build the package, and the run section specifies what packages are necessary for running the package. Since we made the arcpy an optional part of the project we will not include it under the requirements. Setuptools is a package that helps with building Python projects. Please note that in conda the pyqt5 package is just called pyqt.
The about section provides more information about the package, such as the website it may be found on and license specification.
We set the license to BSD, which is a very permissive license type. Other licenses you may want to consider are GPL (General Public License) and LGPL (Lesser General Public License). A summary of these open source license types and a few others can be found at: choosealicense.com. It is a good idea to include a license with your package distribution. The name of the license file is specified in the about – license_file section, and it is typically named just license. You can download a sample license file here to be included with your distribution, or you can use the Binpress license generator and specify your own terms. Place the LICENSE file in the outer <yourinitialsdate>locationsfromwebservices folder where the meta.yaml file is located.
The version of the meta.yaml file we created is rather simple. There are other options you can set if necessary. Find the complete guide here.
Now we also need to create two build script files – build.sh and bld.bat. The .bat file works in the Windows environment, but, if the project is built on a Linux or a macOS environment (unlikely for arcpy type projects), we need the build.sh file as well.
Type in the following content into the bld.bat file:
"%PYTHON%" setup.py install
if errorlevel 1 exit 1
Here is the content for the build.sh file:
$PYTHON setup.py install
As you may have gathered from the batch files we created, the setup.py file is required by conda. Since we created it in setting up the pip package we do not need to recreate it here – just copy it from its location in your pip folder to the <yourinitialsdate>locationsfromwebservices folder within your conda folder.
Copy the LICENSE file into the <yourinitialsdate>locationsfromwebservices folder as well.
Now that we have the package set up, we will use the Python Command Prompt to build the package. Make sure you are in the folder that contains the outer <yourinitialsdate>locationsfromwebservices and run the following command:
conda-build <yourinitialsdate>locationsfromwebservices
After a long process and verbose output, towards the end you should see a line that gives you the command to upload your package to anaconda. More on this later. For now, just look at this output and note where the compressed tar.bz2 archive with your package has been created:
# If you want to upload package(s) to anaconda.org later, type:

anaconda upload c:\Users\<user name>\AppData\Local\ESRI\conda\envs\arcgispro-py3-clone\conda-bld\win-64\<yourinitialsdate>locationsfromwebservicescomplete-1.0-py35hc17e43c_0.tar.bz2

If you were watching the conda-build output very closely you might have seen a couple of errors displaying "The system cannot find the path specified" for some Visual Studio tools – that is okay and you do not need to be concerned by those.
That brings us to the next section of the lesson where we discuss Anaconda. Leave the Python Command Prompt window open, as we will be using it shortly to upload the package to the Anaconda Cloud.
2.8.3.3 Anaconda
Anaconda is a Python distribution that includes the most popular data science package and conda in its distribution. Anaconda makes it easy to create a Python setup conducive to data analytics that also facilitates package management (updates, installs), packaging projects, managing environments and sharing packages. It is build on top of conda but provides a graphical interface for managing Python environments and packages. Figure 40 obtained from the Anaconda website shows the Anaconda components.
If you investigate further you will learn that the conda portion of Anaconda contains a repository of packages maintained by Anaconda (Anaconda Repository), but also the Anaconda Cloud, which users and organizations can contribute to. If we were to upload the package created in the previous optional section with the command conda presented to us, it would be uploaded to the Anaconda Cloud.
We will use Anaconda in Lesson 3 to work in a fresh Python environment outside the ArcGIS Pro installation. You should therefore perform the steps in this section to install Anaconda on your computer. Setting up a user account for Anaconda Cloud will be described in the following optional section. You won't need this unless you want try uploading the conda package from the previous optional section to the cloud yourself.

To download and install Anaconda you would normally go to anaconda.com, pick the Individual Edition option (or one of the other options if you prefer), and then click Download to get to the page where you can download the Anaconda installers (Figure 41; Anaconda frequently updates their website design, but you get the idea). However, we are here providing a direct link to download the Windows 64-bit installer to make sure we all are using the same version, one that we have tested the Lesson 3 content with: https://repo.anaconda.com/archive/Anaconda3-2024.06-1-Windows-x86_64.exe . Once downloaded, double-click on the .exe file to run the installer. Use all the default install options. If asked, you can choose to skip installing Microsoft Visual Studio Code.

After the installation, Anaconda will be located in a folder called Anaconda3 of your user's home directory, so C:\Users\<user name>\Anaconda3. This is the root environment (also called base environment) installed by Anaconda. If you create further environments or clone existing environments, these will be located in the envs subfolder of the Anaconda3 directory.
The easiest way to interact with Anaconda is via the Anaconda Navigator program that provides a graphical user interface for managing the installation, starting programs, etc. Just type the first letters into the Windows search and you should be able to find the program and run it (if not, it is located in the Scripts subfolder of the Anaconda3 directory).
Here is a quick overview of the Navigator interface: As shown in the image below, the Navigator has a vertical main menu on the left side of the window. We are only interested in the Home and Environments entries at the moment. The Home screen simply shows you a number of applications that are either installed and can be launched in your currently active Python environment or that you may want to install. You can switch to a different environment using the dropdown menu box at the top. In the image below, the currently active environment is the root environment installed by Anaconda.

If you now switch to the Environments screen, you will see that it has two main sections: the one on the left is for managing Python environments and the one on the right is for managing packages in the currently active environment. Anaconda will also see potential environments located under C:\Users\<user name>\AppData\Local\ESRI\conda\envs, so, if that's the location where your ArcGIS Pro installation has stored its default Python environment, it should appear in the environments list as well.

Clicking on a environment in the list will activate that environment and update the package manager view on the right accordingly. The buttons below the environment list can be used to easily create, clone or delete environments. The graphical package manager on the right is also relatively intuitive to use. At the top, you can (among other options) select whether it should list the current, not installed, or all available packages. Selecting an uninstalled package by clicking the box on the very left of the entry will allow you to install that package. Packages for which newer versions are available are shown with a blue arrow next to the version number on the right. Clicking that arrow will allow you to update the package. Both the graphical environment manager and package manager are visual front-ends to conda. So whenever you perform some activity, like installing a package, the corresponding conda command will be executed in the background.
This was really just a very brief introduction to the main elements of the Anaconda Navigator and Anaconda in general. However, you will get the chance to further use it and learn more details in Lesson 3.
2.8.3.4 Optional complementary materials: Uploading Conda package to Anaconda Cloud
Important note: This section uses the conda package created in optional section 2.8.3.2. While knowing how to create packages from your Python code to disseminate it is an important skill for a Python programmer, it is not required to have performed the steps required in this section successfully yourself to finish the lesson and the rest of the course. Therefore, this section is provided for interest only. We recommend that you just read through it or skip over it completely and you can then loop back to it at the end of the lesson if you have free time or after the end of the class. If you decide to go through the steps yourself and find yourself stuck with some errors, please feel free to ask about them on the course forums but don't let such issues keep you from reading through the rest of the section and finishing the lesson.
After the installation, the next step to publishing our conda package from Section 2.8.3.2 is creating a user account. In order to obtain one, you need to go to anaconda.org and use the dialog on the right side of the screen to create an account.

Finally, we are ready to upload our package to Anaconda. In the Command Prompt window, run the following command to log into the Anaconda Cloud (note that the path might be one of the following two options depending on where Anaconda is installed):
c:\Users\YourUserName\Anaconda3\Scripts\anaconda login
or
c:\programdata\Anaconda3\Scripts\anaconda login
You will be asked to provide your user credentials and will be greeted with a message that confirms that your login was successful.
The next step is to upload your package – run the following command (remembering to use the path to where Anaconda was installed), but replace the tar.bz2 file with the file name conda provided you at the completion of the package build. If you are using an older version of Pro, you will also have to replace the first part of the path to the .tar.bz2 file with "c:\Program Files\ArcGIS\Pro\bin\Python\envs\arcgispro-py3\conda-bld\win-64\".
c:\Users\YourUserName\Anaconda3\Scripts\anaconda upload "c:\Users\<user name>\AppData\Local\ESRI\conda\envs\arcgispro-py3-clone\conda-bld\win-64\<yourinitialsdate>locationsfromwebservicescomplete-1.0-py35hc17e43c_0.tar.bz2"
You will receive messages that keep you updated on the upload status, and then you will be notified that the upload is complete. Log into the Anaconda Cloud and look at your Dashboard (Figure 43) – the package is now listed, and located in your own Anaconda Cloud Channel. If you click on the package name you will receive information on how it can be installed with conda.

2.8.4 Package Distribution Recommendation - Why Conda?
If you worked or read through the exercises we worked through for packaging our application in the optional parts of this section, you might have gotten the impression that pip is easier to use than conda, and, since they both facilitate software packaging and distribution, why bother packaging your applications with conda? Here are a number of reasons:
- Conda has a built-in virtual environment functionality
- Conda further aids in package installs as it not only checks for dependencies but installs any dependent packages
- Conda is closely bound with Anaconda and Anaconda Cloud, which is set up to use different channels, providing a finer-grained package organization. For example, if you are interested in packages ESRI has published, you can go to the company’s channel - https://anaconda.org/esri.
- While pip can only be used with Python, conda can be used with other languages as well – so if you decided to develop something with R, conda can work with it too.
If you are interested in a more detailed comparison of the two tools, a great article to reference is Conda Myths and Misconceptions.
2.9 Lesson 2 Practice Exercises
After this excursion into the realm of package management and package managers, let's come back to the previous topics covered in this lesson (list comprehension, web access, GUI development) and wrap up the lesson with a few practice exercises. These are meant to give you the opportunity to test how well you have understood the main concepts from this lesson and as a preparation for the homework assignment in which you are supposed to develop a small standalone and GUI-based program for a relatively simple GIS workflow using arcpy. Even if you don't manage to implement perfect solutions for all three exercises yourself, thinking about them and then carefully studying the provided solutions will be helpful, in particular since reading and understanding other people's code is an important skill and one of the main ways to become a better programmer. The solutions to the three practice exercises can be found in the following subsections.
Practice Exercise 1: List Comprehension
You have a list that contains dictionaries describing spatial features, e.g. obtained from some web service. Each dictionary stores the id, latitude, and longitude of the feature, all as strings, under the respective keys "id", "lat", and "lon":
features = [ { "id": "A", "lat": "23.32", "lon": "-54.22" },
             { "id": "B", "lat": "24.39", "lon": "53.11" },
             { "id": "C", "lat": "27.98", "lon": "-54.01" } ]
We want to convert this list into a list of 3-tuples instead using a list comprehension (Section 2.2). The first element of each tuple should be the id but with the fixed string "Feature " as prefix (e.g. "Feature A"). The other two elements should be the lat and lon coordinates but as floats not as strings. Here is an example of the kind of tuple we are looking for, namely the one for the first feature from the list above: ('Feature A', 23.32, -54.22). Moreover, only features with a longitude coordinate < 0 should appear in the new list. How would you achieve this task with a single list comprehension?
Practice Exercise 2: Requests and BeautifulSoup4
We want to write a script to extract the text from the three text paragraphs from section 1.7.2 on profiling without the heading and following list of subsections. Write a script that does that using the requests module to load the html code and BeautifulSoup4 to extract the text (Section 2.3).
Finally, use a list comprehension (Section 2.2) to create a list that contains the number of characters for each word in the three paragraphs. The output should start like this:
[2, 4, 12, 4, 4, 4, 6, 4, 9, 2, 11… ]
Hint 1If you use Inspect in your browser, you will see that the text is the content of a <div> element within another <div> element within an <article> element with a unique id attribute (“node-book-2269”). This should help you write a call of the soup.select(…) method to get the <div> element you are interested in. An <article> element with this particular id would be written as “article#node-book-2269” in the string given to soup.select(…).
Hint 2:Remember that you can get the plain text content of an element you get from BeautifulSoup from its .text property (as in the www.timeanddate.com example in Section 2.3).
Hint 3It’s ok not to care about punctuation marks, etc. in this exercise and simply use the string method split() to split the text into words at any whitespace character. The number of characters in a string can be computed with the Python function len(...).
Practice Exercise 3: GUI Development
The goal of this exercise is to practice creating GUIs a little bit more. Your task is to implement a rudimentary calculator application for just addition and subtraction that should look like the image below:

The buttons 0… 9 are for entering the digits into the line input field at the top. The buttons + and - are for selecting the next mathematical operation and performing the previously selected one. The = button is for performing the previously selected operation and printing out the result, and the “Clear” button is for resetting everything and setting the content of the central line edit widget to 0. At the top of the calculator we have a combo box that will list all intermediate results and, on selection of one of the entries, will place that number in the line edit widget to realize a simple memory function.
Here is what you will have to do:
- Create the GUI for the calculator with QT Designer using the “Widget” template. This calculator app is very simple so we will use QWidget for the main window, not QMainWindow. Make sure you use intuitive object names for the child widgets you add to the form. (See Sections 2.6.2 and 2.7.2)
- Compile the .ui file created in QT Designer into a .py file (Sections 2.6.2 and 2.7.2).
- Set up a main script file for this project and put in the code to start the application and set up the main QWidget with the help of the .py file created in step 2 (Sections 2.6.1 and 2.7.3).
Hint 1: To produce the layout shown in the figure above, the horizontal and vertical size policies for the 10 digit buttons have been set to “Expanding” in QT Designer to make them fill up the available space in both dimensions. Furthermore, the font size for the line edit widget has been increased to 20 and the horizontal alignment has been set to “AlignRight”.
This is the main part we want you to practice with this exercise. You should now be able to run the program and have the GUI show up as in the image above but without anything happening when you click the buttons. If you want, you can continue and actually implement the functionality of the calculator yourself following the steps below, or just look at the solution code showing you how this can be done.
- Set up three global variables: intermediateResult for storing the most recent intermediate result (initialized to zero); lastOperation for storing the last mathematical operation picked (initialized to None); and numberEntered for keeping track of whether or not there have already been digits entered for a new number after the last time the +, -, = or Clear buttons have been pressed (initialized to False).
- Implement the event handler functions for the buttons 0 … 9 and connect them to the corresponding signals. When one of these buttons is pressed, the digit should either be appended to the text in the line edit widget or, if its content is “0” or numberEntered is still False, replace its content. Since what needs to happen here is the same for all the buttons, just using different numbers, it is highly recommended that you define an auxiliary function that takes the number as a parameter and is called from the different event handler functions for the buttons.
- Implement an auxiliary function that takes care of the evaluation of the previously picked operation when, e.g., the = button is clicked. If lastOperation contains an operation (so is not None), a new intermediate result needs to be calculated by applying this operation to the current intermediate result and the number in the line edit widget. The new result should appear in the line edit widget. If lastOperation is None, then intermediateResult needs to be set to the current text content of the line input widget. Create the event handler function for the = button and connect it to this auxiliary function.
- Implement and connect the event handler functions for the buttons + and - . These need to call the auxiliary function from the previous step and then set lastOperation to a string value representing the new operation that was just picked, either "+" or "-".
- Implement and connect the event handler for the “Clear” button. Clicking it means that the global variables need be re-initialized as in step 4 and the text content of the line edit widget needs to be set back to “0”.
- Implement the combo box functionality: whenever a calculation is performed by the auxiliary function from step 6, you now also need to add the result to the item list of the memory combo box. Furthermore, you need to implement and connect the event handler for when a different value from the combo box is picked and make this the new text content of the line edit field. The signal of the combo box you need to connect to for this is called “activated”.
2.9.1 Lesson 2 Practice Exercise 1 Solution
features = [ { "id": "A", "lat": "23.32", "lon": "-54.22" },
             { "id": "B", "lat": "24.39", "lon": "53.11" },
             { "id": "C", "lat": "27.98", "lon": "-54.01" } ]

featuresAsTuples = [ ("Feature " + feat['id'], float(feat['lat']), float(feat['lon']) ) for feat in features if float(feat['lon']) < 0 ]

print(featuresAsTuples)
Let's look at the components of the list comprehension starting with the middle part:
for feat in features
This means we will be going through the list features using a variable feat that will be assigned one of the dictionaries from the features list. This also means that both the if-condition on the right and the expression for the 3-tuples on the left need to be based on this variable feat.
if float(feat['lon']) < 0
Here we implement the condition that we only want 3-tuples in the new list for dictionaries that contain a lon value that is < 0.
("Feature " + feat['id'], float(feat['lat']), float(feat['lon']) )
Finally, this is the part where we construct the 3-tuples to be placed in the new list based on the dictionaries contained in variable feat. It should be clear that this is an expression for a 3-tuple with different expressions using the values stored in the dictionary in variable feat to derive the three elements of the tuple. The output produced by this code will be:
Output:

[('Feature A', 23.32, -54.22), ('Feature C', 27.98, -54.01)]
2.9.2 Lesson 2 Practice Exercise 2 Solution
import requests
from bs4 import BeautifulSoup

url = 'https://www.e-education.psu.edu/geog489/node/2269'

response = requests.get(url)
soup = BeautifulSoup(response.text, 'html.parser')

divElement = soup.select('article#node-book-2269 > div > div')[0]

wordLengths = [ len(word) for word in divElement.text.split() ]
print(wordLengths)
After loading the html page and creating the BeautifulSoup structure for it as in the examples you already saw in this lesson, the select(…) method is used in line 9 to get the <div> elements within the <div> element within the <article> element with the special id we are looking for. Since we know there will only be one such element, we can use the index [0] to get that element from the list and store it in variable divElement.
With divElement.text.split() we create a list of all the words in the text and then use this inside the list comprehension in line 11 where we convert the word list into a list of word lengths by applying the len(…) function to each word.
2.9.3 Lesson 2 Practice Exercise 3 Solution
The image below shows the hierarchy of widgets created in QT Designer and the names chosen. You can also download the .ui file and the compiled .py version here and open the .ui file in QT Designer to compare it to your own version. Note that we are using a vertical layout as the main layout, a horizontal layout within that layout for the +, -, =, and Clear button, and a grid layout within the vertical layout for the digit buttons.

The following code can be used to set up the GUI and run the application but without yet implementing the actual calculator functionality. You can run the code and main window with the GUI you created will show up.
import sys

from PyQt5.QtWidgets import QApplication, QWidget

import calculator_gui

# create application and gui

app = QApplication(sys.argv)

mainWindow = QWidget()        # create an instance of QWidget for the main window
ui = calculator_gui.Ui_Form() # create an instance of the GUI class from calculator_gui.py
ui.setupUi(mainWindow)        # create the GUI for the main window

# run app

mainWindow.show()
sys.exit(app.exec_())
The main .py file for the full calculator can be downloaded here. Function digitClicked(…) is the auxiliary function from step 5, called by the ten event handler functions digitPBClicked(…) defined later in the code. Function evaluateResult() is the auxiliary function from step 6. Function operatorClicked(…) is called from the two event handler functions plusPBClicked() and minusPBClicked(), just with different strings representing the mathematical operation. There are plenty of comments in the code, so it should be possible to follow along and understand what is happening rather easily.
Lesson 2 Assignment
In this lesson's homework assignment you are going to implement your own GUI-based Python program with PyQt5. We won't provide a template for the GUI this time, so you will have to design it yourself from scratch and put it together in QT Designer. However, we will provide a list of required GUI elements that will allow the user to provide the needed input for the program. The program will use arcpy but it is intended to be a standalone program, so it's not supposed to be run as a script tool inside ArcGIS, and that's why it needs its own GUI. The program will realize a simple workflow for extracting features from a shapefile on disk based on selection by attribute and selection by location. If you took GEOG 485 along time ago, you will notice that this is similar to what you did there in lesson 3 and you will also already be familiar with the data we will be using. If you took GEOG 485 more recently and did the assignment with NHL hockey players, it's still a similar approach using multiple selection operations but with different data. Even if it's unfamiliar, don't worry, we are intentionally keeping the feature extraction task simple and providing some sample code that you can use for this so that you can focus on the GUI development aspects.
Data
Please download the zip file assignment2data.zip with the data you will need for this homework project. Extract the data to a new folder and check out the two shapefiles that are contained in the zip file, countries.shp and OSMpoints.shp, in ArcGIS Pro. In particular, have a look at the attribute tables of the two files:
- countries. shp - This shapefile contains polygons for the countries of Central America and will be used for the selection by location part of the project, namely to extract only features that are inside one of the countries. The field you will mainly be working with is the 'NAME' field containing the names of the countries. To test your program, you will mainly use 'El Salvador' for the country you are interested in because the data from the other shapefile is limited to an area in and around El Salvador.

- OSMpoints.shp - This is a point shapefile with Points of Interests (POIs) exported from OpenStreetMap. The file is a bit messy, has quite a few attribute fields, and combines all kinds of POIs. In this assignment, we will be working with the 'shop' field that, if the feature is some kind of shop, specifies what kind of shop it is, e.g. supermarket, convenience, bakery. Our program will either extract all shops in a target country or only shops of one particular type.

The feature extraction task
Your program will provide the GUI that allows the user
- to select the two input files (country file and POI file),
- to provide the name of the target country,
- to specifiy the name of the output shapefile that will be produced with the extracted shop features,
- and to indicate whether all shops or only shops of a particular type should be extracted (and if so, which type).
Then, when the user clicks a button to start the feature extraction, your code will have to select those point features from the POI file that are at the same time (a) located inside the target country and (b) are shops (meaning the 'shop' field is not null and not an empty string) if the user wants all shops. If the user indicated that s/he is only interested in shops of a particular type, only shops of that specified type should be selected (meaning the 'shop' field needs to contain exactly that type for a POI to be selected). After realizing these selections, the selected features satisfying both criteria should be written to a new shapefile with the user-provided output file name.
Hopefully it is clear that this feature extraction can be realized with a combination of the arcpy functions MakeFeatureLayer_management(...), SelectLayerByLocation_management(....), CopyFeatures_management(...) and Delete_management(...). If not, you may want to briefly (re)read the parts of Lesson 3 of Geog485 that talk about these functions or the appropriate sections of the arcpy help. The field names 'NAME' and 'shop' can be hard-coded in your script but only once in variables defined at the beginning that are then used in the rest of the code (so that your code is easily modifiable in-line with good programming practices). As we mentioned at the beginning, we want you to focus on GUI code, so we are, below, providing some basic sample code for performing the extraction task that you can adopt. Of course, you are free to challenge yourself and ignore this code and develop a solution for this extraction part yourself.
# This code uses the following variables:
# polygonFile: input polygon file (e.g. file with countries)
# polygonField: name of field of the input polygon file to query on (e.g. 'NAME')
# polygonValue: value to query polygonField for (e.g. 'El Salvador')
# pointFile: input point file (e.g. file with points of interest)
# pointField: name of field of the input point file to query on (e.g. 'shop')
# pointValue: value to query pointField for (e.g. 'supermarket'); if this variable has the value None, all features with something in pointField will be included
# outputFile: name of the output shapefile to produce

# select target polygon from polygon file
polygonQuery = '"{0}" = \'{1}\''.format(polygonField, polygonValue)          # query string
arcpy.MakeFeatureLayer_management(polygonFile,"polygonLayer", polygonQuery)  # produce layer based on query string

# select target points from point file
if pointValue:   # not None, so the query string needs to use pointValue
    pointQuery = '"{0}" = \'{1}\''.format(pointField, pointValue)
else:            # pointValue is None, so the query string aks for entries that are not NULL and not the empty string
    pointQuery = '"{0}" IS NOT NULL AND "{0}" <> \'\''.format(pointField)
arcpy.MakeFeatureLayer_management(pointFile,"pointLayer", pointQuery)        # produce layer based on query string

# select only points of interest in point layer that are within the target polygon
arcpy.SelectLayerByLocation_management("pointLayer", "WITHIN", "polygonLayer")

# write selection to output file
arcpy.CopyFeatures_management("pointLayer", outputFile)

# clean up layers
arcpy.Delete_management("polygonLayer")
arcpy.Delete_management("pointLayer")
You are expected to place the code that performs this feature extraction task in its own function and its own .py file that is completely independent of the rest of the code in the same way as we did in the lesson's walkthrough with the functions defined in the core_functions.py module. This extraction function needs to have parameters for all input values needed to perform the feature extraction task and produce the output shapefile.
It is definitely not a bad idea to start with producing the feature extraction function/module first (adopting the code from above) and in the code that calls the function use hard-coded input variables for all input values for thoroughly testing that function. Then only start with designing and implementing the GUI, once the feature extraction function is working correctly. As mentioned above, the provided test data mainly contains POI features for El Salvador but you can also test it with one of the adjacent countries that contain some of the point features.
The GUI
As already explained, the main focus of this project will be on designing the GUI for this program, putting it together in QT Designer, and then creating the GUI for the main project code and wiring everything up so that the input values are taken from the corresponding input widgets in the GUI when the button to run the feature extraction is clicked, and so on. These steps can be approached in the same way as we did in the lesson's walkthrough and the project will also have a similar structure.
Designing the GUI will require some creativity and you are free to decide how the different GUI elements should be arranged in your GUI. However, you should make sure that the elements are laid out nicely and the overall GUI is visually appealing. Even though this is just a "toy" project to practice these things, you should try to make your GUI look as professional as possible, e.g. don't forget to give your main window a suitable title, use labels to explain what certain widgets are for, group related widgets together, make adequate use of file dialog boxes and message boxes, etc.
Below is a list of elements that your GUI needs to provide and other requirements we have for your GUI and code. Please don't take the order in which the elements are listed here as the order in which they are supposed to appear in your GUI.
- The GUI should contain a button to start the feature extraction for the input values provided via the other widgets.
- The GUI should contain an input widget for the name of the country shapefile. There should be a corresponding button to open an "Open file" dialog box to pick the country shapefile (similar to how this was done in the Locations From Web Services tool; see, for instance, the code of the selectShapefile() function in Section 2.7.3.5).
- The GUI should contain an input widget for the name of the POI point shapefile. There should be a corresponding button to open an "Open file" dialog box to pick the point shapefile (similar to how this was done in the Locations From Web Services tool; see, for instance, the code of the selectShapefile() function in Section 2.7.3.5).
- The GUI should contain an input widget for the name of the output shapefile. There should be a corresponding button to open a "Save file" dialog box to pick the output shapefile name (similar to how this was done in the Locations From Web Services tool; see, for instance, the code of the selectNewShapefile() function in Section 2.7.3.5).).
- The GUI should contain an input widget for entering the name of the target country (you are not required to create a list of available country names for this; a widget that allows the user to type in the name is ok for this, or a hardcoded list providing it is drawn from a variable defined at the top of the code).
- The GUI should contain an input widget that lets the user indicate whether all shops or only shops of a particular type should be extracted with a single mouse button click. (This should be a separate widget from the following one for choosing a specific shop type if the user picks the "shops of a particular type" option!)
- The GUI should contain an input widget that allows the user to pick a shop type from a given list of predefined types. You can use the following set of predefined shop types for this: [ 'supermarket', 'convenience', 'clothes', 'bakery' ]. Selecting one of the predefined types should be done by clicking, not by letting the user type in the name of the shop type.
- Your program should capture errors and use message boxes to inform the user about errors or when the feature extraction has been performed successfully (see again how this is handled in the walkthrough code).
- The GUI independent code to perform the actual feature extraction (see previous section) should be located in its own module which is imported by the main module of your project.
- The usual requirements regarding code quality and use of comments apply; please make sure that you use intuitive names for the widgets that you are referring to from the main project code.
Successful completion of the above requirements and the write-up discussed below is sufficient to earn 95% of the credit on this project. The remaining 5% is reserved for "over and above" efforts which could include, but are not limited to, the following (implementing just the first two items is not sufficient for the full 5 points):
- Providing helpful tool tip information for all main GUI elements.
- Adding input widgets for the field names to replace the hard-coded values 'NAME' and 'shop'
- Incorporating additional widgets that increase the flexibility of the tool (e.g. you could add support for providing a buffer radius that is applied to the country before doing the selection by location, or an optional projection operation to be applied to the output file using one of several predefined spatial reference system names the user can choose from).
- Populating the list of shop types to choose from automatically with all unique values appearing in the shop column of the selected POI input file whenever the name of the POI input file is changed.
- Replacing the widget that allows the user to type in the name of the target country by a widget that lists the names of all country names in the country input file and allows the user to pick one (or even several) of them.
All files making up your project should be included in your submission for this assignment including the .ui file created with QT Designer. Please also include a screenshot showing the GUI of your program while the program is being executed. If as part of your "over and above" efforts you are making changes that result in the project not satisfying the original conditions from the list above anymore, please include both your original solution and the modified version in your submission as two separate folders.
Write-up
Produce a 400 word write-up of what you have learned during this exercise; reflect on and briefly discuss the decisions you made when you designed the GUI for this project. Please also briefly mention what you did for "over and above" points in the write-up.
Deliverables
Submit a single .zip file to the Programming Assignment drop box; the zip file should contain:
- all the code and .ui files for your project
- a screenshot showing the GUI of the running project
- your 400 word write-up