2.8 Packages
2.8 Packages
You have already used a number of packages in Python, primarily the arcpy package, but you are likely to have encountered others, such as sys, csv, which are a part of the Python standard library, or perhaps numpy and matplotlib, which are auxiliary libraries. In the previous section of this lesson, you learned about the tkinter and PyQT libraries as we built a Python graphical User Interface (GUI). In order to use these packages you had to use the import statement to make the additional methods they provide available to your code, for example:
import arcpy
You also created modules of your own that you imported into other scripts. You simply constructed a .py file and used the import statement in order to use it, and that is all Python requires for a module to be created. Creating such a module is straightforward - all your code was contained in a single .py file, you placed the file in the same folder as the program that would use it, and you imported into that program and used its functions. You may be wondering how a module is different from a package, since they are imported the same way. The difference is that a package is a collection of modules set up for easier distribution. While some projects may consist of one simple module, you will find that if you are building a project of any complexity, more than one .py file will be required, and potentially other files as well, such as configuration files or images.
In the next section, we will look at what exactly can be imported into Python. Later in the lesson, we will demonstrate the pip and conda package and environment managers as well as the Anaconda Python distribution based on conda. The section contains several optional subsections in which we package the Locations From Web Services application from the walkthrough and upload it to distribution sites. As in Lesson 1, we recommend that you only perform what is described in these optional sections yourself if you have time left at the end of the lesson.
2.8.1 Packages and the import statement
2.8.1 Packages and the import statement
As was mentioned earlier, when you use the import statement you can import a single .py file. In addition, the import statement can point to a folder containing a set of .py files, or a library written in a different programming language, such as C++.
You may be wondering how Python finds the module or package you specified since you only specify the name. Your own modules may have been in the current directory with the program using it, but arcpy, for example, isn’t. What happens is that Python has a list of locations that it uses in order to find the necessary packages. It traverses the list in the specific order, and, once it finds all the packages it needs, it stops looking. Here is the search order1 that Python uses:
- The home directory where the currently executing .py file is located
- PYTHONPATH directories: PYTHONPATH is a variable that is optionally set in the operating system. For example, on a Windows machine you would set it in Environmental Variables in System Settings.
- Standard library directories: The location where all standard libraries are installed on the local machine – if you have ArcGIS 10.6 Desktop installed to a default location the standard libraries can be found at C:\Python27\ArcGIS10.6\Lib. Browse to the folder, and take a quick look of all the packages that are installed.
- The contents of any .pth files: These are text files that can be created to add additional library paths; this option is used by ArcGIS Desktop 10.6. In a standard installation you can find the .pth file at C:\Python27\ArcGIS10.6\Lib\site-packages\Desktop10.6.pth. ArcGIS pro has its own .pth file: C:\Users\<username>\AppData\Local\ESRI\conda\envs\arcgispro-py3-clone\Lib\site-packages\ArcGISPro.pth or C:\Program Files\ArcGIS\Pro\bin\Python\envs\arcgispro-py3\Lib\site-packages\ArcGISPro.pth depending on your version of Pro.
- The site-package home or third-party extensions: Packages placed in Libs\site-packages directory. In a standard install of ArcGIS 10.6 Desktop that would be in the C:\Python27\ArcGIS10.6\Lib\site-packages folder.
Because of the way Python finds the code it needs to import, you need to be careful how you name your modules and packages, and where you place them. For example, if you were to create an arcpy.py module and put it in the home directory, the ArcGIS arcpy package would not be loaded.
This list above may look intimidating, but the good news is that packages you are likely to need will be packaged with special Python utilities (either pip or conda) and thus setup to place themselves in the appropriate paths without any manual intervention on your part, beyond the installation step. The other good news is that both pip and conda are fairly straightforward to use when it comes to installing packages and managing Python environments. Creating your own pip or conda packages can be a bit more involved though as you will also see in this section but still provides a convenient way for deploying and sharing your own Python applications.
1Mark Lutz: Learning Python, 5th Edition
2.8.2 Python Package Management
2.8.2 Python Package Management
There are many Python packages available for use, and there are a couple of different ways to effectively manage (install, uninstall, update) packages. The two package managers that are commonly used are pip and conda. In the following sections, we will discuss each of them in more detail. At the end of the section, we will discuss the merits of the two tools and make recommendations for their use.
We will be doing some more complicated technical "stuff" here so the steps might not work as planned because everyone’s PC is configured a little differently. If you get stuck please check in with the instructor sooner rather than later. A quick troubleshooting / debugging process can involve testing to see if running the command or Command Prompt as Administrator resolves the issue, trying the Windows Command prompt instead of the Python Command prompt (or vice versa), and, if none of that has helped, trying the tech support staple of restarting your PC.
2.8.2.1 Pip
2.8.2.1 Pip
As already mentioned, pip is a Python package manager. It allows for an easier install, uninstall and update of packages. Pip comes installed with Python, and if you have multiple versions of Python you will have a different version of pip for each. To make sure we are using the version of pip that comes installed with ArcGIS Pro, we will go to the directory where pip is installed. Go to the Windows Start Menu and open the Python Command Prompt as before.
In the command window that now opens, you will again be located in the default Python environment folder of your ArcGIS Pro installation. For newer versions of Pro this will be C:\Users\<username>\AppData\Local\ESRI\conda\envs\arcgispro-py3-clone\. Pip is installed in the Scripts subfolder of that location, so type in:
cd Scripts
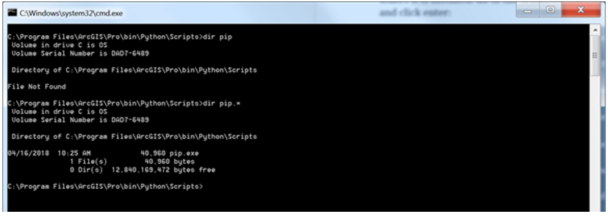
Now you can run a command to check that pip is in the directory – type in:
dir pip.*
The resulting output will show you all occurrences of files that start with pip. in the current folder, in this case, there is only one file found – pip.exe.
Next, let’s run our first pip command, type in:
pip --version
The output shows you the current version of pip. Pip allows you to see what packages have been installed. To look at the list type in:
pip list
The output will show (Figure 31) the list of packages and their respective versions.

To install a package, you run the pip command with the install option and provide the name of the package, for example, try:
pip install numpy
Pip will run for a few seconds and show you a progress bar as it is searching for the numpy package online and installing it. When you run pip install, the packages are loaded from an online repository named PyPI, short for Python Package Index. You can browse available packages at Python's Package Index page [1]. If the installation has been successful you will see a message stating the same, which you can confirm by running pip list again.
In order to find out if any packages are outdated you can run the pip list with the outdated option:
pip list –-outdated
If you find that there are packages you want to update, you run the install with the upgrade option, for example:
pip install numpy –-upgrade
This last command will either install a newer version of numpy or inform you that you already have the latest version installed.
If you wanted to uninstall a package you would run pip with the uninstall option, for example:
pip uninstall numpy
You will be asked to confirm that you want the package uninstalled, and, if you do (better not to do this or you will have to install the package again!), the package will be removed.
The packages installed with pip are placed in the Lib\site-packages folder of the Python environment you are using. You will recall that that was one of the search locations Python uses in order to find the packages you import.
2.8.2.2 Optional complementary materials: Building a pip package
2.8.2.2 Optional complementary materials: Building a pip package
Important note: While knowing how to create packages from your Python code to disseminate it is an important skill for a Python programmer, the procedure described in this section is a bit complex and error-prone due to system and installation differences. It is also not required to have performed these steps successfully yourself to finish the lesson and the rest of the course. Therefore, this section is provided for interest only. We recommend that you just read through it or skip over it completely and you can then loop back to it at the end of the lesson if you have free time or after the end of the class. If you decide to go through the steps yourself and find yourself stuck with some errors, please feel free to ask about them on the course forums but don't let such issues keep you from reading through the rest of the section and finishing the lesson.
Now that we covered the basic operation of pip, we will create a pip package for the Locations From Web Services you developed in this lesson. Creating the pip package will involve the following steps:
- Creating a __init__.py file
- Creating a setup.py file
- Installing the package
- Creating a source distribution
- Creating an account on PyPI (you need to set up an account only once)
- Publishing the package and the source to PyPI
We will walk through all these steps and create the necessary files and folders. For reference, as you are reading on, your final package folder and file structure should look like this for pip:
<yourinitialsdate>locationsfromwebservices
├── setup.py
└── <yourinitialsdate>locationsfromwebservices
   ├── __init__.py
   ├── core_function.py
   ├── gui_main.py
   ├── gui_main.ui
   ├── gui_newshapefile.py
   ├── gui_newshapefile.ui
   └── main.py
Let’s start by creating a separate folder and copying the existing code files into it. Create a pip directory in a location of your choice. Then create a folder named <yourinitialsdate>locationsfromwebservices within it. Replace the <yourinitialsdate> part of the folder name with the combination of your initials and current date and leave out the <>. From now on in the lesson wherever you see that string, replace it with your own combination. Pip packages have to have unique names, otherwise you will not be able to upload them to the repository. Within that folder create another <yourinitialsdate>locationsfromwebservices folder. Copy all the code files you created (or downloaded) for the GUI walkthrough for the Locations from Web Services example in the previous section into this latest (inner) <yourinitialsdate>locationsfromwebservices folder.
Once the folder is set up use your Python editor or other text editor of choice to create the __init__.py file and place it in the same directory. The file is used by Python to indicate folders that are Python packages. We will leave the file blank – only its presence in the folder is required. The file need not be blank, however. It is a special file that gets executed once the package is imported into another package. It is written in standard Python, so it can contain regular code, and is often used to import other packages, so other modules in the package can import it from the package instead.
Let’s proceed to the second step – creating the setup.py file. The file needs to be located in the folder above the code, in the top level <yourinitialsdate>locationsfromwebservices folder. If that is confusing refer back to the folder tree diagram above. Type in the following content into the file:
from setuptools import setup, find_packages

setup(name='<yourinitialsdate>locationsfromwebservices',
      version='1.0',

description='<yourinitialsdate>locationsfromwebservices',
      url='http://drupal.psu.edu/geog489/',
      author='GEOG489',
      author_email='GEOG489@psu.edu',
      license='BSD',
      packages=find_packages(),
      install_requires=['pyqt5'],
      zip_safe=False)
Now we are ready to install the package. Please make sure that there are no other Python processes running; this includes quitting ArcGIS and/or spyder if they are currently running. In the Python Command Prompt window navigate to the location of your project, specifically the folder containing the setup.py file. Once there, type in and run this command (note the '.' at the end of the command which is important):
pip install .
You will receive some status update messages ending with the notification that the package has been successfully installed. You may get a notification you are using an outdated version of pip. Please do not update pip or any other package, as then your set up would be out of sync with the class material.
In order to upload the source to PyPI, the Python Package Index, we need to create a source distribution. To do so type in and run this command:
python setup.py sdist
The sdist option creates a new folder in your project named dist and packages all the necessary files for upload into a tar.gz file, which is a compressed file type.
Now that we have everything ready for upload, go to the Python Package Index page [1] and click on Register (top right corner), and proceed to create an account. You will need to log into your e-mail account and click the link to verify the account before you can make any uploads. Once you have an account enter the following in the Command Prompt window:
python setup.py sdist upload
You will be asked for your user credentials (or at least your password). Please enter them and the upload will start.
It is very likely you will get an error "error: Upload failed (403): Invalid or non-existent authentication information" that means your username wasn't specified.
The solution to this issue is twofold: First you need to create a file called .pypirc in your home directory (that is c:\Users\<your user name>). You can download this sample configuration file [2], place it in your home directory, and then edit it to put in your user credentials. Second, you need to install another package called twine:
pip install twine
Once twine is installed:
twine upload dist\*
will use twine to upload the zipped package in the dist folder to your repository (assuming you modified your username and password in the .pypirc file).
Once complete go back to your PyPI account and check the list of your projects to confirm the upload was successful. Please delete the project, as projects need to have unique names and another student attempting this process will get an error if your project remains in PyPI (although our attempt at generating a unique name with the date and our initials should minimize that chance). You need to click on Manage, then Settings and then Delete next to the project name (and type in the project name to confirm).

The package we created is a barebones package, it has absolute minimum elements to be uploaded. Two other elements you should definitely consider adding to your packages are a README and a LICENSE file. The README file would contain some information about the project – who created it, what it does, and any other notes you would like to leave for the users. The LICENSE file should spell out the license agreement for using your package. We will leave the pip package as is but will be adding a LICENSE file to our conda package.
2.8.3 Conda and Anaconda
2.8.3 Conda and Anaconda
Another option for packaging and distributing your Python programs is to use conda (we will discuss Anaconda a bit later in the lesson). Just like pip, it is a package manager. In addition, it is also an environment manager. What that means is that you can use conda to create virtual environments for Python, while specifying the packages you want to have available in that environment. A little more about that in a moment. Conda comes installed with ArcGIS Pro. While conda should be installed if you were able to install spyder in Lesson 1, we can doublecheck that it is by opening the Python Command Prompt and then typing in:
cd Scripts
followed by:
conda –-version
The output should show the conda version.
In order to find out what packages are installed type in:
conda list
Your output should look something like Figure 2.34:

The first column shows the package name, the second the version of the package. The third column provides clues on how the package was installed. You will see that for some of the packages installed, Esri is listed, showing they are related to the Esri installation. The list option of conda is useful, not only to find out if the package you need is already installed but also to confirm that you have the appropriate version.
Conda has the functionality to create different environments. Think of an environment as a sandbox – you can set up the environment with a specific Python version and different packages. That allows you to work in environments with different packages and Python versions without affecting other applications. The default environment used by conda is called base environment. We do not need to create a new environment, but, should you need to, the process is simple – here is an example:
conda create -n gisenv python=3.11 arcpy numpy
the –n flag is followed by the name of the environment (in this case gisenv), then you would choose the Python version which matches the one you already have installed (3.10, 3.11 etc.) and follow that up with a list of packages you want to add to it. If you later find out you need other packages to be added, you could use the install option of conda, for example:
conda install –n gisenv matplotlib
To activate an environment, you would run:
activate gisenv
And to deactivate an environment, simply:
deactivate
There are other options you can use with environments – you can clone them and delete them, for example. A great resource for the different options is Conda's Managing Environments page [3].
2.8.3.1 Optional complementary materials: Installing Conda Build Package
2.8.3.1 Optional complementary materials: Installing Conda Build Package
Important note: While knowing how to create packages from your Python code to disseminate it is an important skill for a Python programmer, the procedure described in this section and section 2.8.3.2 is a bit complex and error-prone due to system and installation differences. It is also not required to have performed these steps successfully yourself to finish the lesson and the rest of the course. Therefore, this section is provided for interest only. We recommend that you just read through it or skip over it completely and you can then loop back to it at the end of the lesson if you have free time or after the end of the class. If you decide to go through the steps yourself and find yourself stuck with some errors, please feel free to ask about them on the course forums but don't let such issues keep you from reading through the rest of the section and finishing the lesson.
Before we can create a conda package of our own we do need to install the conda-build package. We will use conda to install the conda Build package, just as you did with the PyQT5 package.
Use the Python Command Prompt and type in:
conda install conda-build
What we are doing is running conda with the install option, and asking it to install the conda-build package. A search and analysis will be performed by conda to find the package, determine its dependencies and you will be informed of all the packages that will be installed. Type in y to allow the install to proceed, and you will get progress messages for the installation of conda-build and all packages it is dependent on.

You could install other packages as well in a similar fashion (just as with pip), by changing the name conda-build to the appropriate package name. In order to know if a package you are looking for is available to be installed from conda, you can run conda with a search option, for example:
conda search pandas
The output will show if the package is available, and if so from which channels. Channels are different repositories that have been set up by users and organizations.
2.8.3.2 Optional complementary materials: Packaging Your Code with Conda
2.8.3.2 Optional complementary materials: Packaging Your Code with Conda
Important note: As the previous section, this section is provided for interest only. We recommend that you just read through it or skip over it completely and you can then loop back to it at the end of the lesson if you have free time or after the end of the class. If you decide to go through the steps yourself and find yourself stuck with some errors, please feel free to ask about them on the course forums but don't let such issues keep you from reading through the rest of the section and finishing the lesson.
Now that we know conda is installed and working, we will proceed to building your first conda package. Before we begin create a copy of your pip folder and rename it to conda. Delete the "dist" and "locationsfromwebservices.egg-info" folders. Creating a conda package will involve the following steps:
- Creating a meta.yaml file
- Creating a LICENSE file
- Creating a build.sh and bld.bat files
- Creating a setup.py file (we already created it while building the pip package)
- Building the project using conda-build
- Creating an account on Anaconda Cloud
- Uploading the project to Anaconda Cloud
We will walk through all these steps and create the necessary files and folders, just as we did for pip. For reference, as you are reading on, your final package folder and file structure should look like this for conda:
<yourinitialsdate>locationsfromwebservices
  ├── bld.bat
  ├── build.sh
  ├── LICENSE
  ├── meta.yaml
  ├── setup.py
  └── <yourinitialsdate>locationsfromwebservices
     ├── __init__.py
     ├── core_function.py
     ├── gui_main.py
     ├── gui_main.ui
     ├── gui_newshapefile.py
     ├── gui_newshapefile.ui
     └── main.py
The next step is to create a file named meta.yaml in the original (outer) <yourinitialsdate>locationsfromwebservices folder. You can create the file in any text editor. Make sure the name and extension match exactly. Type in the following into the file. Some of the elements will be left empty, but it is a good idea to use this template, to make sure all the elements you need are there:
package:
  name: <yourinitialsdate>locationsfromwebservicescomplete
  version: "1.0"

source:
  path: ./

requirements:
  build:
    - python
    - setuptools

  run:
    - python
    - pyqt

about:
  home: https://www.e-education.psu.edu/geog489/node/1867/
  license: BSD
  license_file: LICENSE
The package section of the file simply contains the package name and the version. The name can only contain lowercase letters and dashes.
The source sections point to the source of the data. In this case, we are pointing to the source on the local drive, but the source could be git or a compressed (.zip or .tar file), along with a few other options.
The requirements specify what tools are necessary to build the package, and the run section specifies what packages are necessary for running the package. Since we made the arcpy an optional part of the project we will not include it under the requirements. Setuptools is a package that helps with building Python projects. Please note that in conda the pyqt5 package is just called pyqt.
The about section provides more information about the package, such as the website it may be found on and license specification.
We set the license to BSD, which is a very permissive license type. Other licenses you may want to consider are GPL (General Public License) and LGPL (Lesser General Public License). A summary of these open source license types and a few others can be found at: choosealicense.com [4]. It is a good idea to include a license with your package distribution. The name of the license file is specified in the about – license_file section, and it is typically named just license. You can download a sample license file here [5] to be included with your distribution, or you can use the Binpress license generator [6] and specify your own terms. Place the LICENSE file in the outer <yourinitialsdate>locationsfromwebservices folder where the meta.yaml file is located.
The version of the meta.yaml file we created is rather simple. There are other options you can set if necessary. Find the complete guide here [7].
Now we also need to create two build script files – build.sh and bld.bat. The .bat file works in the Windows environment, but, if the project is built on a Linux or a macOS environment (unlikely for arcpy type projects), we need the build.sh file as well.
Type in the following content into the bld.bat file:
"%PYTHON%" setup.py install
if errorlevel 1 exit 1
Here is the content for the build.sh file:
$PYTHON setup.py install
As you may have gathered from the batch files we created, the setup.py file is required by conda. Since we created it in setting up the pip package we do not need to recreate it here – just copy it from its location in your pip folder to the <yourinitialsdate>locationsfromwebservices folder within your conda folder.
Copy the LICENSE file into the <yourinitialsdate>locationsfromwebservices folder as well.
Now that we have the package set up, we will use the Python Command Prompt to build the package. Make sure you are in the folder that contains the outer <yourinitialsdate>locationsfromwebservices and run the following command:
conda-build <yourinitialsdate>locationsfromwebservices
After a long process and verbose output, towards the end you should see a line that gives you the command to upload your package to anaconda. More on this later. For now, just look at this output and note where the compressed tar.bz2 archive with your package has been created:
# If you want to upload package(s) to anaconda.org later, type:

anaconda upload c:\Users\<user name>\AppData\Local\ESRI\conda\envs\arcgispro-py3-clone\conda-bld\win-64\<yourinitialsdate>locationsfromwebservicescomplete-1.0-py35hc17e43c_0.tar.bz2

If you were watching the conda-build output very closely you might have seen a couple of errors displaying "The system cannot find the path specified" for some Visual Studio tools – that is okay and you do not need to be concerned by those.
That brings us to the next section of the lesson where we discuss Anaconda. Leave the Python Command Prompt window open, as we will be using it shortly to upload the package to the Anaconda Cloud.
2.8.3.3 Anaconda
2.8.3.3 Anaconda
Anaconda is a Python distribution that includes popular data science packages and the familiar package manager conda in its distribution. Anaconda makes it easy to create a Python setup conducive to data analytics that also facilitates package management (updates, installs, removals), packaging projects, managing environments, and sharing packages. Anaconda provides a Graphical User Interface for managing Python environments, packages, and various data science software. Figure 2.40 below (obtained from the Anaconda website [8]) shows the Anaconda components.
The conda portion of Anaconda contains a repository of packages maintained by Anaconda (Anaconda Repository), but also the Anaconda Cloud, which users and organizations can contribute to. If we were to upload the package created in the previous optional section with the command conda presented to us, it would be uploaded to the Anaconda Cloud.
We will use Anaconda in Lesson 3 to work in a fresh Python environment outside the ArcGIS Pro installation. You should therefore perform the steps in this section to install Anaconda on your computer. Setting up a user account for Anaconda Cloud will be described in the following optional section, but you won't need this unless you want try uploading the conda package from the previous optional section.

To download and install Anaconda you would normally go to anaconda.com [9], pick the Individual Edition option (or one of the other options if you prefer), and then click Download to get to the page where you can download the Anaconda installers (Figure 41; Anaconda frequently updates their website design, but you get the idea). However, we are here providing a direct link to download the Windows 64-bit installer to make sure we all are using the same version, one that we have tested the Lesson 3 content with: https://repo.anaconda.com/archive/Anaconda3-2024.06-1-Windows-x86_64.exe [10] . Once downloaded, double-click on the .exe file to run the installer. Use all the default install options. If asked, you can choose to skip installing Microsoft Visual Studio Code.

After the installation, Anaconda will be located in a folder called Anaconda3 of your user's home directory, so C:\Users\<user name>\Anaconda3. This is the root environment (also called base environment) installed by Anaconda. If you create further environments or clone existing environments, these will be located in the envs subfolder of the Anaconda3 directory.
The easiest way to interact with Anaconda is via the Anaconda Navigator program that provides a graphical user interface for managing the installation, starting programs, etc. Just type the first letters into the Windows search and you should be able to find the program and run it (if not, it is located in the Scripts subfolder of the Anaconda3 directory).
Here is a quick overview of the Navigator interface: As shown in the image below, the Navigator has a vertical main menu on the left side of the window. We are only interested in the Home and Environments entries at the moment. The Home screen simply shows you a number of applications that are either installed and can be launched in your currently active Python environment or that you may want to install. You can switch to a different environment using the dropdown menu box at the top. In the image below, the currently active environment is the root environment installed by Anaconda.

If you now switch to the Environments screen, you will see that it has two main sections: the one on the left is for managing Python environments and the one on the right is for managing packages in the currently active environment. Anaconda will also see potential environments located under C:\Users\<user name>\AppData\Local\ESRI\conda\envs, so, if that's the location where your ArcGIS Pro installation has stored its default Python environment, it should appear in the environments list as well.

Clicking on a environment in the list will activate that environment and update the package manager view on the right accordingly. The buttons below the environment list can be used to easily create, clone or delete environments. The graphical package manager on the right is also relatively intuitive to use. At the top, you can (among other options) select whether it should list the current, not installed, or all available packages. Selecting an uninstalled package by clicking the box on the very left of the entry will allow you to install that package. Packages for which newer versions are available are shown with a blue arrow next to the version number on the right. Clicking that arrow will allow you to update the package. Both the graphical environment manager and package manager are visual front-ends to conda. So whenever you perform some activity, like installing a package, the corresponding conda command will be executed in the background.
This was really just a very brief introduction to the main elements of the Anaconda Navigator and Anaconda in general. However, you will get the chance to use it further and learn more details in Lesson 3.
2.8.3.4 Optional complementary materials: Uploading Conda package to Anaconda Cloud
2.8.3.4 Optional complementary materials: Uploading Conda package to Anaconda Cloud
Important note: This section uses the conda package created in optional section 2.8.3.2. While knowing how to create packages from your Python code to disseminate it is an important skill for a Python programmer, it is not required to have performed the steps required in this section successfully yourself to finish the lesson and the rest of the course. Therefore, this section is provided for interest only. We recommend that you just read through it or skip over it completely and you can then loop back to it at the end of the lesson if you have free time or after the end of the class. If you decide to go through the steps yourself and find yourself stuck with some errors, please feel free to ask about them on the course forums but don't let such issues keep you from reading through the rest of the section and finishing the lesson.
After the installation, the next step to publishing our conda package from Section 2.8.3.2 is creating a user account. In order to obtain one, you need to go to anaconda.org [11] and use the dialog on the right side of the screen to create an account.

Finally, we are ready to upload our package to Anaconda. In the Command Prompt window, run the following command to log into the Anaconda Cloud (note that the path might be one of the following two options depending on where Anaconda is installed):
c:\Users\YourUserName\Anaconda3\Scripts\anaconda login
or
c:\programdata\Anaconda3\Scripts\anaconda login
You will be asked to provide your user credentials and will be greeted with a message that confirms that your login was successful.
The next step is to upload your package – run the following command (remembering to use the path to where Anaconda was installed), but replace the tar.bz2 file with the file name conda provided you at the completion of the package build. If you are using an older version of Pro, you will also have to replace the first part of the path to the .tar.bz2 file with "c:\Program Files\ArcGIS\Pro\bin\Python\envs\arcgispro-py3\conda-bld\win-64\".
c:\Users\YourUserName\Anaconda3\Scripts\anaconda upload "c:\Users\<user name>\AppData\Local\ESRI\conda\envs\arcgispro-py3-clone\conda-bld\win-64\<yourinitialsdate>locationsfromwebservicescomplete-1.0-py35hc17e43c_0.tar.bz2"
You will receive messages that keep you updated on the upload status, and then you will be notified that the upload is complete. Log into the Anaconda Cloud and look at your Dashboard (Figure 43) – the package is now listed, and located in your own Anaconda Cloud Channel. If you click on the package name you will receive information on how it can be installed with conda.

2.8.4 Package Distribution Recommendation - Why Conda?
2.8.4 Package Distribution Recommendation - Why Conda?
If you worked or read through the exercises we worked through for packaging our application in the optional parts of this section, you might have gotten the impression that pip is easier to use than conda, and, since they both facilitate software packaging and distribution, why bother packaging your applications with conda? Here are a number of reasons:
- Conda has a built-in virtual environment functionality
- Conda further aids in package installs as it not only checks for dependencies but installs any dependent packages
- Conda is closely bound with Anaconda and Anaconda Cloud, which is set up to use different channels, providing a finer-grained package organization. For example, if you are interested in packages ESRI has published, you can go to the company’s channel - https://anaconda.org/esri.
- While pip can only be used with Python, conda can be used with other languages as well – so if you decided to develop something with R, conda can work with it too.
If you are interested in a more detailed comparison of the two tools, a great article to reference is Conda Myths and Misconceptions [12].