Lesson 3: Web Publishing Technologies: HTML/XHTML/CSS
Overview
Overview
A web mapping application is essentially a web page containing special scripts that dynamically add a map to the page. The bulk of this course will be concerned with writing these map building scripts (using JavaScript). However, web maps are embedded within pages written in the web publishing languages of HTML and CSS, so it makes sense to first spend some time discussing those languages.
This lesson covers a lot of material, so be sure to set aside enough time for it. At the end of the lesson, you'll be given a document and asked to apply what you've learned to produce a web page that replicates the formatting of your assigned document.
Objectives
At the successful completion of this lesson, students should be able to:
- understand the basic rules/terminology of Hypertext Transfer Markup Language (HTML);
- author a simple web page containing paragraphs, lists, tables, images, and links without the aid of an HTML editor;
- describe notation schemes that are not handled well by HTML;
- explain the need for and uses of eXtensible Markup Language (XML);
- describe the motivation behind the development of eXtensible HTML (XHTML) and its syntax differences from HTML;
- describe the benefits of using Cascading Style Sheet (CSS) technology;
- author a simple web page using XHTML and CSS.
Questions?
Conversation and comments in this course will take place within the course discussion forums. If you have any questions now or at any point during this week, please feel free to post them to the Lesson 3 Discussion Forum. (That forum can be accessed at any time by clicking on the Discussions tab.)
Checklist
Checklist
Lesson 3 is one week in length. (See the Calendar in Canvas for specific due dates.) To finish this lesson, you must complete the activities listed below. You may find it useful to print this page out first so that you can follow along with the directions.
| Step | Activity | Access/Directions |
|---|---|---|
| 1 | Work through Lesson 3. | Lesson 3 |
| 2 | The instructor will email you a Word Document. Reproduce that document as a web page using HTML and CSS. | Post your web page in your e-portfolio. |
| 3 | Take Quiz 3 after you read the online content. | Click on "Lesson 3 Quiz" to begin the quiz. |
3.1 HTML
3.1 HTML
HTML Basics
HyperText Markup Language (HTML) is the core language involved in the authoring of pages published on the World Wide Web. HTML is simply plain text in which the text is "marked up" to define various types of content, such as headings, paragraphs, links, images, lists, and tables. The markup occurs in the form of tags, special character strings that signal the beginning and end of a content element. For example, the <h1>...<h6> tags are used to define heading elements:

- The characters that denote an HTML tag (< and >) are referred to as angle brackets.
- Tags usually come in pairs (e.g., <body> and </body>, where <body> is the start tag and </body> is the end tag).
- HTML is not case sensitive (i.e., <title> is the same as <TITLE>), though lowercase is the recommended standard.
- Tags and their associated text form HTML elements.

A simple HTML document
All HTML documents should be enclosed within <html></html> tags and should contain a head section and a body section. The head section contains metadata about the document and is defined using the <head> tag. The <title> tag is used frequently in the head section to define the title of the document. The body section contains the information you want to appear on the page itself and is defined using the <body> tag. Below is an example of a very basic HTML document:

Commonly used tags
As we saw earlier, the <h1>...<h6> tags are used to define headings. Other tags that are often used to define elements in the body of a document include:
- <p></p> to define paragraphs of text
- <em></em> to give text emphasis (displayed in italics by default)
- <strong></strong> to give text strong emphasis (displayed in bold by default)
- <br> to insert a line break
- <hr> to insert a horizontal rule (line)
Note that a couple of these tags refer to the default presentation of their associated text. Later in the lesson, we'll see how stylesheets can be used to override these defaults.
Displaying lists
HTML allows authors to define two types of lists -- ordered and unordered. Ordered lists are most appropriate when listing a set of steps or items that can be ranked in some way. The <ol> tag is used to begin an ordered list and the </ol> tag is used to end it. Within those tags, each item should be enclosed within <li> and </li> tags. By default, web browsers number the items automatically beginning with 1.
| Code | Display |
|---|---|
<html>
<body>
<h4>Ordered List</h4>
<ol>
    <li>Citizen Kane</li>
    <li>Casablanca</li>
    <li>The Godfather</li>
</ol>
</body>
</html>
|
 |
Unordered lists are most appropriate when listing items that cannot be ranked meaningfully. List items are defined the same way with <li></li>, but the items are enclosed by <ul></ul> rather than <ol></ol>. By default, web browsers mark the items with bullets.
| Code | Display |
|---|---|
<html>
<body>
<h4>Unordered List</h4>
<ul>
    <li>Ford</li>
    <li>GM</li>
    <li>Chrysler</li>
</ul>
</body>
</html>
|
 |
Note: The indentation of the list items in the examples above is done merely to improve the readability of the HTML code and is not responsible for the indentation of the items in the output. Writing the code such that the li elements appear flush with the left margin would result in the same output.
Displaying images
Images are added to a web page using the <img> tag. For example:
<img src="brown_MarkerA.png">
Some important points to note about this example:
- img elements don't have an end tag.
- src is an example of an element attribute.
- Attribute values should be specified in quotes, preferably double quotes.
- The web browser will look for brown_MarkerA.png in the same folder that the HTML document is in.
- It is also possible to load images using a full web address (URL):
<img src="http:/detwilergeog863.webhostapp.com/icons/brown_MarkerA.png">
Adding links
Links are added to a web page using the anchor tag (<a>) and its href attribute:
<a href="http://www.psu.edu/">Penn State</a>
Note that the text that you want to display as a link should be placed between the <a> and </a> tags. The URL that you want to load should be used to specify the href attribute value.
You've probably encountered pages with links that jump to a specific location in the page (e.g., a "Back to top" link). This is called a bookmark link and creating one is a two-step process:
- Create an anchor somewhere in the document: <a id="top"></a>
- Link to that anchor: <a href="#top">Back to top</a>
Note that the value assigned to the id attribute ("top" in this case) is entirely up to you. The key is to plug the same value into the href attribute and precede that value with a pound sign to specify that you're linking to an anchor in the same document.
This will also work to link to a specific location in another page a bookmark link will also work to link to another page such as Lesson 3 Deliverables using:
<a href="www.e-education.psu.edu/geog863/node/1886#L2deliverables">Lesson 3 Deliverables</a>
HTML entities
Some of the characters you might want to display on your page require special coding because they have special meanings in HTML. For example, if you wanted to display an algebraic expression like x > 5, you'd need to use the code > since angle brackets are used to produce start and end tags.
Another aspect of HTML that can prompt the use of one of these entities is the fact that consecutive spaces in your HTML source code are treated as one. You can get around this by inserting one or more non-breaking spaces with the entity .
Some other commonly used entities include:
| Output char | HTML code |
|---|---|
| & | & |
| " | " |
| © | © |
| ÷ | ÷ |
| × | × |
HTML tables
Tables are commonly used in mapping applications to display information associated with features on the map. A table is defined using the <table> and </table> tags. A row can be added to the table using the <tr> and </tr> tags. Individual cells of data can be added to a row using the <td> and </td> tags. Here is a very simple example:
| Code | Display |
|---|---|
<table> <tr> <td>Penn State</td> <td>Nittany Lions</td> </tr> <tr> <td>Ohio State</td> <td>Buckeyes</td> </tr> </table> |
 |
To add a border to a table, you set its border attribute to some whole number (of pixels):
| Code | Display |
|---|---|
<table border="1"> <tr> <td>Penn State</td> <td>Nittany Lions</td> </tr> <tr> <td>Ohio State</td> <td>Buckeyes</td> </tr> </table> |
 |
To include column headings, add a row containing <th> elements instead of <td> elements. By default, web browsers will display the <th> elements in bold:
| Code | Display |
|---|---|
<table border="1"> <tr> <th>School</th> <th>Mascot</th> </tr> <tr> <td>Penn State</td> <td>Nittany Lions</td> </tr> <tr> <td>Ohio State</td> <td>Buckeyes</td> </tr> </table> |
 |
<td> and <th> elements have an attribute called colspan that can be used to spread the element's text across multiple columns:
| Code | Display |
|---|---|
<table border="1"> <tr> <th colspan="2">2000</th> <th colspan="2">2006</th> </tr> <tr> <th>Males</th> <th>Females</th> <th>Males</th> <th>Females</th> </tr> <tr> <td>5,929,663</td> <td>6,351,391</td> <td>6,043,132</td> <td>6,397,489</td> </tr> </table> |
 |
Likewise, <td> and <th> elements also have a rowspan attribute for spreading text across multiple rows.
Miscellaneous notes
Comments (text that you want to be visible when viewing the source code, but not in the rendered page) can be inserted into an HTML document using the following syntax:
<!-- This is a comment. -->
Also, as mentioned above, consecutive spaces are ignored by web browsers. This means that you should feel free to indent your HTML code (as shown in the table examples) and use line spacing to make it easier to read and follow.
Online tutorials/cheatsheets
This section of the lesson is just an introduction to the basics of HTML. There are many other helpful online HTML tutorials that can help you learn the language, along with cheatsheets that can be used for quick reference once you've gained some coding experience. Here is a list of sites that I've found to be helpful:
3.2 XML/XHTML
3.2 XML/XHTML
What is XML?
HTML handles the needs of most web authors, but there are some kinds of information that it is not well suited for presenting (e.g., mathematical notations, chemical formulae, musical scores). The eXtensible Markup Language (XML) was developed to address this shortcoming. XML is a language used to define other languages, a meta-language. Just as HTML has its own syntax rules, you can create your own markup language with its own set of rules.
For example, here is an example of a markup language used to store information about CDs in a CD catalog. Unlike HTML, in which the root element is called <html>, this language has a root element called <CATALOG>. A <CATALOG> element is composed of one or more <CD> elements. Each <CD> element in turn has a <TITLE>, <ARTIST>, <COUNTRY>, <COMPANY>, <PRICE>, and <YEAR>.
So, like HTML, XML documents use tags to define data elements. The difference is that you create the tag set. It is possible (though not required) to specify the rules of your XML language in a document type definition (DTD) file or an XML schema definition (XSD) file. For example, you might decide that a <CD> element can have one and only one <ARTIST> element within it.
While XML is quite similar in syntax to HTML (i.e., its use of tags), there are some syntax differences that make XML a bit more strict. Among these differences are:
- XML elements must have an end tag. Recall that the <img> element in HTML doesn't require an end tag.
- XML tags are case sensitive. <CATALOG> is not the same as <catalog> in XML, whereas <EM> is the same as <em> in HTML.
- XML elements must be nested properly. In HTML, an author can get away with code like <strong><em>Total</strong></em>, whereas in XML the </em> tag must come before the </strong> tag.
XML's Uses
XML has become an important format for the exchange of data across the Internet. And, as the CD catalog example discussed above implies, it can also be used as a means for storing data. We'll use XML later in the course for both of these purposes. Right now, we're going to focus on XML's use in creating a new flavor of HTML called XHTML.
An early development in the growth of web publishing was that desktop web browsers were designed to correct poorly written HTML. For example, in a bit of content containing paragraphs of text, it is possible to omit the </p> tag for paragraph elements and all of the popular desktop web browsers will render the content the same as if the </p> tags were present. This is not a surprising development if you think about it for a moment. Which browser would you prefer to use: one that displays a readable page the vast majority of the time or one that displays an error message when it encounters poorly written HTML?
Flash forward to the 2000s, the dawn of portable handheld devices like tablets and smartphones and wireless Internet. Slower data transfers and less computing power in these devices combined to produce lesser performance when rendering HTML content. This was one of the factors leading to the development of XHTML.
What is XHTML?
XHTML (eXtensible Hypertext Markup Language) is simply a version of HTML that follows the stricter syntax rules of XML. An XML/XHTML document that meets all of the syntax rules is said to be well-formed. Well-formed documents can be interpreted more quickly than documents containing syntax errors that must be corrected.
The introduction of this new XHTML language came after years of the development of plain HTML content. Thus, web authors interested in creating well-formed XHTML had to adjust their practices a bit, both because of the sloppy habits that forgiving browsers had enabled and the outright differences with HTML. These adjustments include:
- Elements that don't require an end tag in HTML must have one in XHTML (e.g., <p> needs a matching </p>).
- Empty elements in HTML must be terminated in XHTML (e.g., <br> must be changed to <br></br> or its shortcut <br />).
- Elements must be properly nested.
<strong><em>Some text</strong></em> INCORRECT
<strong><em>Some text</em></strong> CORRECT - Attribute values must be quoted.
<table rows=3> INCORRECT
<table rows="3"> CORRECT - XHTML is case sensitive. <a> and <A> are different tags. The standard is to use lowercase.
Flavors of XHTML
HTML was originally developed such that the actual informational content of a document was mixed with presentational settings. For example, the <i> tag was used to tell the browser to display bits of text in italics and the <b> tag was used to produce bold text. An important aspect in the development of web publishing has been its push for the separation of content from presentation. This resulted in the creation of an <em> tag to define emphasized text and a <strong> tag to define strongly emphasized text. It turns out that the default behavior of browsers is to display text tagged with <em> in italics and text tagged with <strong> in bold, which may leave you wondering what purpose these new tags serve if they only replicate the behavior of <i> and <b>.
The answer lies in the use of Cascading Style Sheets (CSS). With CSS, web authors can override the browsers' default settings to display elements differently. Authors can also develop multiple style sheets for the same content (e.g., one for desktop browsers, one intended for printing, etc.). The usage of style sheets also makes it much easier to make sweeping changes to the look of a series of related pages. We'll talk more about CSS in the next section.
So, while it is possible to override the behavior of the <i> and <b> tags just as easily as any other tags, the <em> and <strong> tags were added and recommended over <i> and <b> to encourage web authors to move away from the practice of mixing content with presentation.
XHTML has two main dialects that differ from one another in terms of whether they allow the use of some presentational elements or not. As its name implies, the XHTML Strict dialect does not allow the usage of elements like <font> and <center>. It also does not allow the usage of element attributes like align and bgcolor. Presentation details like font size/type and alignment must be handled using CSS. The Strict dialect also requires that all text and images be embedded within either a <p> element or a <div> element (used to define divisions or sections of a document).
The XHTML Transitional dialect does not prohibit the use of presentational elements and attributes like those described in the previous paragraph. Generally speaking, XHTML Transitional was intended for developers who want to convert their old pages to a newer version, but would probably not bother to do it if they had to eliminate every presentational setting. XHTML Strict was intended for developers creating new pages.
XHTML developers specify which set of rules their page follows by adding a DOCTYPE line to the top of the page. For example, here are the DOCTYPE statements for XHTML Strict and XHTML Transitional, respectively:
<!DOCTYPE html PUBLIC "-//W3C//DTD XHTML 1.0 Strict//EN"
"http://www.w3.org/TR/xhtml1/DTD/xhtml1-strict.dtd">
OR
<!DOCTYPE html PUBLIC "-//W3C//DTD XHTML 1.0 Transitional//EN"
"http://www.w3.org/TR/xhtml1/DTD/xhtml1-transitional.dtd">
Browse this article, Transitional vs. Strict Markup, for more details on the differences between the two dialects.
The basic skeleton of an XHTML Strict document looks like this:
<!DOCTYPE html PUBLIC "-//W3C//DTD XHTML 1.0 Strict//EN"
    "http://www.w3.org/TR/xhtml1/DTD/xhtml1-strict.dtd">

    <html xmlns="http://www.w3.org/1999/xhtml">
        <head>
            <meta http-equiv="content-type"
                content="text/html; charset=utf-8"/>
            <title>Your title here</title>
        </head>
        <body>
            Your content here
        </body>
    </html>
Page validation and conversion
XHTML and its dialects were developed by a standards organization called the World Wide Web Consortium (W3C). They also provide tools for web authors to validate that their pages follow the syntax rules of their selected DOCTYPE and to convert their pages from sloppy HTML to clean XHTML. This conversion tool is called HTML Tidy and can be run on the desktop or online (see links below).
Recent developments
Though XHTML was originally intended to be "the next step in the evolution of the Internet," it never gained a strong foothold in the web development community. A major factor that discouraged its adoption was that in order to reap the full benefit of an XML-based document, it needed to be served to browsers as "application/xhtml+xml" rather than "text/html." Most major browsers such as Firefox, Chrome, and Safari were built to handle the "application/xhtml+xml" content type. The notable exception was Internet Explorer, which until version 9 did not support "application/xhtml+xml" content — users were asked if they wanted to save the file when documents of that type were encountered.
In addition to the content type issue, technological advances have undercut the argument that small handheld devices cannot load web pages at an acceptable speed without the use of an XML-based parser. Today's smartphone browsers utilize the same HTML parsers as their desktop counterparts.
Thus, in recent years, the notion of a world in which browsers parse all web pages as XML and page developers must author well-formed documents appears less and less likely. The W3C halted their development of a new version of XHTML and shifted their focus towards a new version of HTML (HTML5). This led some to declare that "XHTML is dead." HTML5 requires browsers to continue correcting poorly written HTML. This has the effect of allowing sloppy page authors to continue in their sloppy habits. That said, browsers will continue to accept pages authored with XHTML-style coding, so developers who see value in serving their pages as XML may continue to do so. To learn more about HTML5, see the HTML 5 Introduction at the w3schools site.
So what language should we use?
HTML5 is the current standard for web publishing and you should certainly be looking to employ it in the web pages you develop. I have the content on XHTML in this lesson for a few reasons:
- to give you an appreciation for the evolution of web publishing standards,
- to encourage you to write clean HTML code. Doing so will enable you to achieve a higher level of consistency in the rendering of your pages than if you allowed yourself to pick up bad habits, and
- you may encounter XHTML in other people's source code.
At the end of this lesson, you'll be asked to write a web page from scratch using what you learned from the lesson. I'm going to require you to write that page in XHTML Strict. However, for subsequent projects, you will be able to use the less rigid HTML5.
3.3 CSS
3.3 CSS
The need for CSS
During the early years of the World Wide Web, maintaining a site where all of the pages share the same style was tedious and inefficient. For example, if a web author wanted to change the background color of each page on his/her site, that would involve performing the same edit to each page.
Creating alternate versions of the same page (e.g., one for the visually impaired) was also frustrating since it involved maintaining multiple copies of the same content. Any time the content required modification, the same edits would need to be made in multiple files.
Also, the mixing of page content with its presentational settings resulted in bloated pages. This was problematic for a couple of important reasons:
- It decreased the readability of the HTML source code, for example when performing edits.
- It increased the page's file size, which in turn increased the time required to download it.
The Cascading Style Sheet (CSS) language was developed to address all of these issues. By storing presentational settings in a separate file that can be applied to any desired page, it is much easier to give multiple related pages the same look, create multiple views of the same content, and reduce the bloating of pages.
How does CSS work?
To see how CSS works, go to this w3schools CSS demo. Click on a few of the "Stylesheet" links beneath the Same Page Different Stylesheets heading and note how the same exact content is displayed in a different way through the use of different style sheets.
Have a look at the page as rendered by "Stylesheet1," if you're not already, and view the page's source code (right-click on the page and select View Page Source) to see the CSS code stored in that style sheet. The beginning of this stylesheet tells the browser to display text within the document's body element at 100% of the size set by the user (as opposed to shrinking or enlarging it) and in the Lucida Sans font. It also applies a 20-pixel margin and a line-height of 26 pixels. Scrolling down to the bottom of the stylesheet, note that the a element is set to display in black (#000000) and with an underline. If you scan through the rest of the document, you should notice some other useful settings. Don't worry if you don't follow all of the settings at this point; you should have a clearer understanding after working through this page of the lesson.
The basic syntax used in CSS coding is:
selector {property: value}
where selector is some element, property is one of its attributes and value is the value that you want to assign to the attribute. I'll again refer you to the w3schools site for more CSS syntax and selector details. Pay particular attention to the "class selector," which is used when you don't want every element of a particular type to be styled in the same way (e.g., if you wanted some paragraphs to be aligned to the left and some to the right), and the "id selector," which is used to style a specific element.
Where to put CSS
CSS code can be written in three places:
- External style sheet - in an entirely separate file from the HTML document
- Internal style sheet - in the HTML document's head section
- Inline - the style is made an attribute of the desired HTML element
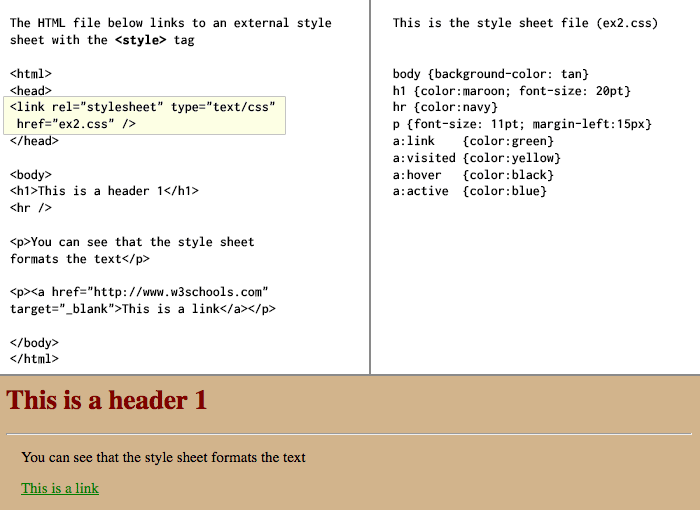
When the CSS code is stored in an external style sheet, a critical step is to add a reference to that style sheet in the HTML document's head section. The screen capture below (from the w3schools site) highlights this important setting.
To implement an internal style sheet, the actual CSS code should be stored in the head section of the HTML document rather than a link to an external file. The code should be surrounded by <style></style> tags as in this example:
<head>
  <style type="text/css">
    hr {color: sienna}
    p {margin-left: 20px}
    body {background-image: url("images/back40.gif")}
  </style>
</head>
Finally, to apply an inline style, the required CSS code should be assigned to the style attribute of the desired HTML element. Here is an example that changes the color and left margin settings for a paragraph element:
<p style="color: sienna; margin-left: 20px"> This is a paragraph </p>
Cascade order
The CSS language gets its name from the behavior exhibited when a page has styles applied from more than one of the sources described above. Styles are applied in the following order:
external — internal — inline
This order becomes important when the same selector appears in more than one style source. Consider the following example in which a page acquires styles from both an external and internal style sheet:

All h3 elements on the page will be colored red based on the setting found in the external sheet. The cascading nature of CSS comes into play with the text-align and font-size attributes. The page's h3 elements will take on the settings from the internal style sheet, since those styles were applied after the styles found in the external style sheet.
Now that you've seen how CSS works, the rest of this section will cover some of the more commonly used styles.
Background styles
The background color for any element (though most especially for the page's body) can be set as in the following example from w3schools:
| Code | Display |
|---|---|
<html>
    <head>

        <style type="text/css">
            body {background-color:yellow}
            h1 {background-color: #00ff00}
            h2 {background-color: transparent}
            p {background-color: rgb(250,0,255)}
        </style>

    </head>

    <body>

    	<h1>This is header 1</h1>
    	<h2>This is header 2</h2>
    	<p>This is a paragraph</p>

    </body>
</html>
|
 |
Note the different ways that the background-color property can be set. Valid values include names, 6-character hexadecimal values and RGB values. A list of valid color names can be found at w3schools.com.
Text styles
The color of text can be altered using the color property. As with background colors, text colors can be specified using names, hexadecimal values or RGB values:
| Code | Display |
|---|---|
<html>
    <head>

        <style type="text/css">
            h1 {color: #00ff00}
            h2 {color: #dda0dd}
            p {color: rgb(0,0,255)}
        </style>

    </head>

    <body>

    	<h1>This is header 1</h1>
    	<h2>This is header 2</h2>
    	<p>This is a paragraph</p>

    </body>
</html>
|
 |
Text can be aligned to the left, right or center using the text-align property:
| Code | Display |
|---|---|
<html>
    <head>

        <style type="text/css">
            h1 {text-align: center}
            h2 {text-align: left}
            p {text-align: right}
        </style>

    </head>

    <body>

    	<h1>This is header 1</h1>
    	<h2>This is header 2</h2>
    	<p>This is a paragraph</p>

    </body>
</html>
|
 |
Underlining text and producing a strikethrough effect is accomplished using the text-decoration property. Note that this is also the property used to remove the underline that is placed beneath linked text by default. Removing this underline is sometimes desirable, particularly when lots of links are clustered near each other.
| Code | Display |
|---|---|
<html>
    <head>

        <style type="text/css">
            h1 {text-decoration: overline}
            h2 {text-decoration: line-through}
            h3 {text-decoration: underline}
            a {text-decoration: none}
        </style>

    </head>

    <body>

    	<h1>This is header 1</h1>
    	<h2>This is header 2</h2>
    	<h3>This is header 3</h3>
    	<p><a href="http://www.w3schools.com/default.asp">This is a link</a></p>

    </body>
</html>
|
 |
The font used to display the text of an element can be set using the font-family property. Because the fonts loaded on the client device are unpredictable, it is a good idea to list multiple fonts in case the preferred one is not available.
Text can be sized using the font-size property. Note that valid values include percentages in relation to the parent element, lengths in pixel units and names like small, large, smaller, and larger.
<html>
    <head>

        <style type="text/css">
            h1 {font-size: 150%}
            h2 {font-size: 14px}
            p {font-size: small}
        </style>

    </head>

    <body>

    	<h1>This is header 1</h1>
    	<h2>This is header 2</h2>
    	<p>This is a paragraph</p>

    </body>
</html>
|
 |
To change the weight of text (i.e., its boldness), the font-weight property is used. Valid values include names like bold, bolder, lighter or multiples of 100 ranging from 100 to 900 with 400 being normal weight and 700 being bold.
| Code | Display |
|---|---|
<html>
    <head>

        <style type="text/css">
            p.normal {font-weight: normal}
            p.thick {font-weight: bold}
            p.thicker {font-weight: 900}
        </style>

    </head>

    <body>

    	<p class="normal">This is a paragraph</p>

    	<p class="thick">This is a paragraph</p>

    	<p class="thicker">This is a paragraph</p>

    </body>
</html>
|
 |
For more details on font-related styling, refer to w3schools.com.
Margin styles
The space around elements can be specified using the margin-top, margin-right, margin-bottom, and margin-left attributes. These margin attributes can be set using values in pixel units, centimeters or as a percentage of the element's container. For example:
{margin-left: 2cm}
{margin-left: 20px}
{margin-left: 10%}
Note that all four margins can be set at once using the margin property. The values should be specified in the order top, right, bottom and left:
{margin: 2px 4px 2px 4px}
Table styles
Some of the more important styles to understand in a web mapping context are those involving tables. The border properties are used to control the width, color and style (e.g., solid or dashed) of the borders of tables and their cells. Different settings can be applied to each side with separate declarations or the same settings applied to all sides in one declaration. The latter option, which is the most common, has this syntax:
border: thin solid gray
See w3schools' CSS Border page for more details on the usage of the border properties.
Tables drawn with a border have their cells detached or separated from one another by default. Personally, I find this behavior to be annoying and prefer to collapse the borders using the setting:
border-collapse: collapse
 Table without a border-collapse setting (or set to border-collapse: separate) |
 Table with border-collapse: collapse setting |
Another default behavior that I find annoying is that empty cells are not displayed with a border. (This actually only applies to tables with detached borders; when borders are collapsed, empty cells will be visible no matter what.) To override this behavior, the empty-cells property is used:
empty-cells: show
Finally, the padding properties are used to specify the amount of space between the outside of an element's container and its content. Applying padding settings to td elements is commonly done to control the amount of space between a table cell border and its text. Again, padding can be controlled on a side-to-side basis or in a single declaration. The most common setting is to pad the cells equally on all four sides, which can be done as follows:
padding: 5px
The following CSS styling example applies some of these styles and some that were described earlier to produce a visually appealing table:
CSStable {
background-color:#FFFFFF;
border: solid #000 3px;
width: 400px;
}
table td {
padding: 5px;
border: solid #000 1px;
}
.data {
color: #000000;
text-align: right;
background-color: #CCCCCC;
}
.toprow {
font-style: italic;
text-align: center;
background-color: #FFFFCC;
}
.leftcol {
font-weight: bold;
text-align: left;
width: 150px;
background-color: #CCCCCC;
}
|
HTML<table cellspacing="2">
<tr class="toprow">
<td> </td>
<td>John</td>
<td>Jane</td>
<td>Total</td>
</tr>
<tr>
<td class="leftcol">January</td>
<td class="data">123</td>
<td class="data">234</td>
<td class="data">357</td>
</tr>
<tr>
<td class="leftcol">February</td>
<td class="data">135</td>
<td class="data">246</td>
<td class="data">381</td>
</tr>
<tr>
<td class="leftcol">March</td>
<td class="data">257</td>
<td class="data">368</td>
<td class="data">625</td>
</tr>
<tr>
<td class="leftcol">Total</td>
<td class="data">515</td>
<td class="data">848</td>
<td class="data">1363</td>
</tr>
</table>
|

Assignment: Write a Page Using XHTML and CSS
Assignment: Write a Page Using XHTML and CSS
By now, you should have been sent a document containing text that I’d like you to convert to a valid XHTML Strict document. Match the formatting found in the document as closely as possible, paying particular attention to text alignment, font size, and font weight. Some of the formatting will require CSS, which you should write in either an external file (this is preferred) or in the head section of the XHTML doc.
The goal of this project is to test your ability to code the document from scratch, so avoid using applications that generate the HTML code for you, such as Word. They almost invariably generate more code than is actually needed and your grade will be docked considerably if you use one. Instead, I recommend you use a basic text editor like Notepad or an editor designed for HTML coding if you have experience with one. (We'll discuss some of these later in the course.)
You can refer to the links below for an example in which I've replicated a document similar to the one you've been assigned:
Example document
My solution: XHTML and CSS
To see the source code of the solution, you can save the files locally and open them in a text editor. Or simply follow the XHTML link to open it in your browser, use Ctrl-U to view the source code, then follow the link to the CSS file to see the style settings.
You may be tempted to find your assigned document online and copy its source code. To discourage this, I’ve made small modifications to each document. If I find that you’ve submitted a document that matches the original and not the one that I sent you, I will consider it an academic integrity violation (resulting in a grade of 0).
For full credit, your page must pass through the World Wide Web Consortium’s page validator without errors.
Your Portfolio
From this point on in the course, you should be publishing your assignments to your Portfolio site.
- Following the instructions in Portfolios, connect to your web space.
- There will possibly be a default index.html page in your www or htdocs (InfinityFree) folder. Modify this page (or create a new index.html page altogether) to include links to your first three assignments, along with anything else you want to include on your page.
- After uploading your index.html page, I will be able to view it through the URL you setup while setting up your portfolio. For example, if you picked the subdomain xyz123geog863 and the domaine free.nf, then the URL to view your web page would be http://xyz123geog863.free.nf (You should test this to confirm - not this example does not go anywhere.)
- Note that when a URL ends in a folder name rather than a file name, the web browser looks for a file by the name of index.html or index.htm in that folder. This is why index.html can be omitted when attempting to view that page.
Deliverables
This project is one week in length. Please refer to the Canvas course Calendar for the due date.
- Click on the Assignment 3 Submission to submit a link to your project page (a link to your portfolio index page is OK too if it contains a link to your project). (70 of 100 points)
- I will be checking your page against the World Wide Web Consortium’s page validator. For full credit, your page must pass through without errors. (25 of 100 points)
- Be sure to include a link to your app from Lesson 1 in your portfolio (5 of 100 points).
- Complete the Lesson 3 quiz.
Summary and Final Tasks
Summary and Final Tasks
In this lesson, you learned about the core languages involved in web publishing. While knowledge of these languages isn't completely necessary for producing web mapping apps, you are now likely to have a much better understanding of the pages in which your maps will reside and you'll also be better equipped to develop pages of a higher quality.
In Lesson 4, you'll be introduced to Esri's ArcGIS API for JavaScript and use it to create a map of your hometown.