Lesson 3: Scripts and Functions
Overview
So far, everything we have learned how to do in MATLAB required typing in commands one by one on the command line. This is fine for testing things out, but, really, the whole point of computers is to make repetitive calculations quickly and accurately. As soon as you realize you want to run the same set of commands over again, it is time to write a script or a function so you can do it 100 times. In this lesson, we'll begin learning how to write functions and scripts. You want to be hard-working with the thinking, but lazy with the typing.
Learning Outcomes
By the end of this lesson, you should be able to:
- write a script to display a table of data.
- write a function with user inputs.
- write a script to make a plot.
- use MATLAB as a graphing calculator, also to display data.
| To Read | content on this web site | here |
|---|---|---|
| To Do |
Quiz |
Canvas |
Questions?
If you have questions, please feel free to post them to the Questions? discussion forum in Canvas. While you are there, feel free to post your own responses if you, too, are able to help a classmate.
Lesson 3: Script that displays data
Syntax introduced:
% clearvars disp
Write a simple script
A script, in any programming language, is a file containing a series of commands that are executed automatically in order as if you had typed them one by one. MATLAB scripts end with the file extension ".m" In your MATLAB command screen there's a button that looks like a big yellow plus sign up in the toolbar labeled 'New.' If you click it, an Editor window will open up and your cursor will be in it, ready for you to type something.

You can also use the text editor of your choice to create a script. As long as the file you create has the right file extension and MATLAB knows where the file is located in your computer's file structure, you can run it. When I say "text editor of your choice" I do not mean a word processing program like Microsoft Word or Macintosh Pages. I mean a plain text editor like vi or emacs. If you don't know what I'm talking about, just use the built-in editor in MATLAB.
I wrote a short script to display a two-column table of data (below this paragraph). Copy and paste it into your editing window. Save the file. Name it sb.m. In order to run it, just type sb into the command line. Or you can hit the Run button in the MATLAB toolbar.
%display points scored by the first ten superbowl winners clearvars; yr=[1967 1968 1969 1970 1971 1972 1973 1974 1975 1976]; winnerPoints=[35 33 16 23 16 24 14 24 16 21]; tableYW(:,1)=yr'; tableYW(:,2)=winnerPoints'; disp(' YEAR POINTS SCORED')disp(' BY WINNER')disp(' ')disp(tableYW) |
WebApps Note
If you are running MATLAB through webapps then copying and pasting is not so simple. This is what you do: Highlight and copy the chunk of text like you normally would. Then in your webapps tab, click the pink toolbox icon to expand it. Now click the clipboard icon from the toolbox dropdown. Follow the instructions there to put your copied text onto the clipboard. Once you close the clipboard, the paste-from-clipboard icon will now be available in the MATLAB window. Click that to paste the contents of the clipboard into your editing window inside MATLAB.

>> sb
        YEAR       POINTS SCORED
                    BY WINNER

        1967          35
        1968          33
        1969          16
        1970          23
        1971          16
        1972          24
        1973          14
        1974          24
        1975          16
        1976          21
New Stuff in this Script
Comments
The first line of the script begins with %. That's a comment. MATLAB ignores it but you shouldn't. Comments are some of the most important parts of a program, no matter what language you use. I rank comments right up there with help and lookfor in the MATLAB Pantheon of What's Useful. Comments are handy for saying in plain language what your code does, reminding yourself where you got the data, temporarily not running a certain problematic line of code while debugging, and more. Single line comments are preceded by %. If you want to write more than one line you can either put a % at the beginning of each line or enclose the whole block inside a %{ %} pair.
Clearing and displaying variables
The next line of my script says clearvars which tells MATLAB to clear all the variables from the workspace. I'm in the habit of putting clearvars at the top of my scripts so I don't have to worry about introducing some unexpected error by using a variable name that is already there. The next lines create row vectors to house the data. Then I turn the row vectors into column vectors and make an array out of them. I use disp to tell MATLAB to show me the data on the screen. Using disp is about the same as leaving off the ; at the end of the line except MATLAB doesn't echo back the variable name. You can also use disp as I did to display the actual text of what you typed by putting the text inside single quotes ' '.
Efficiency v. Clarity
In my script above I did a couple of things that expert programmers hate. First of all, I typed in my data by hand. This is not good practice because it takes time and is a really obvious way to introduce clerical errors. A better approach would be to find the data somewhere, download a file of it and read that file in. We'll learn how to do that soon, so no worries there. The second thing is that I created two vectors, then a created a whole 'nother array out of my two vectors, so essentially I'm duplicating effort there. I could have written the program like this instead and eliminated two lines of code:%display points scored by the first ten superbowl winners clearvars; tableYW(:,1)=[1967 1968 1969 1970 1971 1972 1973 1974 1975 1976]'; tableYW(:,2)=[35 33 16 23 16 24 14 24 16 21]'; disp(' YEAR POINTS SCORED')disp(' BY WINNER')disp(' ')disp(tableYW) |
Check yourself!
Lesson 3: Script that makes a plot
Syntax introduced:
legend
% this is a test script. it makes a plotx=0:.1:2*pi;y=sin(x);z=sin(2*x);plot(x,y,x,z);axis([0 2*pi -1 1]);legend('sin(\theta)','sin(2\theta)'); |
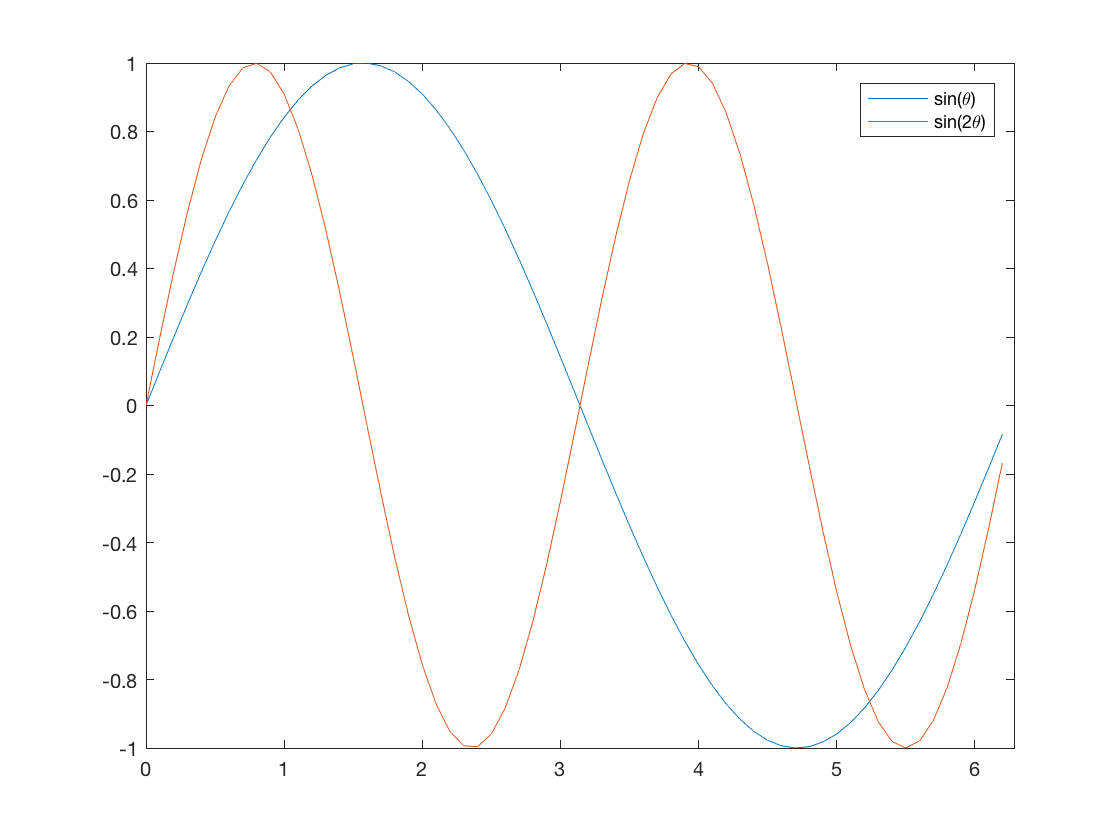
Explanation of the script
First I wrote a comment that says what the script does. Then I created a vector named x. Then I created two more vectors the same size as x that are functions of x. Next I used plot to plot both functions on the same axes. I set the axes limits, and then I made a legend to label both lines. legend is a new command. By default it correctly labels the plotting elements in the same order as you plot them in your script. Enclose any plain text in single quotes so MATLAB will render it as text. This works in the legend and also in axes labels and tick labels. Many special symbols such as Greek letters can be rendered by typing the word out with a backslash in front of it. The table below tells how to make some common special characters so they'll be rendered correctly on labels.
| SYMBOL | AN EXAMPLE | HOW TO TYPE IT |
|---|---|---|
| lowercase Greek letter | α | '\alpha' |
| uppercase Greek letter | Γ | '\Gamma' |
| degree | 40.8° N | '40.8\circ N' |
| superscript | x2, ∂O18 | 'x^2', '\deltaO^{18}' |
| subscript | H2SO4 | 'H_2SO_4' |
Efficiency vs. Readability, take two
I could have saved a couple of lines in my script if I had just written:% this is a test script. it makes a plotx=0:.1:2*pi;plot(x,sin(x),x,sin(2*x));axis([0 2*pi -1 1]);legend('sin(\theta)','sin(2\theta)'); |
Lesson 3, Page 3
Lesson 3, Page 4
Lesson 3, Page 5
Lesson 3, Page 6
Lesson 3, Page 7
Lesson 3, Page 8
Lesson 3, Page 9
Summary and Final Tasks
Summary
add summary here
Reminder - Complete all of the Lesson 3 tasks!
You have reached the end of Lesson 3! Double-check the to-do list on the Lesson 3 Overview page [1] to make sure you have completed all of the activities listed there before you begin Lesson 4.