Lesson 1: A Meteorologist's Toolbox
Motivate...

You might be used to the idea of carpenters or "handy" workers carrying a toolbox containing all the tools they need to complete a job. But, in reality, all people use various tools all the time, and in this lesson, we're going to focus on the tools that meteorologists use. Of course, meteorologists aren't using hammers and screwdrivers to understand the world around them, so we need to think more generally about tools. In general, a tool is something that makes a particular task easier. Think about it. Everything that you use to make something easier is a tool. When you clean your teeth, you use a tool (a toothbrush). When you communicate with someone, you often use some sort of tool (perhaps a cell phone). When you want to collect and analyze information, you use tools (perhaps computer software). Indeed, you are surrounded by a multitude of tools that you use without even thinking about it!
Of course, also knowing how to use tools is extremely important. Think back to the last time you got a new cell phone or some other device made to make your life easier. There's a good chance that it didn't make your life easier right away. In fact, until you became familiar with the new tool, it often took longer than the "old" way of doing things. But, once you integrate a new tool into your life, you can't imagine life without it! This is typical of all tools: you must know what the tool does, how to use it, and actually get comfortable using it. Only then can you realize the power of the tool itself. Alas, the only way to get comfortable with using a certain tool is to actually use it.
So, what's all this talk about tools have to do with meteorology? Well, Lesson 1 is all about the tools that meteorologists use to understand the world around them. We'll start off examining such tools as map projections, universal time, temperature scales, and mathematical tools such as climate statistics. Then we'll move on to tools that deal with the analysis of meteorological data, in both time and space. Remember, these tools exist to make understanding meteorology easier (you need to learn them well). And, as with all tools, you not only need to learn about them, but you also need to practice using them. That is the only way to make these tools work for you.
Before we get started the tools in a meteorologist's toolbox, however, since this course is an introduction to meteorology, it's probably a good idea to define exactly what meteorology is (and identify the types of things that meteorologists study). Let's get started!
What do Meteorologists Study?
Prioritize...
By the time you are finished reading this page, you should be able to define meteorology, and identify common applications of meteorology.
Read...

We can't really begin studying meteorology if we don't know what it is first! For starters, let me tell you what meteorology is not. It is not the study of meteors (small rocks and metallic objects) flying through outer space. Perhaps you already knew that, but believe it or not, I've encountered a number of people who have that notion. Meteorology is not the study of meteors, so if you had that misconception coming into the course, erase it from your mind!
So, what is meteorology? You're probably most familiar with meteorology as the study of the science of weather and weather forecasting. Indeed, understanding various aspects of the weather will be our focus for much of this course. But, meteorology isn't just about the weather forecast. More broadly, meteorology is the study of the physics and chemistry of Earth's atmosphere, including its interactions with Earth's surface (both land and water). In short, meteorologists want to completely understand how Earth's atmosphere works (and often use that knowledge for future predictions). That means meteorologists need to know about the composition, structure, and air motions within the atmosphere.
In case it wasn't clear from the definition above, there's a lot of physics and chemistry in meteorology! If you were pursuing an undergraduate degree in meteorology, your course schedule would be filled with courses in calculus, differential equations, and calculus-based physics courses (dynamics, thermodynamics, energy transfer, etc.). In this course, I'm going to do my best to spare you the gory details whenever I can so that you can walk away with a practical understanding of common weather events, and better consume the large variety of weather information available. Don't worry: there won't be any complex math (just a little arithmetic here and there).
How do meteorologists apply their knowledge of the atmosphere? The list below provides some common applications of meteorology (it's far from exhaustive, but it will give you an idea of the types of things meteorologists are involved in):
- weather observation and forecasting
- computer modeling of the atmosphere
- analyzing, monitoring, and predicting air pollution
- Earth science education
- helping industries (agriculture, energy, aviation, insurance, etc.) manage the risks posed by weather
- assisting emergency managers and disaster planners
- studying Earth's climate and climate change
Meteorologists work in these areas in academia, public-sector (government), and private sector (business) settings. You might be surprised at some of the companies and organizations that have meteorologists on staff or use various meteorological services! In this course, our focus is mainly going to be on weather analysis and forecasting (although we'll touch on a few other areas, too). After all, the weather impacts everyone, in some way, every single day.
Since meteorologists are so interested in the atmosphere, we need to start off by finding out what the atmosphere is "made of." Read on.
The Composition of our Atmosphere
Prioritize...
When you've finished this page, you should be able to discuss the composition of the atmosphere, including identifying which gases are most and least abundant, and which gases have permanent versus variable (changing) concentrations.
Read...

Why is there a picture of apple slices on this page, and what does it have to do with the composition of the atmosphere? I'm going to use it as an analogy to help us get a feeling for the size of Earth's atmosphere. If you imagine that the fruit inside the apple skin is akin to Earth, it turns out that the thickness of Earth's atmosphere can be likened to the thickness of the skin of an apple.
To put some numbers to this analogy, imagine an average sized apple with a radius of 40 millimeters (a little more than 1.5 inches). The skin has a thickness of about 0.3 millimeters (about 0.1 inches), which is 0.75 percent of the apple's radius. Now, our atmosphere has no definite upper boundary, but nearly all of the mass of the atmosphere lies below an altitude of 50 kilometers (a little more than 30 miles above Earth's surface). So, if we use 50 kilometers to compare with the average radius of Earth (6,368 kilometers), the thickness of our atmosphere is about 0.8 percent of the radius of Earth.
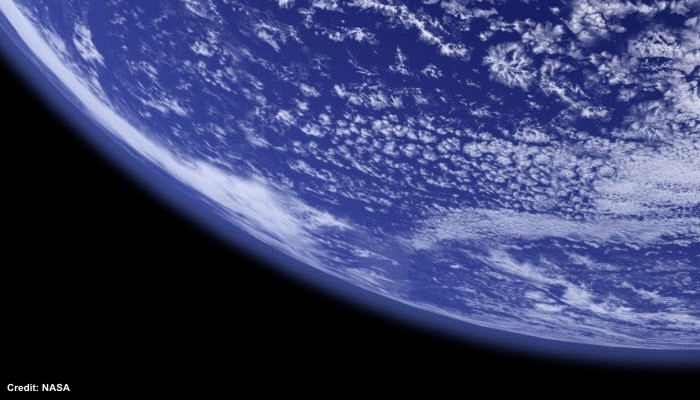
What does that all mean? Well, the atmosphere is actually quite thin (when you compare it to the size of the earth) even though it seems so vast to us standing on the ground. This high-resolution view of Earth and its atmosphere [8] shows the thin atmosphere surrounding our planet, just as the skin of an apple surrounds the fruit inside.
What is the atmosphere made of? Obviously, the air we breathe is critical for our survival, but it's actually a mixture of many different types of molecules. Some of the gases are "permanent," meaning that their concentrations are basically constant. Other gases are "variable," meaning that their concentrations vary from time to time and place to place. I've summarized the gases that comprise our atmosphere and their concentrations in the table below:
| Permanent Gases | Variable Gases | ||
|---|---|---|---|
| Gas (Symbol) | Percent (by volume of dry air) | Gas (Symbol) | Percent (by volume) |
| Nitrogen (N2) | 78.08 | Water Vapor (H2O) | 0 to 4 |
| Oxygen (O2) | 20.95 | Carbon Dioxide (CO2) | about 0.041 |
| Argon (Ar) | 0.93 | Methane (CH4) | about 0.00018 |
| Neon (Ne) | 0.0018 | Nitrous Oxide (N2O) | about 0.00003 |
What should you take away from this table? First of all, even though we need to breathe oxygen to survive, oxygen is not the most abundant gas in the atmosphere. Nitrogen is, by far. There's nearly four times as much nitrogen as there is oxygen! However, nitrogen and oxygen, combined, account for roughly 99 percent of "dry air" in the atmosphere, so they're the "big two" in terms of total concentration.
Of course, air isn't perfectly "dry." Water vapor also exists in our atmosphere, but note that the concentration of water vapor is rather small and is variable (it varies from 0 to 4 percent). Furthermore, while you might hear a lot about carbon dioxide in the news because of its connection to climate change, it only accounts for about 0.041 percent of the atmosphere. In other words, carbon dioxide accounts for a little more than 400 molecules out of every million molecules in the atmosphere. Surprised? That doesn't mean carbon dioxide is an insignificant gas, however. Indeed, it's a very important gas for reasons we'll cover later on.
With a little background about meteorology and the atmosphere out of the way, now we're going to start filling our meteorologist's toolbox. For starters, since weather occurs all over the globe constantly, meteorologists must have a handle on time zones and time conversions in order to interpret data and communicate it correctly. Therefore, it's time to talk about time in the next section.
Does Anybody Really Know What Time It Is?
Prioritize...
It's critical that you understand universal time conventions and be able to convert between universal time (aka UTC, GMT, or Z-time) and local time zones within the United States. You will use this skill throughout the course, so make sure you are comfortable making such conversions before moving on.
Read...
"Does anybody really know what time it is? Does anybody really care...?"
Those words come from this section's theme song—”Does Anybody Really Know What Time It Is“ by Chicago [9] (that's right, this section has a theme song). Well, I can tell you that meteorologists must know what time it is, and they definitely care about time. Weather is a global phenomenon, and since our world is sliced into individual time zones, meteorologists need a universal standard to keep it all straight.
That standard is Greenwich Mean Time (GMT). "Greenwich" refers to the English village of Greenwich, a borough of London, through which the Prime Meridian [10] (zero degrees longitude) passes. The advantage of adhering to one time standard is that observers all over the world can record weather conditions in Greenwich time. Such a universal time system is indispensable for synchronizing when weather observations are collected. If observers worldwide were to record observations in local time, then interpretation would become much more complicated and confusing. Ultimately, it's important to remember that GMT is a time zone, just like any other. It just happens to be the time zone at Greenwich, England, along the Prime Meridian.
GMT goes by a couple of other aliases--"Zulu time" (often shortened to Z-time), or UTC (Coordinated Universal Time). "Zulu" is a funny sounding name, but it's the U.S. Navy's and our civil aviation's version of GMT. The bottom line is that if you see time expressed as GMT, Z-time, or UTC, they're all referring to the same thing--the time in Greenwich, England. Most often, we'll use UTC or Z-time in this course. Meteorologists universally use this time to synchronize the times of weather observations and forecasts, so it's important for us to be able to convert from UTC to other local time zones, as well as from other local time zones to UTC.
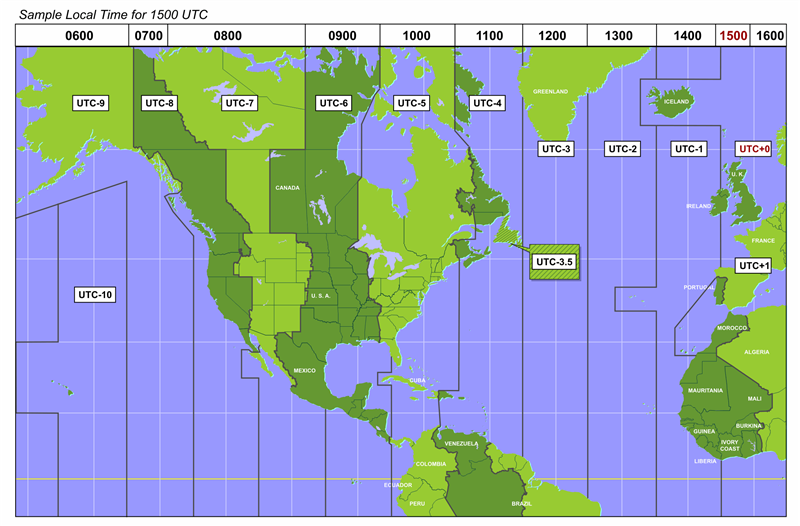
You can convert to Local Time at any location by referring to a map of world time zones [11] (zones are labeled along the bottom of the map). That's a pretty "busy" map, so let's streamline our discussion a bit. Focus your attention on the map of standard time zones for a large portion of the Western Hemisphere (shown below). Further note that each time zone is labeled with its corresponding time difference from Greenwich, England (expressed in hours UTC). How does this map work?
First, we're using the military's 24-hour clock system [13]. For this system, 0000 hours ("zero hundred hours") corresponds to local midnight, and 1200 hours ("12 hundred hours") represents local noon. Okay, let’s assume that it’s 1500 hours in Greenwich (alternatively, 15 UTC, 15Z or 15 GMT...take your pick!). On a 12-hour clock, the local time in Greenwich would be 3 P.M. At any rate, you can see, across the top of the colorful map above, the corresponding local times for each of the represented time zones. For example, at 15 UTC (1500 hours in Greenwich), it’s 1000 hours (10 A.M.) local time in the eastern United States (Eastern Standard Time is UTC - 5 hours), and 0600 hours (6 A.M.) local time in Alaska (Alaska Standard Time is UTC - 9 hours).
On the flip side, if you lived in Chicago, Illinois and it was 9 A.M. local time (0900 hours), and you wanted to convert to UTC, you would simply add 6 hours because Central Standard Time (where Chicago is located) is 6 hours behind UTC. So, 0900 hours + 6 hours = 1500 hours, or 15 GMT (or 15 UTC or 15Z).
Ultimately, converting from UTC to local time (or the other way) is really no different than figuring out what time it is in California if you live in, say, New York. If it's 5 P.M. local time in New York, we have to subtract 3 hours to get the local time on the West Coast in California, so we know its 2 P.M. local time in California. Converting to or from UTC is no different: It's just addition or subtraction. You have to figure out how many hours difference there is between whatever location you're interested in and UTC.
Many of the time-zone boundaries are parallel to longitude lines, although, for convenience, there are several exceptions (Alaska, for example). Each time zone spans approximately 15 degrees of longitude, which is the longitudinal distance that the Earth rotates in one hour. Of course, you must adjust for Daylight Saving Time [14] during the warmer months (from the second Sunday in March to the first Sunday in November in the United States). While 15 UTC corresponds to 10 A.M. Eastern Standard Time (EST) in New York City, from early March to early November it's 11 A.M. Eastern Daylight Time (EDT) in the New York (Eastern Daylight Time is 4 hours behind GMT). So, when Daylight Saving Time is in effect, the difference between GMT and time zones in the U.S. is one hour less than what's indicated on the map above. By the way, it is bad form to say "Daylight Savings Time." Save yourself the trouble, and don't put the "s" on the end of "saving."
Please note that the International Date Line [15] zig-zags across the Pacific Ocean in an attempt not to inconvenience local time keeping (traveling westward across the date line results in the calendar advancing one day). For convenience, the abrupt zig-zag in the International Date Line south of Siberia allows Alaska's long Aleutian Island chain to be in the same time zone as the rest of the state (Alaska Standard Time, AST, is 9 hours behind UTC).
Now that you know how time conversions work, the best way to really get comfortable with knowing what time it is anywhere in the world is to do some practicing. Make sure to spend some time on the Key Skill questions and the Quiz Yourself tool below.
Key Skill...
Time conversions are one of the most basic and important early skills that you must learn in this course. You must understand the concept of UTC and know how to convert it to a location's local time (as well as convert a location's local time back to UTC). You really need to know this, because this time convention is going to show up over and over again throughout the semester (not to mention on quizzes and lab assignments).
Here are a few examples for you to try (you'll likely need to refer to the map of time zones above)...
Example #1:
Say that it starts raining at your house in Denver, Colorado, and the time is 20Z on June 23. What was the local time in Denver when the rain started?
Answer: We notice from the map above that Denver is located in the UTC-7 time zone. However, since Daylight Saving Time is in effect (in June), Denver is only 6 hours behind UTC. So, if we subtract 6 hours from 20Z, we get 1400 local daylight time on June 23 (or 2:00 P.M. on June 23). Note that when talking about local time, we DO NOT have the "Z" or UTC designator (because we have converted from that time zone). When talking about local time, you should typically say "Local Standard Time" (LST) or "Local Daylight Time" (LDT).
Example #2:
You pull up a weather map on your favorite smartphone app at 10:35 P.M. local time on December 18 in New York, NY. What time stamp would be on this image if it was expressed in Z-time?
Answer: We notice from the map above that New York is located in the UTC-5 time zone, meaning that New York is 5 hours behind UTC. So to convert from local time to UTC, we need to add 5 hours. 10:35 P.M. can also be written as 2235 hours on a 24-hour clock, so 2235 + 5 hours = 0335Z. Since we crossed over local midnight when making our conversion, we also need to increment the date by one. Therefore, the time stamp on the image would be 0335Z on December 19.
Example #3:
You're vacationing on big island of Hawaii, and your plane lands at 03Z on January 3. What local time is this (in Hilo, Hawaii)?
Answer: We notice from the map above that Hawaii is located in the UTC-10 time zone. So, we must subtract 10 hours from 03Z, which gives us 1700 local standard time on January 2 (or 5:00 P.M. on January 2). Notice that we have to subtract a day because we passed 0000 (local midnight) when converting.
Quiz Yourself...
Think you understand how to convert between local time and "Z-time"? Take this self-quiz below to see how you do. Select whether you want to practice converting local time to GMT or GMT to local time (or "Either"). Then hit the "Quiz me" button. Use the provided drop-down menus to fill in the missing time and date. Click "Submit" to check your answer. Good luck! If you've got the hang of it, you should be able to get the correct answer each time!
The Station Model: Part I
Prioritize...
When you finish this page, you should be able to discuss temperature, dew point, visibility, and their units of measurement. You should also be able to identify and interpret temperature, dew point, visibility, and present weather (obstructions to visibility) on a station model.
Read...

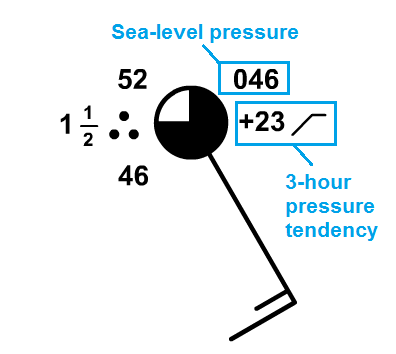
For meteorologists, the first step in studying the atmosphere is making observations. Commonly, meteorologists display these observations in something called a station model (check out the example on the right), which is a graphical template showing current weather conditions at a weather station (often located at an airport). Over the next couple of sections, I'm going to introduce you to the key variables displayed on the station model and show you how to interpret one. On this page, we're going to focus on temperature, dew point, visibility, and "present weather" (obstructions to visibility), which I've put in a red box in the station model on the right.
I'll briefly discuss each variable (what it is and its common units of measurement), and then I'll discuss how you can interpret each one on a station model. Let's start with something I'm sure you're familiar with--temperature.
Temperature: While you probably think of temperature as "how hot or cold something is," that's a pretty ambiguous definition (since "hot" and "cold" are somewhat subjective). More precisely, temperature is a measure of energy. You see, air molecules are restless little lumps of matter, continually vibrating, wriggling and bumping into their many neighbors. As air temperature increases, the molecular dance becomes increasingly frenetic. At a temperature of 72 degrees Fahrenheit, the average speed of air molecules is about 1,000 miles an hour, which translates into ample kinetic energy (energy of motion). Thus, air temperature is a measure of the average kinetic energy of air molecules.
In the United States, we typically express temperature using the Fahrenheit temperature scale [16], but most countries in the world use the Celsius temperature scale [17] (undoubtedly, you've heard temperature expressed in "degrees Fahrenheit" or "degrees Celsius" before). By the way, if you ever need to convert between the two scales, the National Weather Service temperature conversion calculator [18] is great!
To give you some weather context, the North American all-time marks for highest and lowest temperatures are, respectively, 134 degrees Fahrenheit (56.7 degrees Celsius) in California's Death Valley, and minus 81.4 degrees Fahrenheit (minus 63 degrees Celsius) at the village of Snag in the Yukon Territory of Canada. You may also be familiar with some (non-weather) common temperature markers:
- 100 degrees Celsius (212 degrees Fahrenheit) is the boiling point of water
- 37 degrees Celsius (98.6 degrees Fahrenheit) corresponds to normal body temperature
- 22.2 degrees Celsius (72 degrees Fahrenheit) represents the "ideal" room temperature
- 0 degrees Celsius (32 degrees Fahrenheit) is the melting point of ice
There are other temperature scales besides Celsius and Fahrenheit. For example, there's the Kelvin scale [19] (sometimes called the "absolute temperature scale"). Please note that the number of kelvins = the number of degrees Celsius + 273.15. So, the melting point of ice is 273.15 kelvins and the boiling point of water, at standard pressure, is 373.15 kelvins. For the record, it's bad form to say "degrees kelvin." Indeed, the proper way to express the units of absolute temperature is simply "kelvins." The Kelvin scale is used commonly in the physical sciences, and in fact it's the most direct way to describe the relationship between the average speed of air molecules and their temperature (higher temperatures = faster average molecule speeds).

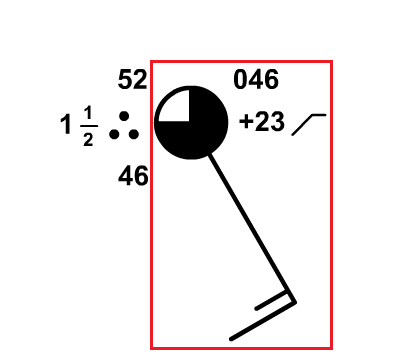
On a station model, reading the temperature is pretty easy. The number located in the upper-left corner of the model is the station temperature expressed in degrees Fahrenheit (or Celsius, depending on the country of origin). In the case of the station model on the right, the temperature is 52 degrees Fahrenheit. Unless otherwise indicated, you can assume in this course that we're using degrees Fahrenheit on the station model.
Dew Point: By definition, the dew point is the approximate temperature to which the water vapor (the gaseous form of water) in the air must be cooled (at constant pressure) in order for it to condense into liquid water drops. We're going to talk a lot more about dew point later on, but for now, focus on the fact that dew point is a temperature, so it's typically expressed in degrees Fahrenheit or Celsius.
As it turns out, the dew point temperature is also an absolute measure of the amount of water vapor present. The higher the concentration of water vapor, the higher the dew point, and by itself, the dew point serves as an indicator of the way the air “feels” – whether it be dry or muggy. Since our skin temperature is regulated to some degree by evaporation of sweat, it would be logical that we would be affected to some degree by the dew point temperature. Certainly, describing how something “feels” can be a bit dicey in a science course because it’s a somewhat subjective topic, but examine the table below for a rough guide on how the air might “feel” based on dew point temperature.
| Dew Point | General level of comfort |
|---|---|
| 60 degrees | For most people, the air starts to feel a tad "muggy" or "sticky." |
| 65 degrees | The air starts to feel "muggy" or "sticky." |
| 70 degrees | The air is sultry and tropical and generally uncomfortable. |
| 75 degrees or higher | The air is oppressive and stifling. |

Finding the dew point on a station model is also pretty easy. The number located in the lower-left corner of the model is the station dew point in degrees Fahrenheit (or Celsius, depending on the country of origin). In the case of the station model on the right, the temperature is 46 degrees Fahrenheit.
Visibility and Present Weather: I'm going to cover these two observations together, since they're highly related. Meteorologists are very interested in the horizontal visibility (essentially, how far you can see) because it has major implications for transportation. If visibility is very low, conditions can be quite hazardous for drivers or landing aircraft!
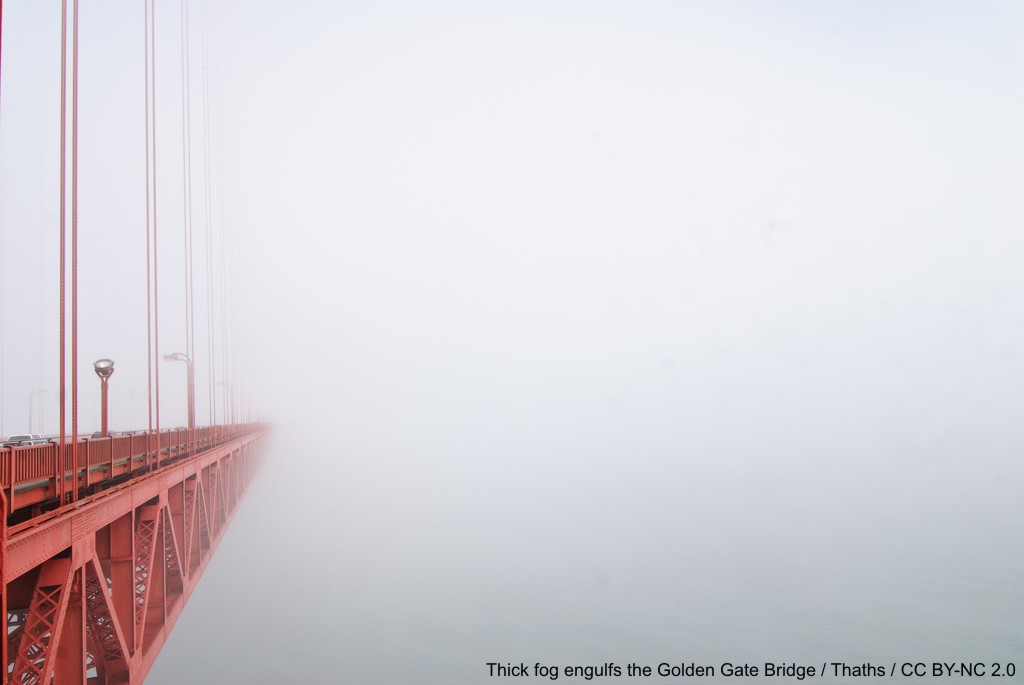
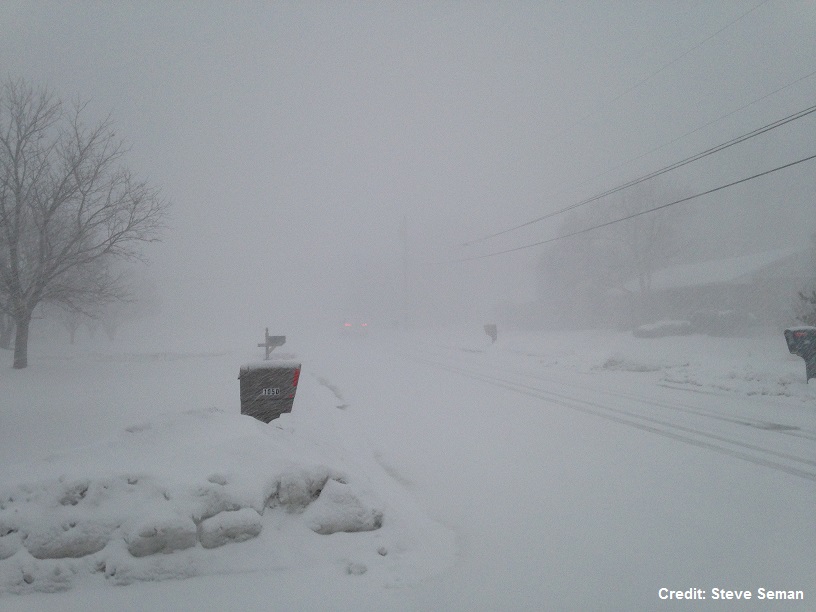
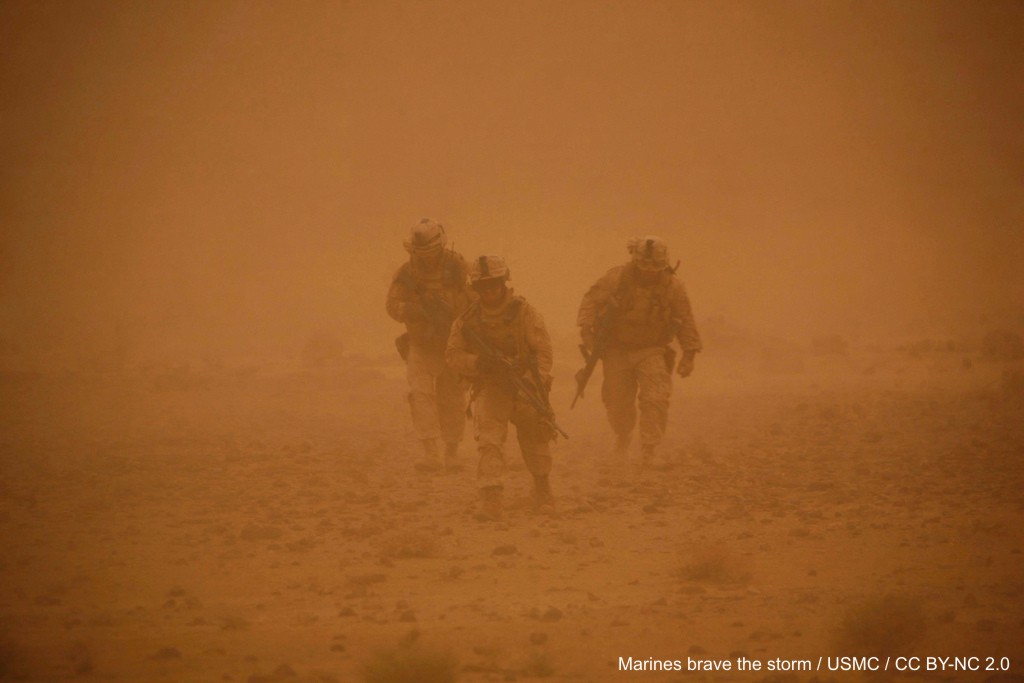
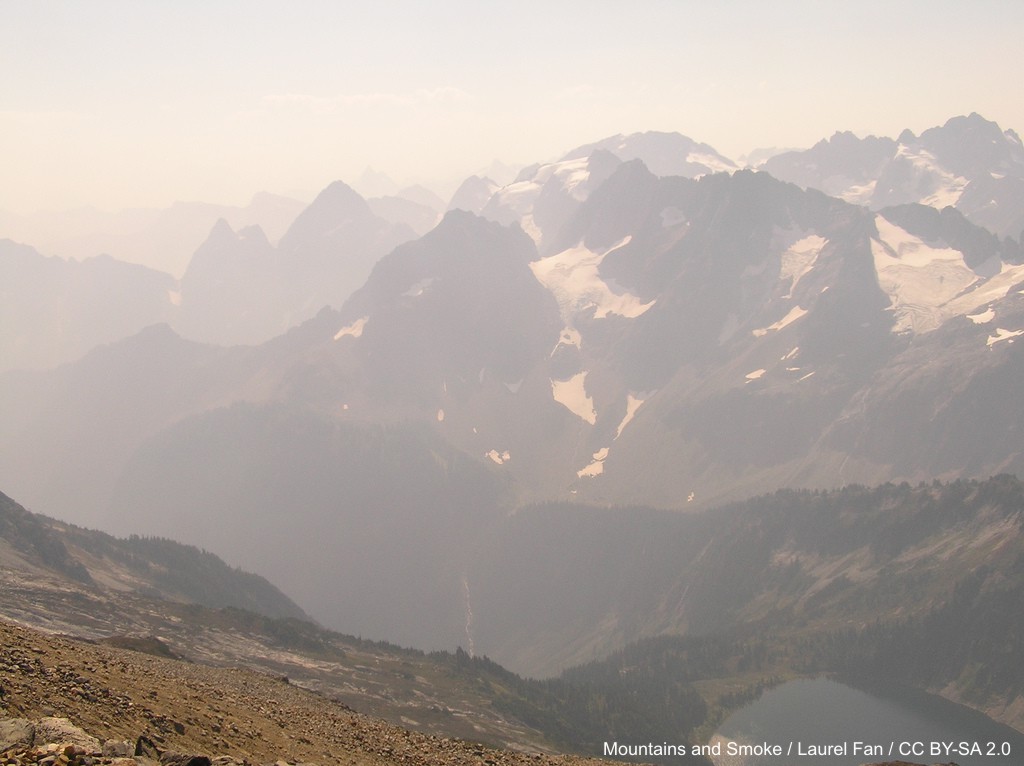
Horizontal visibility can run the gamut. On a perfectly clear day, you can't see forever, but visibility can reach approximately 100 miles in the mountainous western U.S. On the other hand, visibility can lower to near zero in heavy, "pea-soup" fog [20], fierce blowing and/or falling snow [21], blowing sand/dust [22], smoke [23], etc. On a station model, the visibility is expressed in miles in the United States (you can assume we're using miles in this course, unless noted otherwise), and is located below and to the left of the temperature.

On the annotated station model to the right, I've labeled the visibility (1 1/2 miles, in this case). Please note, however, that if visibility is not greatly reduced, it is often omitted from the station model. However, if visibility is reduced to seven miles or fewer, the offending obstruction to visibility ("present weather") is also included in the station model, immediately to the right of the visibility and just below the temperature. While there are many, many possible symbols, here are the most commonly used symbols for present weather [24]. In the sample station model to the right, the three "dots" indicate that moderate rain was the culprit, reducing visibility to one-and-a-half miles. If you're interested, here's a very comprehensive list showing the wide variety of possible present weather symbols [25] (although some of these very rarely get used).
Because of the varying degrees that precipitation can reduce horizontal visibility, the qualifiers of light, moderate, or heavy are added (such as "light rain" or "heavy snow"). I should also note that if precipitation is falling, it is always reported on the station model, no matter how light or how little it affects visibility. But, as I mentioned before, non-precipitating obstructions to visibility (fog, haze, and smoke are perhaps the most common) are only reported in the station model when visibility drops to seven miles or fewer.
Ultimately, while you don't need to memorize every single symbol for present weather, you should spend some time familiarizing yourself with the common ones, and you should certainly memorize the location of temperature, dew point, visibility, and present weather on the station model. To help you get started, take some time to examine the Key Skill box below.
Key Skill...
Below in an interactive station model that allows you to input your own data, and the station model will adjust, so you can see how it looks. The tool includes some parts of the station model that we haven't talked about yet, but for now, focus on changing the temperature, dew point, visibility, and obstruction to visibility (present weather) to see how the station model changes. This will help you cement where each of these is located on the station model, and help you become familiar with the common symbols for present weather.
You can also look at the most current surface observations [26] and you should be able to pick out the temperature and dew point at each station (many may not have visibility or present weather plotted).
The Station Model: Part II
Prioritize...
When you finish this page, you should be able to:
- discuss sky coverage (fraction of cloud cover) and interpret it on a station model
- apply the standard convention for expressing wind direction in meteorology, as well as interpret wind direction on a station model
- interpret wind speed on a station model.
Read...
We're going to continue tackling the information contained in the station model, and now we're going to turn our attention to cloud coverage and wind direction and speed. I've outlined the part of the station model that includes this information in the sample on the right, but note that the station model also includes information about air pressure, which we'll mostly ignore for now and come back to later on. As I did with temperature, dew point, visibility, and present weather, I'll briefly describe each variable and its common units of measurement (if applicable), and then describe how to interpret it on a station model. Let's start with sky coverage:
Sky Coverage: Sky coverage simply describes the portion of the sky covered by clouds. Let me start with the age old question: "Which phrase do you think describes a cloudier sky? Partly sunny or partly cloudy?" The National Weather Service defines partly sunny [27] and partly cloudy [28] as essentially the same, with the caveat that we wouldn't use "partly sunny" at night, of course. But, in practice, some forecasters use these terms differently because the word "partly" is somewhat vague, so it's not clear cut. Some folks use "partly sunny" to emphasize that there will be a bit more clouds than sun, and use "partly cloudy" to emphasize that there will be a bit more sun than clouds. With this usage, a partly sunny day is actually cloudier than a partly cloudy day.
Most weather forecasters don't want to get drawn into such an argument of semantics, so when it comes to quantifying the coverage of the sky by clouds, they rely on a specific "pie-chart" system that leaves little room for debate (see table below). The "pie" that makes up the sky coverage observation is divided into 8 sections. Clear conditions (0/8 cloud coverage) constitute a perfectly sunny sky, while a "few" clouds (1/8 to 2/8 coverage) represent mostly sunny conditions. "Scattered" clouds (3/8 to 4/8 cloud coverage) correspond to a partly cloudy or partly sunny sky, with "broken" clouds (5/8 to 7/8 cloud coverage) describing a partly cloudy or partly sunny (5/8 coverage) to mostly cloudy (6/8 to 7/8 coverage) sky. When the sky is nearly overcast except for a few breaks, forecasters refer to the cloud coverage as breaks in the overcast (abbreviated as "BINOVC [29]"). Picturing "overcast" conditions (8/8 coverage) is straightforward. When the sky is broken or overcast, weather observations will include the corresponding cloud ceiling, which is simply the height of the base of a broken or overcast layer of clouds. Cloud ceiling is not included in the station model, but it is particularly important for airplane pilots.
| Official Sky Cover Categories | Fractional Coverage | Plain-Language Descriptions |
|---|---|---|
| CLEAR | 0/8 | Sunny (or clear) |
| FEW [30] | 1/8 - 2/8 | Mostly Sunny |
| SCATTERED [31] | 3/8 - 4/8 | Partly Cloudy or Partly Sunny |
| BROKEN | 5/8 - 7/8 | Partly Cloudy or Partly Sunny [32] (5/8) to Mostly Cloudy [33] (6/8 or 7/8) |
| OVERCAST | 8/8 | Cloudy (or overcast) |
| SKY OBSCURED | (no fraction) | The weather observer can't determine the coverage or ceilings of clouds because low-level fog, haze, or smoke obscures the sky. |
Interpreting sky coverage on the station model is fairly intuitive, as the circle in the station model serves as the "pie chart" that shows the cloud coverage. The greater the cloud coverage that exists, generally the larger the portion of the circle that is filled in. In the sample station model below on the right, the circle is mostly filled in, corresponding to a "mostly cloudy" sky with 6/8 cloud coverage.

I should add that on occasion, the sky cover cannot be seen due to a low-level obstruction such as heavy fog, heavy rain, blowing snow, etc. In such cases when the observer cannot determine the sky coverage, the condition "sky obscured" is reported. The station model is thus marked with an "X" in the sky cover circle to designate that an obstruction prevents the weather observer from observing the rest of the sky. Even if the observer is fairly confident that the sky is overcast, if the ceiling cannot be observed, "sky obscured" would still be reported. Also, when sky obscured conditions exist and vertical visibility is very low, you'll sometimes see references to an indefinite ceiling. This simply means that the surface obscuration (such as heavy fog, blowing snow, etc.) has limited vertical visibility to the point that the cloud ceiling can't be determined.
Wind Direction: Wind is the horizontal movement of the air, and one of the most fundamental rules that you need to know is that the direction of the wind is always expressed as the direction FROM which the wind blows and NOT the direction toward which the wind blows. Make sure to commit that to memory! So, if the wind blows from the north, for example, you'll hear a meteorologist say that the wind is "northerly" (or there's a "north" wind), NOT a "southerly" or "south" wind. Meteorologists are always interested in where the air is coming from because it can help with weather forecasting. For example, if a wind is blowing from a region of warm air toward a region of colder air, a weather forecaster would want to know that!
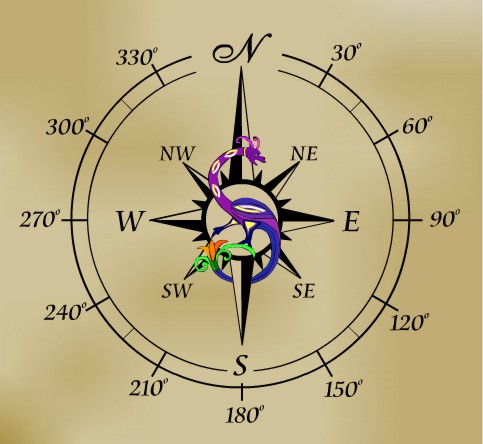
So, wind direction is always the direction from which the wind is blowing. Rather than brand the wind with a general direction such as "north" or "southeast," weather forecasters routinely use standard compass angles [34] to fine-tune the wind direction. For sake of illustration, the wind direction from the north blows from a direction of 0 degrees. A wind that blows from the east is a 90-degree wind, while a wind direction of 70 degrees corresponds to a wind that blows from the east-northeast.

On a station model, the thin, solid line (often referred to as the "flag") extends outward from the sky coverage symbol in the direction that the wind is blowing from. In the example on the right, I've highlighted the wind "flag." Can you tell what the wind direction is on this station model? Remembering that wind direction is the direction that the wind is blowing from, it's apparent that the wind is blowing from the southeast (so we would say that we have a "southeast" wind, or "winds are southeasterly"). More precisely, we could say that winds were 150 degrees (you may want to refer to the image of standard compass angles to confirm).
Wind Speed: Wind speed is simply how fast the air is moving. You may hear references to "sustained" wind speeds, which are wind speeds averaged over a certain time period (usually 1 or 2 minutes), but the wind is sometimes unsteady, with brief, sudden increases in wind speed called gusts. As a general rule, gusts last less than 20 seconds. Weather observers typically only report gusts when the wind varies by greater than 10 knots (between the peaks and lulls). However, reported wind gusts usually do not appear on station models.
In the United States, we usually talk about wind speed in miles per hour (just like automobile speed limits), but on station models, wind speed is always expressed in units of knots (nautical miles per hour). For the record, 1 knot = 1.15 miles per hour. On station models, the speed of the wind is expressed as a series of notches, called "wind barbs" on the clockwise side of the line representing wind direction. Each longer wind barb counts as a tally of 10 knots (actually, each longer barb represents a speed of 8 to 12 knots, but weather forecasters operationally choose the middle value of 10 knots for simplicity). The shorter barbs count as a tally of five knots. So, to figure out the wind speed, you need to add the values associated with any long and short wind barbs present.
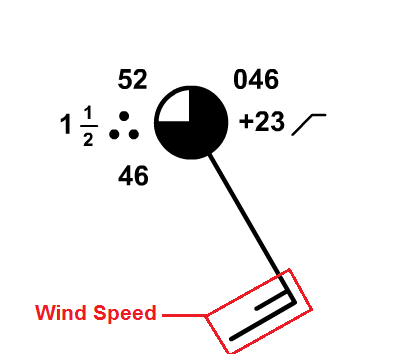
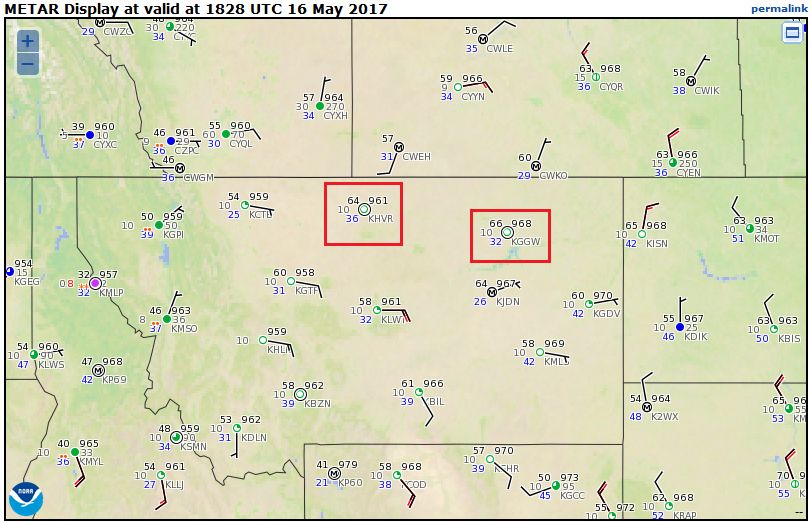
In the sample station model on the right, there's one long barb (10 knots) and one short barb (5 knots), so we add 10 knots and 5 knots together to get our wind speed of 15 knots (which converts to 17 miles per hour). If the surface wind is "calm," then it has neither direction nor speed. In this case, a larger circle is drawn around the circle that represents sky coverage. To see an example, check out the 1828Z map of station models [35] over a portion of the western United States on May 16, 2017. The two stations I've highlighted (Havre and Glasgow, Montana) were both reporting calm winds.
On the other hand, for very strong winds, a "triangular" barb counts as a tally of 50 knots.The use of the 50 knot symbol doesn't happen at the surface very often in most locations, however, because sustained winds rarely reach such speeds. Of course, wind gusts of 50 knots occur a little more frequently (severe thunderstorms, strong cold fronts, etc.). You're more likely to observe a sustained 50-knot wind near the Atlantic and Gulf Coasts with a hurricane nearby, such as the sustained 50-knot wind at Cape Hatteras, North Carolina, early on August 27, 2011 [36] as Hurricane Irene approached.
Finally, I should quickly note that I haven't covered a couple of parts of the station model dealing with air pressure [37]. The remaining information to the right of the sky coverage circle represents sea-level pressure in millibars (upper right) and sea-level pressure tendency (the change over the past three hours). Sea-level pressure is the air pressure (the force per unit area exerted by air molecules) that would be exerted at sea level. We'll talk much more about the relevance of air pressure later in the course, and cover how to decode the pressure information from a station model, too. So, for now, don't worry about the pressure information on the station model.
Before you move on, be sure to spend some time on the Key Skill and Quiz Yourself sections below. They'll help you become familiar with interpreting sky coverage and wind direction / speed on a station model. Make sure you're comfortable with interpreting these variables on a station model before you move on!
Key Skill...
On this page, you learned about sky coverage, wind direction, and wind speed on the station model. The interactive station model below allows you to change these variables and see how the station model will look. I especially recommend entering various sky coverages, wind directions, and speeds (all the way from calm to speeds greater than 50 knots) in the "Current Conditions" panel.
I've also created a short video (3:20) that walks through a translation of all the variables we've covered so far in the station model, with an emphasis on wind direction and speed. Check it out!
You should be able to interpret most of the information from a station model, and our interactive station model tool will help you learn how to do that. I'm going to decode the parts of the station model that we've talked about so far, and explore wind direction and speed a bit more since they tend to be a bit more challenging.
For starters, at this station, the current temperature is 32 degrees Fahrneheit (temperature is the number in the upper-left of the station model). The dew point is in the lower left, so the dew point here is 30 degrees Fahrenheit.
The visibility is over on the far left here, and it's 2 miles in this case, because of light snow, as indicated by the 2 little snowflake icons. The sky is completely overcast, as indicated by the fact that this circle is completely filled in.
Of course, this tool is completely interactive, so we can change the weather conditions. We can change the temperature, the dew point, the visibility, and the present weather. So, now our temperature is 85 degrees Fahrenheit, our dew point is 70 degrees Fahrenheit, and our visibility is a half mile in a thunderstorm, and we can see the changes on the station model.
I want to spend a little time specifically on wind direction and speed so that you get used to the conventions for those variables. First, the tool defaults to a wind from 180 degrees. It's important to remember in meteorology that wind is expressed as the direction that the wind is blowing from.
If we assume that north is at the top of the image, south is at the bottom, west is on the left, and east is on the right, we can see that this 180-degree wind is blowing from the south to the north. We would call this a south wind, or a southerly wind.
We can change the wind direction to, say, 50 degrees. Now we have winds from the northeast to the southwest, and that's what it would look like on the station model. We would call this a northeast wind, or a northeasterly wind.
We can also tell wind speed from the station model. The speed here is 25 knots, as indicated by the two long wind barbs and the one short wind barb. Each long wind barb represents 10 knots, and the short wind barb represents 5 knots. So we sum those together, and we get a total of 25 knots.
If we had calm winds, we would just have an extra circle around the sky coverage because the wind doesn't have a direction. Or, on the other hand, we could make it really windy, and have 65-knot sustained winds –say maybe a hurricane is making landfall nearby. The pennant, or triangular barb, represents 50 knots, the long barb represents 10 knots, and the short barb represents 5 knots. Add those together, 50 + 10 + 5, to get our total of 65 knots.
I really encourage you to explore this tool. Trying out different conditions and seeing how the station model looks will help you get a feel for how to decode the station model.
Quiz Yourself...
Think you have a good handle on wind speed and direction on a station model? Take this self-quiz below to see how you do. Begin by hitting the "Quiz me" button. Fill in the missing wind direction and speed, and then hit "Submit" to check your answer. Wind direction can be rounded to the nearest 10 degrees and wind speed is to the nearest 5 knots. You may also turn on some directional hint lines if you have trouble estimating angles. If you've mastered wind direction and speed on the station model, you should be able to get the right answer just about every time!
Lies, Damned Lies, and Statistics
Prioritize...
Upon completion of this page, you should be able to describe and interpret simple statistical measures of weather and climate information. Specifically, students should focus on "normal," mean (average), extremes (records), the climate period of record, and range.
Read...
Perhaps you've heard the saying, "There are three kinds of lies: lies, damned lies, and statistics [38]." There's no doubt that statistics can be used to deceive, or that some statistics can be misinterpreted, but statistics are a huge part of a meteorologist's toolbox. In fact, they're often used in weather forecasts that you probably see all the time!
For example, one statistic that you've probably seen is the probability (or chance) of precipitation. If you hear that there's a 40 percent chance of rain tomorrow, do you know what that actually means? Study after study shows that most people don't! The probability of rain doesn't tell us anything about how long it will rain, how heavy the rain will be, or what percentage of a given area will get rain (those are all common misconceptions).
A 40 percent chance of rain tomorrow means there's a four in ten chance that any point (your backyard, perhaps) in a forecast area will receive at least 0.01 inches of rain tomorrow. Alternatively, if the same forecast scenario occurred ten times, at least 0.01 inches of rain would fall on four days at any point in the forecast area, and no measurable rain would fall in the forecast area the other six days.
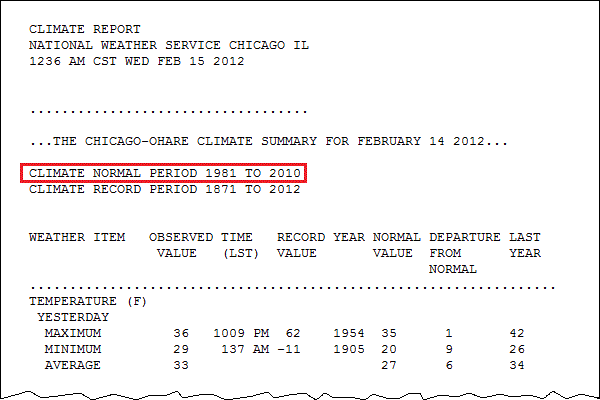
Some statistics that meteorologists use are a little more straightforward than probability of precipitation. For example, the observations that you learned about that go into the station model can be tracked over a long period of time to determine the long-term averages and extremes (highest and lowest values) at a location. These long-term averages and extremes constitute a location's "climate" and meteorologists often refer to them as "climatology." The National Weather Service is the keeper of many weather records in the U.S., and each day, each office of the National Weather Service issues a "climate report," which summarizes the previous day's temperature and precipitation and compares them to the climate record. Below is a sample display of temperature data in an NWS Climate Report from February 14, 2012 at Chicago's O'Hare Airport.

Climatology is extremely useful for weather forecasters because it gives an expectation (based on history) of types of weather that are typical at the location. While climate information runs the gamut from temperatures to dew points, to winds, to precipitation, etc., here we'll focus our discussion on temperatures since temperature statistics are cited so commonly. We'll start with so-called "normal" temperatures.
There's Nothing Normal about Normal Temperatures
One of the statistics in the climate report above is the ”normal value“ of maximum, minimum, and (daily) average temperature [40]. What does that mean? Well, "normal" temperatures are based on perhaps the most often used statistical measure in meteorology (and in general)--the mean (or "average"). The mean is simply the sum of a set of observations, divided by the number of observations. Meteorologists average lots of things, such as temperatures over the course of a day, a week, a month, a year, or even longer.
So, how did the NWS come up with 35 degrees Fahrenheit for the normal maximum temperature in the report above? They calculated the mean of all of the high temperatures for February 14 over a 30-year period in Chicago. Similarly, the "normal minimum temperature" of 20 degrees Fahrenheit is just the mean of the minimum temperatures for February 14 over a 30-year period. So, normal temperatures are 30-year means (averages). In case you're wondering how to interpret the "normal average" temperature of 27 degrees Fahrenheit, it's the 30-year mean of the daily average temperature (the average of the daily high and low temperatures for February 14 at Chicago).
Note that in Chicago's climate report above, the 30-year means ("NORMAL VALUE") came from weather observations taken during the period from 1981 to 2010 [41]. Every ten years, the averaging period for calculating normals changes. We started using 1981-2010 in the year 2011, but in 2021 the averaging period became 1991-2020. The switch to "new normals" every ten years usually results in normal temperatures that are a little different than previous normals. Moreover, the common use of the term "normal" is unfortunate because weather seldom behaves exactly in a "normal" way. In winter, for example, a season renowned for occasionally abrupt temperature swings, it sometimes turns out that a city's normal high for the date never actually occurred as a high temperature on the date in question during the previous 30-year period! So, there's nothing "normal" about "normal" temperatures!
Still, normal temperatures are useful for meteorologists because on most days, temperatures don't deviate all that much from normal. Indeed, a forecaster should be cautious about forecasting a high temperature that's 25 degrees above the normal high for the date. Such large departures from normal are possible, but they may only occur a few times each year.
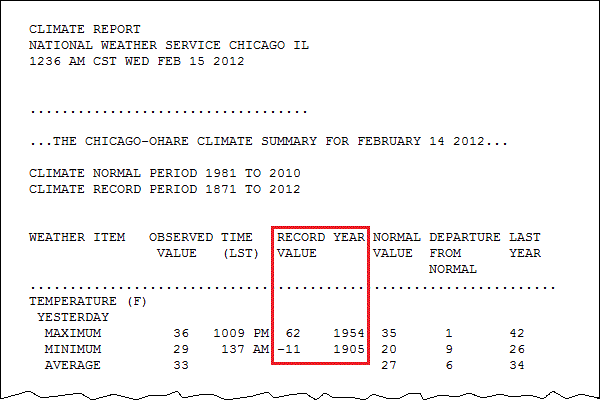
Record Temperatures and the Climate Period of Record
The climate period of record refers to the length of time that weather observations have been taken for a given city. For example, the ”CLIMATE RECORD PERIOD“ in Chicago's climate report [42] indicates that weather records in Chicago started in 1871; however, the period of record varies from city to city. Some places in the United States have reliable weather records dating back to the late 1800s, while others only date back to the 1930s to 1950s (or even more recently). Keep the idea of a "climate period of record" in mind whenever you hear someone tout an extreme, or record value (the highest or lowest temperature observed in the period of record), for a given day as "the highest (or lowest) temperature ever" for the date. What they really mean is that it's the highest or lowest temperature for the date in the period of record. So, the record high and record low for February 14 in Chicago [43] represent the highest and lowest temperatures observed on February 14 since 1871. Before records began, we have nothing reliable to compare to.

Furthermore, if you hear about a record high (or low) temperature being broken, it's always worth asking "what's the period of record?" A record high at a station that has only been keeping records for 30 or 40 years might not be a big deal. In other words, it might be setting a record only because they've been keeping weather observations for such a short period of time. It takes more extreme weather events to break records at locations that have a period of record 100 years or longer, such as the Blue Hill Meteorological Observatory (pictured on the right) in Milton, Massachusetts. The Blue Hill Observatory has the longest single, continuous set of weather records in the U.S. (going back to 1885). The location for taking weather observations in most cities (like Chicago) has changed at least once since the late 1800s (if they've been taking observations that long).
Temperature Ranges
Another statistic that meteorologists commonly use is the range of a set of observations, which is simply the difference between the maximum observation and minimum observation. Meteorologists often look at the range of temperatures over the course of a single day (called the "diurnal range"), or the range of temperatures over the course of a month, year, etc.
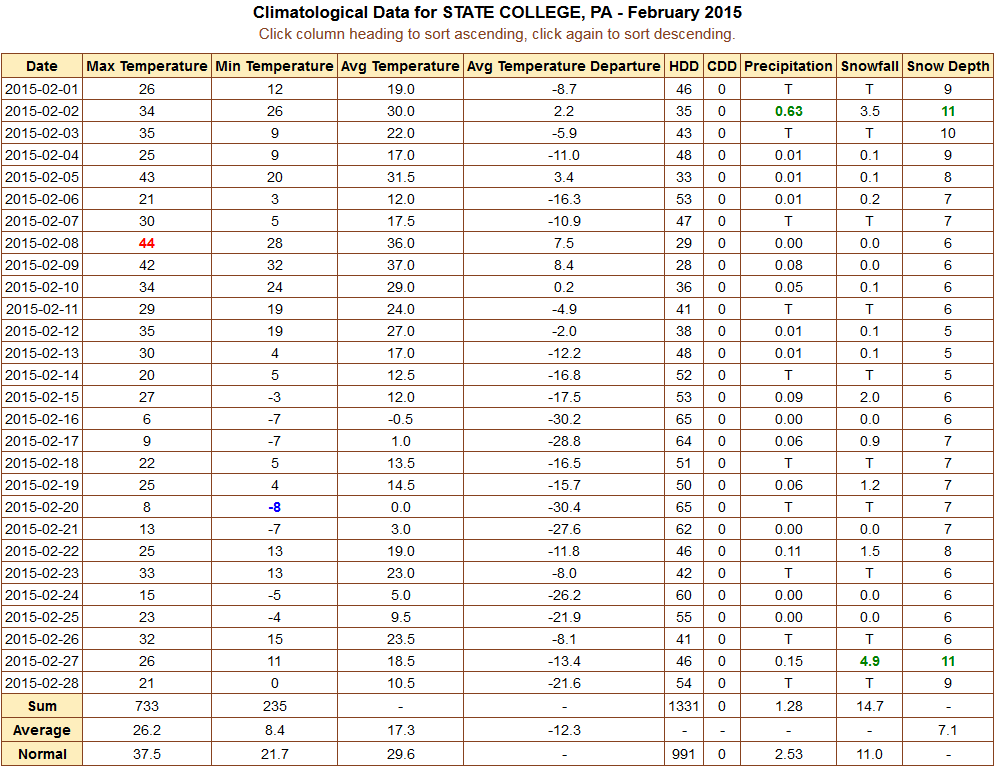
For example, take this table of climatological data for State College, Pennsylvania from February, 2015 [47], which was the coldest February on record at Penn State, where weather records began in 1893. The highest temperature measured during the month was 44 degrees Fahrenheit (in red in the "Max Temperature" column). Meanwhile the lowest temperature measured during the month was -8 degrees Fahrenheit (in blue in the "Min Temperature" column). So, during February 2015 temperatures in State College ranged from 44 degrees Fahrenheit to -8 degrees Fahrenheit. If we take the difference between the two, that gives us 44 degrees Fahrenheit - (-8 degrees Fahrenheit) = 52 degrees Fahrenheit. So, February 2015 had a 52 degree Fahrenheit temperature range in State College. If you wanted to find the range of monthly temperatures for all Februaries in State College, you would take the single highest temperature on record from all Februaries and subtract the single lowest temperature on record for all Februaries (and that would give you a much larger range than the range for February 2015).
These statistics (means, normals, and ranges) are pretty straightforward, but make sure you remember what each of them is telling you. Meteorologists use them a lot, and they'll certainly come up again in this course!
Now we're going to shift gears a bit. In the past few sections, we've talked about weather observations at a single location, but meteorologists need to observe the weather over large areas, too, and that requires us to talk a bit about maps and map projections. We'll start "mapping things out" in the next section.
Map Projections
Prioritize...
After completing this page, you should be able to identify / discuss map features such as latitude lines, longitude lines (meridians) and projections. You should also be able to orient yourself on certain map projections (specifically polar stereographic and mercator projections).
Read...
Meteorologists are always looking at maps! But, anyone who uses maps regularly can tell you that all maps are not created equal. For starters, (most) maps are flat, and while that's very convenient (far more convenient than carrying around a globe to simulate the spherical Earth), there's a trade-off for using flat maps. To see what I mean, think about unraveling the skin of an orange in one piece and then trying to make it lie flat without breaking or distorting it. Good luck! Trying to create a flat map of our spherical Earth brings the same problems: No matter how you do it, you'll always have distortions.
A number of imperfect techniques (called map projections) exist for making flat maps of Earth. Each projection has its own strengths and weaknesses, and it's important for you to know what those are in order to analzye weather maps that you see. We're going to focus on two common projections here: polar stereographic projections and mercator projections.
Polar Stereographic Projections
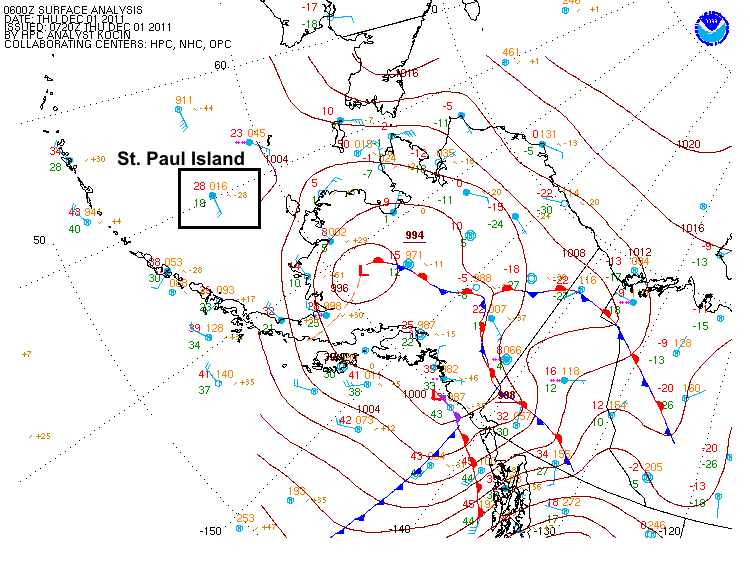
On a polar stereographic projection, the observer's perspective comes from looking down at either the north or south pole. This unique vantage point allows operational weather forecasters to watch, for example, the movements of weather system over long distances. But, there's a catch (of course). Latitude lines, which run west-east (paralleling the equator) and mark the distance from the equator (0 degrees latitude), are not straight on polar stereographic projections. Instead, latitude lines appear as large circles (or arcs, if you're not looking at the entire hemisphere). Meanwhile, longitude lines (also called "meridians"), which run north-south and mark the distance from the Prime Meridian (0 degrees longitude), are straight, and they all converge at the poles. To see what I mean, check out the polar stereographic projection below.

So, on polar stereographic projections, finding east and west isn't simply a matter of looking to the right or the left. Similarly, finding north and south isn't as easy as looking up or down on the image. Those directions will change orientation on the map depending on what area of the map you're looking at. For example, the arrow off the West Coast of the United States in the image above might look like it's blowing from the northwest, but if you look closely, it's blowing parallel to the nearest latitude arc. That means the wind is actually blowing from due west (270 degrees).
For a real-life example, take a look at this map including station models near Alaska from 06Z on December 1, 2011 [48]. I've outlined the weather station on tiny St. Paul's Island. Knowing that this is a polar stereographic projection, can you determine the wind direction? It might look like it's from the southeast at first, but it's really from due east (90 degrees). If you look carefully, the wind is blowing parallel to the nearest latitude arc. The bottom line is simply that you must orient yourself to the local latitude arcs and longitude lines on polar stereographic projections. Latitude arcs run west-east and longitude lines run north-south (and they intersect at right angles). Without orienting yourself, you can't properly determine things like wind direction. To further illustrate this issue, I created a short video below (2:37) that shows how the same wind direction can appear very differently on station models in different areas of a polar stereographic maps.
To help you get a feel for determining wind direction on polar stereographic maps, I'm going to use this interactive tool that shows a station model, and allows you to change its location as well as wind direction.
First, let's get our bearings -- this is a polar stereographic projection focused on the North Pole. Here's North America. Over here is Asia. Here's Europe, and Africa is toward the bottom.
Right now I have my station model located over Europe and it's set up for a 270 degree wind. That's a westerly wind. See how the wind flag parallels the local latitude circle at the station model?
If we keep our wind direction the same, but move our station model over North America, now it looks completely different. But, we know the wind is still westerly here because it's paralleling the local latitude circle at the station model.
Let's move it over Asia. Again, it looks completely different, but it's still showing a westerly wind because it still parallels the local latitude circle.
Now let's change wind direction to 180 degrees. The wind is blowing from south to north, and we know that because the station model is paralleling the local longitude line blowing from the south toward the North Pole.
But, if we move the station model over Greenland, like this, the southerly wind looks just like this. Again, the key is realizing that it parallels the local longitude line.
Now let's move our station model over Europe, and change our wind direction to 320 degrees. That's a northwesterly wind, so it won't parallel either a latitude circle or a longitude line.
But, this wind is clearly blowing from the northwest because it's coming from the north of the local latitude circle, and from the west of the nearest longitude line.
If we move the station model to the middle of North America, it now looks completely different, but the wind is still from the northwest, and we can tell that if we look at how the wind flag is oriented compared to the nearest latitude circle, which runs east / west, and longitude line, which runs north / south.
That's always the key when interpreting wind direction on a polar stereographic map.
There's one other big issue with polar stereographic maps--size and distance distortion. Note in the idealized polar stereographic map shown above that Alaska and Texas look to be about the same size. But, in reality, Alaska is more than twice the size of Texas! In fact, the farther you get away from the pole on a stereographic projection, the more signifcant the size and distance distortion, and that causes some issues when analyzing weather features closer to the equator. For analyzing weather features closer to the equator, meteorologists often turn to mercator projections.
Mercator Projections
Mercator projections are routinely used for weather maps and other imagery that focus on low latitudes (near the equator). This type of projection minimizes distortion near the equator, which makes it better for tracking weather systems at low latitudes. The closer you are to the equator on a mercator projection, the more accurate the distance representation.
Another benefit of the mercator projection is that compass directions are preserved. That's a huge benefit when tracking weather features over some distance. For example, north is always oriented in the same direction when looking at the image, regardless of where you are on the map. So, typically, north, south, east, and west are easy to find on mercator projections. You should still find latitude and longitude lines to orient yourself, but because each is a straight line, the directions are more intuitive, as shown in the sample mercator map below. North is at the top of the image, south is at the bottom, west is on the left, and east is on the right (regardless of location on the image).

Since compass directions are preserved and distances at low latitudes are depicted with reasonable accuracy, why don't meteorologists just use mercator projections all the time? Well, size and distance distortion are significant farther away from the equator. As weather systems move north or south, that can be a problem because they might appear to change size, when in reality the changes are just an artifact of the map projection. On the mercator map above, for example, Alaska absolutely dwarfs Texas (far more than in reality). At even higher latitudes, Greenland looks to be about the size of Africa, but in reality, Africa is more than 13 times larger than Greenland. At the extreme, the North and South Poles (single points, in reality) appear as straight lines at the top and bottom of Mercator maps. Now that's distortion!
Ultimately, no map projection is perfect, and meteorologists use the strengths of each type to their advantage. But, they must be familiar with the quirks of each type of projection, or else they could easily draw an incorrect conclusion about the direction, distance moved, or the size of a weather feature. Most often, it seems that students are a bit less familiar with polar stereographic projections, so to help you get comfortable with working them, check out the Key Skill and Quiz Yourself boxes below so that you can further explore the interpretation of these maps, and practice with determining wind direction on them.
Key Skill...
Determining wind direction on polar-stereographic plots can be a challenge, so to help you get the hang of it, check out the interactive tool below that allows you to enter a wind direction (in degrees) and then move the tool's station model across a polar stereographic map. By moving the station model over the polar stereographic map, you can see how the look of the wind flag on the station model changes relative to local latitude and longitude lines. You can also pick a location for the station model, and input different wind directions to see what the wind flag looks like.
Quiz Yourself...
If you think that you have a handle on reading wind direction on a polar stereographic map, give this quiz a try. Start by clicking "Quiz Me." Look at the station model on the polar stereographic map and enter the wind direction on the right. Don't forget to round answers to the nearest 45 degrees, and hit submit to see how you did. If you really understand the concept, you should be able to get it right every time! If you find that you need more practice, you might want to revisit the "Key Skill..." section.
Making a Map out of a Mountain
Prioritize...
When you've finished this page, you should be able to discuss what isopleths are, and you should be able to apply the idea of isoplething to an elevation contour map (a topographic map).
Read...
Now that we've covered some basics about maps, let's start investigating some ways that meteorologists use maps! To begin with, if you are an avid hiker or skier, you've probably consulted a topographical map [49] for insights into elevation and the "grade" (steepness) of slopes and hiking trails. Believe it or not, deciphering topographical maps actually lends itself to the process of interpreting weather maps.
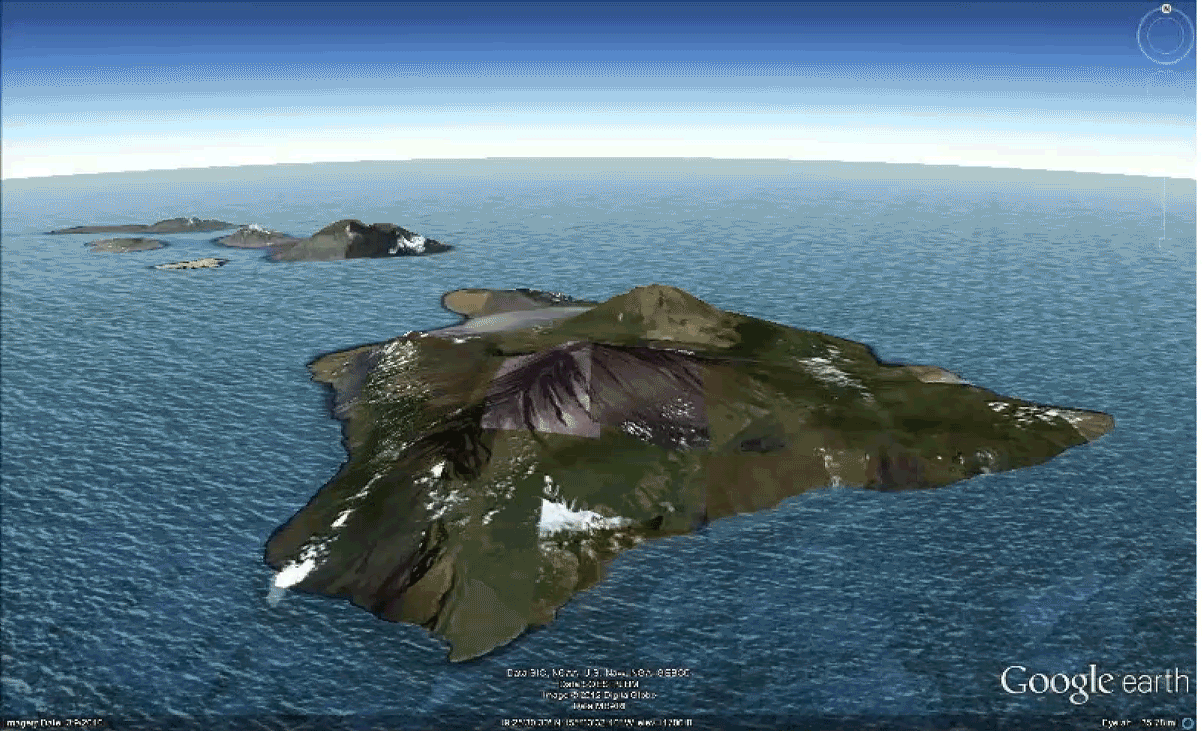
To get you started, let's look at the Big Island of Hawaii. Just in case you're not familiar with the topography of Hawaii, let's take a virtual fly-by of the Big Island [50] to get a sense of the dramatically changing elevation on the Big Island. As you might have guessed, elevation changes rapidly, varying from sea level to the volcanic summits of Mauna Loa and Mauna Kea at 13,452 feet and 13,796 feet (respectively) in a relatively short distance.
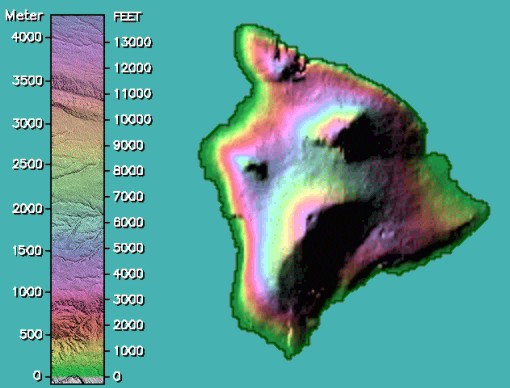
Now that you have a sense for the wildly varying elevations on Hawaii, focus your attention on a topographical map of the Big Island (below). Such a two-dimensional map represents a "plan" or "top-down" view."

Each contour on the map is an isopleth, which is a contour connecting points of equal value ("iso" translates to "equal" and "pleth" means "value"). In this case, the isopleths connect points of equal elevation above sea level, and are drawn for every 1,000 feet of elevation above sea level. I point out, however, that such a choice is strictly arbitrary. Isopleths could have been drawn for every 250 feet above sea level, meaning that there would be four times the number of isopleths on the map, probably making it look a little cluttered. The arbitrary choice of 1000 feet for the "contour interval" was a trade-off between the look of the map and its detail.
To explain what I mean by "detail," consider the southernmost tip of the island. Suppose I asked you to locate the point precisely due north of the southernmost tip that has an elevation of 400 feet. With isopleths drawn every 1000 feet, you must visually estimate the distance from the southernmost tip to the 1000-foot contour and then pick a reasonable intermediate spot to place the point. Had contours been drawn every 250 feet instead of every 1,000 feet (the cluttered look), your task would have been a little easier and your answer would likely have been more accurate. Just in case you're having difficulty making the connection between a three-dimensional mountain and a two-dimensional topographical map, I've created a short video (2:00) showing a virtual representation of Hawaii's topography [51] (video transcript [52]) to help you to better visualize what I'm talking about.

Looking at this virtual representation of Hawaii in the video, you might get the mistaken notion that all isopleths are closed curves or circles. Depending on the breadth of the map, however, some contours could conceivably extend from one side of the map to another without making a closed loop. Indeed, zooming in on the topographical map of the Big Island and restricting the focus just to Mauna Kea (see image on the right), some elevation contours now simply end at a boundary. We'll see this quite often when we start looking at contoured maps of weather variables.
The great thing about contour maps like our elevation map of Hawaii is that it allows us to see the elevation pattern relatively easily (much more easily than if we just plotted individual elevation numbers at random points). And, that's why meteorologists use contour maps regularly: contour maps help meteorologists easily find patterns in weather data. But, meteorologists must also be able to look at a contour map and, using the pattern of contours, estimate a value at any point. That's our next task at hand. Read on.
Interpreting Contour Maps
Prioritize...
When you've completed this page, you should be able to name the isopleths for temperature ("isotherms") and pressure ("isobars"). You should also be able to estimate a value at a point on a contour map of temperature or pressure (or any variable, for that matter).
Read...

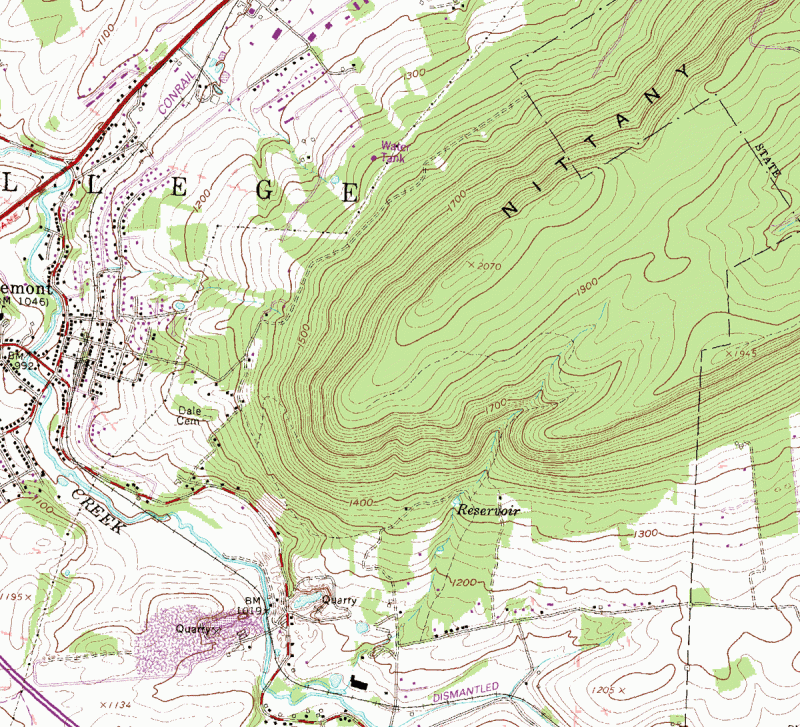
Meteorologists regularly use contour maps to see how weather variables (temperature or pressure, for example) change over large areas, but they also use them to estimate values of weather variables at individual points. To get us started on interpreting contour maps, we're first going to revisit our topographic map of Hawaii (right).
How would we go about figuring out the elevation of the point marked "P"? First, we must identify the two contours that lie on either side of "P." In some cases the contours that we need are clearly labeled; however, in other instances, you will need to use the contour interval (1,000 feet, in this case) to "count" up or down from a labeled contour. On our map, point "P" lies between 3000 feet and 4000 feet contours, so the elevation at point "P" is greater than (but not equal to) 3000 feet but less than (but again, not equal to) 4000 feet. We know that point "P" is not equal to either of these values because it does not lie on one of the contour lines.
Technically, this is all that we can say for sure about the elevation at point "P" -- it can be anywhere between 3,000 and 4,000 feet. However, often instead of giving a range of elevation, we would prefer a single number. In such cases, we can interpolate (make an estimate by assuming the elevation changes linearly) between the two known contours. In this case, we can see that point "P" is about half-way between the two contours and thus has an elevation of approximately 3,500 feet. Using interpolation usually provides us with a sufficient approximation, but we must always realize that it's only an estimate.
What about closed contours that have no other contours drawn within them? Look again at the contour map and focus your attention on the southern-most peak, Mauna Loa. How might we estimate the height of this peak? Clearly, we do not have two contours to use... or do we? The last drawn contour is 13,000 feet. This means that the peak is higher than 13,000 feet. However, we know that the summit of Mauna Loa is not higher than 14,000 feet. Why? Well, if it were, then the 14,000 feet contour would have been drawn around the summit. So, for an inner-most closed contour, the range is always between the last drawn contour and the next undrawn contour. You should also note that interpolation cannot be performed in such cases because we have no way of knowing how far away the undrawn contour is. The summit of Mauna Loa is 13,452 ft (within our deduced range of 13,000-14,000 feet), but we really couldn't have known that just from our topographic map (unless the peak elevation was labeled).
Two variables that are commonly contoured by meteorologists are temperature and air pressure. Isopleths of temperature are called isotherms (contours of constant temperature), and isopleths of pressure are called isobars (contours of constant pressure). Don't confuse the two! It would be incorrect to look at a map that shows only contours of constant temperature and call them "isobars," for example.
Maps with isobars of sea-level pressure help meteorologists recognize areas of high and low pressure. Why is this important? Well, generally speaking, areas of high pressure at the surface are often areas of "fair" weather (relatively calm, with at least some sunshine). Meanwhile, regions of low pressure are often somewhat unsettled (cloudy with precipitation). To see a map with isobars of sea-level pressure, check out the image below, from 15Z on May 1, 2017.

The H's mark centers of high pressure (highest pressure in the region), while the L's mark centers of low pressure (lowest pressure in the region). The feature that would immediately jump out at a weather forecaster as a region of "active" weather is the large area of low pressure centered over the Midwest (near the Iowa / Wisconsin border).
The first step in interpreting values from this image is to figure out the contour interval, which is four millibars (millibars is a standard unit of pressure). Knowing that, we can estimate the pressure near the center of the low over the Midwest. The inner-most closed isobar is 996 millibars (it's unlabeled, but it's inside of the 1000 millibar isobar and values are decreasing toward the center of the low), so the pressure must be less than 996 millibars. However, there's no 992 millibar isobar drawn, so the pressure must be greater than 992 millibars.
Similarly, meteorologists contour maps of temperature because such maps allow them to easily spot areas of cold and warm air. But, maps of isotherms are often color-coded to help make the interpretation easier (for what it's worth, colors are sometimes used on topographic maps [53], too). I caution you that color schemes and contour intervals can vary widely on images you may see on television or online, and determining which color is which can sometimes be a real challenge. But, if you understand how to interpret contour maps, you can keep your wits about you and use the isotherms (in conjunction with the colors, if you'd like) to gather useful information.
For example, check out the map of isotherms at 15Z on May 1, 2017, below. The contour interval on the image is 5 degrees Fahrenheit. Given that, what would you say is an appropriate range in temperature for somewhere in Indiana? Given that the 60 degree Fahrenheit isotherm and 55 degree Fahrenheit isotherm nearly match the eastern and western borders of the state (respectively), it's fair to say that temperatures in Indiana were greater than 55 degrees Fahrenheit, but less than 60 degrees Fahrenheit. And, if you look at the color key on the right of the image, the shade of yellow-green (or is it green-yellow?) over Indiana matches the color used for temperatures between 55 and 60 degrees Fahrenheit (although some might find it hard to tell).

If we wanted to pick a specific point, "P," on the map, near Indianapolis, Indiana [54], and estimate a specific temperature, we could do that, too. Point "P" is approximately half-way between the 55 and 60 degree Fahrenheit isotherms, so the temperature at "P" is about half-way between 55 and 60 degrees Fahrenheit. We'll call it 57 or 58 degrees Fahrenheit, knowing that we're just making our best estimate based on the isotherms.
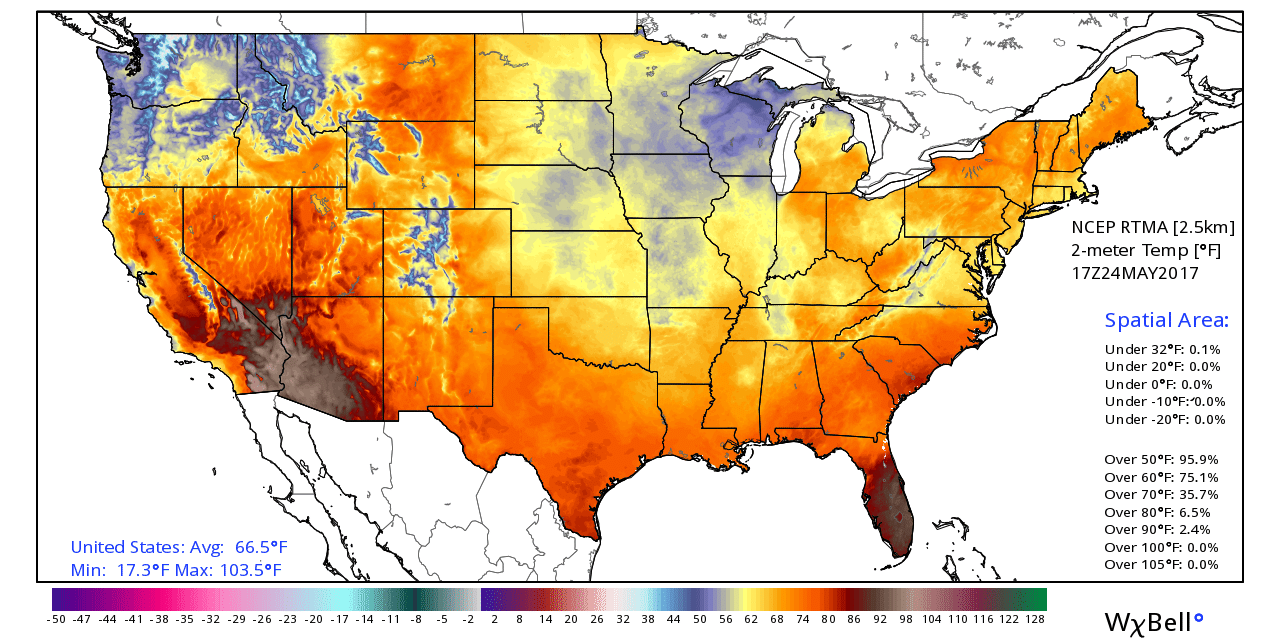
I should also point out that sometimes you won't even see isotherms plotted, and instead, a temperature map will just be shaded. In reality, every boundary where colors change is an isotherm (even if it's not drawn or labeled), and sometimes very small contour intervals are used. On such maps, like this analysis of temperatures from 17Z on May 24, 2017 [55]. Using the color key is the only way to go, and even then (because colors change every degree in this case), estimating a specific temperature at a point can be difficult when the shadings are so similar.
To see a few more examples of interpreting values from a contour map, watch the short video (3:28) below.
Click here for a transcript of this video.
Extracting information from contour maps is a really valuable skill. You'll see contour maps on TV weathercasts and on weather websites and mobile apps. So it's very helpful to be able to gather some information from them, and I’m going to show you some examples of how to interpret contour maps.
This is a map of surface temperature at 19Z on Thursday, May 18, 2017. If we do the time conversion, that’s 3 PM Eastern Daylight Time. So, this map comes from mid-afternoon in the eastern U.S. Along the West Coast, it was noon.
On this map of afternoon temperatures we can see that it was really warm for mid-May in the East. Using the pattern of isotherms, we can estimate the actual temperatures anywhere on the map.
The first step is always to determine your contour interval, and here it’s 5 degrees Fahrenheit. We see an 85 degree isotherm running through Pennsylvania. All along that isotherm, the temperature is 85 degrees, and immediately to its east is a 90 degree isotherm. All along that isotherm, the temperature is 90 degrees, so each isotherm represents a change of 5 degrees compared to the isotherm that it’s adjacent to.
Knowing that, we can estimate temperature anywhere on the map. If we picked a spot here in central Pennsylvania we know the temperature is between 85 and 90 degrees, because it falls between those two contours.
Anywhere inside this 90 degree isotherm, the temperature is greater than 90 degrees, but we know it’s less than 95 degrees because there is no 95 degree isotherm drawn.
For a different challenge, we could pick a spot in western North Carolina. What’s the temperature here? It looks like it lies between two 85 degree isotherms. But, if we look way back to the west, we see this 80 degree isotherm running through the Midwest. So, temperatures in Western North Carolina are greater than 80 degrees, but less than 85 degrees.
If we change to a map of sea-level pressure in millibars, here we don’t have the color coding, but the process is the same.
Once we determine our contour interval we’re all set, and it looks like it’s 4 millibars here, since we have a 1004 millibar isobar here in Texas, immediately adjacent to a 1008 millibar isobar.
So, if we wanted to know the pressure near this center of low pressure in Texas, we know that it’s less than 1004 mb. The values of isobars are decreasing as you get closer to the low, from 1008 here to 1004 here. But, we know the pressure is also greater than 1000 millibars since there is no 1000 millibar isobar drawn. So, the pressure here is between 1000 and 1004 millibars.
Here in Missouri, we have another one of those cases where it looks like it’s between contours with the same value. 1012 mb here to the northwest, and 1012 millibars to the southeast. But, if we look here to the southwest and the northeast, we have 1008 millibar isobars, so we know the pressure at our point in Missouri greater than 1008 millibars, but less than 1012 millibars.
So, always start by identifying your contour interval, and study values of the contours near your point to estimate a range of values.
Finally, before you continue on, make sure to check the Key Skill and Quiz Yourself sections below. They'll help you make sure that you can interpret contour maps on your own, which is a useful skill outside of meteorology, too (elevation and many other variables can be isoplethed, and the principle for interpreting the values is the same, regardless of what's being plotted).
Key Skill...
Consider the examples below using various different kinds of contour maps.
Example #1:
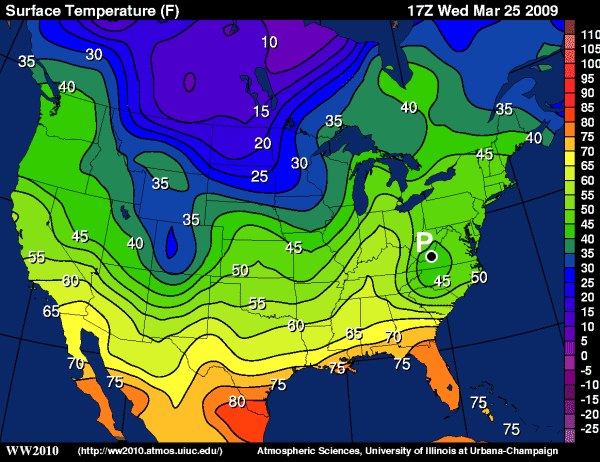
Let's start with an easy one. Consider this contour map of temperatures [56] with a point "P" located on the Iowa/Nebraska border. What temperature range would you specify at point "P"?
Answer: Point "P" is located between the 10 degrees Fahrenheit and 5 degrees Fahrenheit isotherms. Therefore, the temperature at point "P" is less than 10 degrees Fahrenheit but greater than 5 degrees Fahrenheit.
Example #2:
Here's another easy one. Consider this contour map of temperatures [57] with a point "P" located in western Virginia. What temperature range would you specify at point "P"?
Answer: Point "P" is located inside the 45 degree Fahrenheit isotherm. Note that the temperature outside of this closed contour is 50 degrees Fahrenheit. This means that temperature is decreasing towards the center of the contours (that is, this is a temperature minimum). Since the contour interval is 5 degrees, the next undrawn contour would be 40 degrees Fahrenheit. Therefore, the temperature at point "P" is less than 45 degrees Fahrenheit but greater than 40 degrees Fahrenheit.
Example #3:
Ready for a problem that is a bit more challenging? Consider this contour map of sea-level pressure [58] with a point "P" located in Montana. What range of pressures would you consider possible at point "P"?
Answer: At first, it looks like point "P" is located between 1020 millibars and ... 1020 millibars. If you think of these isobars as elevation (just as a visual aid), you will note that point "P" sits atop a large, flat plateau of pressure. It certainly has a pressure greater than 1020 millibars because each of the surrounding 1020 millibars lines has lower pressures on the other side. Next, we know that these contours are drawn every 4 millibars, so we know that the pressure at point "P" is not greater than 1024 millibars (indeed there are some 1024 millibar isobars northwest and southeast of our location). So, the answer is that the pressure at point "P" lies between 1020 millibars and 1024 millibars (not including those values).
Quiz Yourself...
Think you understand how to extract information from contour maps? Take this self-quiz below to see how you do. First, hit the "Quiz me" button and look for the red push-pin on the map provided. Fill in the range in values that the pin represents, and hit "Submit" to check your answer.
Caution: Gradient Ahead
Prioritize...
The change in a quantity over a certain distance is called the gradient. When you've finished this page, you should be able to discuss gradients, why they're important to meteorologists, and identify / interpret relatively large and small gradients on contour maps.
Read...
Besides allowing meteorologists to estimate values of weather variables at specific points, contour maps are also useful tools that help meteorologists to see patterns in the data. In other words, contour maps make it easy for meteorologists to see how a weather variable (like temperature or pressure) is changing over a large area. Maps of isotherms allow meteorologists to identify regions of warm and cold air, as well as how temperatures change over certain areas. Similarly, maps of isobars allow meteorologists to find areas of high and low pressure, and see how pressure changes over certain areas.
The change in a variable over a certain distance is called the gradient, and gradients are very important in meteorology. Zones where weather variables have large changes are often zones of active weather, so meteorologists like to keep tabs on areas with so-called "large gradients." Tuck this idea away, as the importance of gradients will come back again and again in our studies of meteorology.

But, to start us off in our discussions of gradients, let's return to the example of elevation. Driving to the summit of the beautiful mountains in central Pennsylvania, motorists are greeted by signs that warn of "steep grades" ahead, which refers to large gradients. What does that mean in practical terms? For the mountain road to have a large gradient, the elevation of the road must change relatively rapidly over a short traveling distance. In other words, you're driving on a steep hill. Similarly, a small gradient means that the elevation of the road changes very little with distance (the road is relatively flat).
How do we distinguish between a large and small gradient on a topographical map? Let's return to the video showing the virtual topography of Hawaii [51] (video transcript [52]) you saw earlier. Remember that the contours of constant elevation are packed close together in areas where the elevation changes rapidly over short distances (like near the mountain summits). Thus, a large gradient on a topographical map, which marks a large change in elevation over a relatively short horizontal distance (steep terrain), corresponds to a tight packing of contours.
Meanwhile, the "packing" of contours of constant elevation is rather loose where the terrain is flatter. In other words, the gradient is small. Thus, a small gradient, which marks little change in elevation over a relatively short horizontal distance (fairly flat terrain), corresponds to a loose packing of contours.
Now let's take what we've learned from topographical maps and generalize it to weather maps. Check out the 06Z analysis of sea-level pressure on March 15, 2017 (below), which shows a powerful low-pressure system along the New England Coast. Note the tight packing of isobars over the northeastern U.S. and eastern Canada, indicating a large pressure gradient over this region (relatively large pressure changes over a short distance). As you'll learn in later in the course, tight packings of isobars (large pressure gradients) correspond to strong surface winds. This case was no exception! This area of low pressure was dubbed "The Blizzard of 2017 [59]" and winds along the coast in Massachusetts gusted to more than 70 miles per hour.

On the flip side, for an example of a small pressure gradient, look at the western United States on the map above. There's not a single isobar in California or Nevada, and overall isobars are packed very loosely in the West, so pressure changes very little over the entire region.
Turning our attention to temperature, tightly packed isotherms represent large horizontal changes in temperature over a relatively short distance (that is, a large temperature gradient). For example, the analysis of surface isotherms from 19Z on May 18, 2017 [60] shows a very large temperature gradient (tight packing of isotherms) stretching all the way from the Southwestern U.S. to the Great Lakes and into Canada. Such a large temperature gradient marks a contrast between very warm air and colder air. For example, check out the change in temperature just in the state of Kansas (outlined in the black box [61]). In the southeast corner of the state, temperatures were in the 80s. In the northwest corner, temperatures were in the 40s! As we will learn in later lessons, large temperature gradients often indicate the presence of cold and warm fronts, which you've probably heard weathercasters talk about before (and that was certainly the case here)
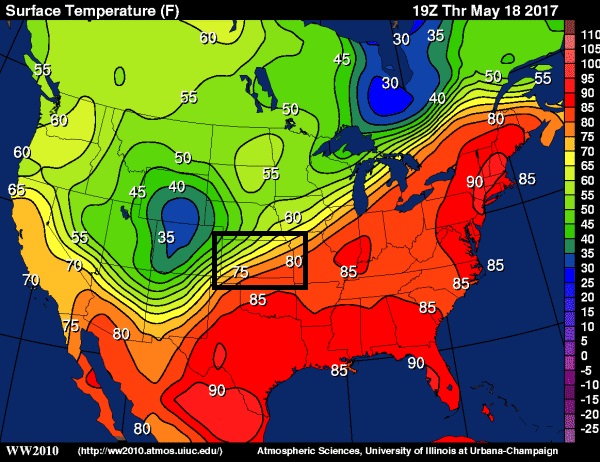
On the other hand, if you want to see an example of a small temperature gradient, look no further than the Gulf Coast States. The packing if isotherms was very loose, and temperatures didn't change very much with distance. In fact, temperatures over a several state area were mainly between 85 and 90 degrees.
To see another example of interpreting temperature gradients, check out the short video (1:40) showing some large and small temperature gradients in the winter time!
A useful thing that we can do with contour maps, and another one of your objectives from lesson one, is to be able to estimate and compare gradients on contour maps. So this is a map of surface temperature. And so we would be looking at temperature gradients, changes in temperature over certain distances.
And we want to look for areas of relatively large temperature gradients and relatively small temperature gradients. And where there's a large temperature gradient, that means the temperature is changing by a lot over a relatively small distance. So an example of a large temperature gradient would be over the eastern United States, say over the Appalachian Mountains, the lines are packed very close together.
That means temperature is changing by a lot over a relatively small distance. Look over here near the Ohio River, temperatures are near zero or below zero. And over to the east, along the east coast of North Carolina, temperatures are in the 40s. So temperature changes by a lot over that distance. You get a tight packing of isotherms and that's a large temperature gradient.
A small temperature gradient, on the other hand, would be where the lines are packed very loosely. We see that here along the Canadian border, North Dakota, and Minnesota. There's not a tight packing of the lines at all. That means the temperature doesn't change by very much over that distance.
So we see this minus 15 degree isotherm here. There's this closed isotherm which is minus 20 degrees. And then over here near Lake Superior there's a minus 15 degree isotherm again. So temperatures are largely between minus 15 degrees and a little bit lower than minus 20 within that circle, that closed isotherm there.
One quick note: When talking about gradients, be careful that you use the proper terminology. For example, if temperature changes rapidly over a short distance, you might refer to this as a "strong," "tight," "steep," or "large" gradient. You wouldn't, however, say that the "temperature gradient is changing rapidly." Doing so means that the change in temperature is changing. While this is certainly possible, it's not how we talk about a single gradient, because the gradient itself IS the change over a certain distance.
The bottom line is that meteorologists really pay attention to gradients in temperature and pressure (among other variables), mainly because large gradients can be zones of very "interesting" weather! Before wrapping up the lesson, make sure you try your hand at the Key Skill section below, to make sure you can "size up" gradients.
Key Skill...
After studying this section, you should be able to identify and describe gradients based on contour maps. You should be able to look at a location on a contour map and describe a gradient as relatively large or small compared to other locations on the map, and be able to describe what that means for changes in the variable (is it changing by a lot or by a little?).
Try these examples out for yourself. For each example, use the image below...

Compare the magnitudes of the temperature gradients at stations A and B. For example, which station has the larger gradient? How do you know? Are the gradients large or small compared to other locations on the map?
Answer: Station A has a larger gradient than Station B. We know this because the isotherms are packed closer together at A than at B. Alternatively, we could say that over a fixed distance near Station A (say, 1 cm on the map), the temperature changes a great deal more than for the same distance at Station B. While Station A shows a large gradient, there are perhaps slightly larger gradients in temperature in South Carolina and northern Canada. Station B's temperature gradient is certainly among the smallest on the map.
Example #2:
Perform the same analysis that you did in Example #1, but with stations C and D.
Answer: Station C has a larger gradient than Station D. We know this because the isotherms are packed closer together at C than at D. We could also say that over a fixed distance near Station C (say, 1 cm on the map), the temperature changes a great deal more than for the same distance at Station D. Station C shows one of the largest gradients on the map. Station D's temperature gradient is certainly among the smallest on the map.
Links
[1] https://www.flickr.com/photos/22280677@N07/2504310138/in/photolist-4Pifa1-n1GWFu-9rPDkF-8x4RCw-76kYTa-4c9L2-qrDUdc-5etMtM-pexVmh-efoWfy-4ZREm3-63KHzf-imbgwP-2HCnJN-6t59b-pE754E-oj6c3-ejYozd-9JN1fC-qrYD7n-fdUY1p-6YHtYJ-jKESwZ-7KXb8L-924SmZ-9QKxv-EBJpv-32N3ho-8DiwUH-7VuShM-9aXqae-bz6igw-5cE5kR-4qxGRq-32HtCK-7arjd2-57Swx2-5qLPrf-u1FLs-iS1MdJ-2h819u-28A3Y-rds4KY-k88eCY-4LFjre-6eHnyM-b5GyUF-aypDGP-2Z2rR-5nPGJe/
[2] https://www.flickr.com/photos/22280677@N07/
[3] http://creativecommons.org/licenses/by-nd/2.0/
[4] https://commons.wikimedia.org/wiki/File:Leonid_Meteor.jpg
[5] https://commons.wikimedia.org/wiki/User:Navicore
[6] https://creativecommons.org/licenses/by/3.0/
[7] http://www.flickr.com/photos/djt23/
[8] https://www.e-education.psu.edu/meteo3/sites/www.e-education.psu.edu.meteo3/files/images/lesson1/blue_marble0601.jpg
[9] https://www.youtube.com/watch?v=lzLbmOHTYcI?rel=0
[10] http://en.wikipedia.org/wiki/Prime_Meridian
[11] http://upload.wikimedia.org/wikipedia/commons/a/ad/Standard_time_zones_of_the_world.png
[12] https://www.e-education.psu.edu/meteo3/sites/www.e-education.psu.edu.meteo3/files/images/lesson1/timezones0103.png
[13] http://en.wikipedia.org/wiki/24-hour_clock
[14] http://en.wikipedia.org/wiki/Daylight_saving_time
[15] http://en.wikipedia.org/wiki/International_Date_Line
[16] https://en.wikipedia.org/wiki/Fahrenheit
[17] https://en.wikipedia.org/wiki/Celsius
[18] http://www.weather.gov/epz/wxcalc_tempconvert
[19] http://en.wikipedia.org/wiki/Kelvin
[20] https://www.e-education.psu.edu/meteo3/sites/www.e-education.psu.edu.meteo3/files/images/lesson1/goldengate_fog0105.jpg
[21] https://www.e-education.psu.edu/meteo3/sites/www.e-education.psu.edu.meteo3/files/images/lesson1/squall.jpg
[22] https://www.e-education.psu.edu/meteo3/sites/www.e-education.psu.edu.meteo3/files/images/lesson1/sand_storm0105.jpg
[23] https://www.e-education.psu.edu/meteo3/sites/www.e-education.psu.edu.meteo3/files/images/lesson1/smoke0105.jpg
[24] http://www.wpc.ncep.noaa.gov/html/stationplot.shtml
[25] https://www.noaa.gov/jetstream/wxmaps-max/jetstream-max-surface-weather-plot-symbols#ww
[26] http://www.wpc.ncep.noaa.gov/html/sfcloop/currobs.html
[27] http://forecast.weather.gov/glossary.php?word=partly+sunny
[28] http://forecast.weather.gov/glossary.php?word=partly+cloudy
[29] https://www.e-education.psu.edu/meteo3/sites/www.e-education.psu.edu.meteo3/files/images/lesson1/binovc0107.jpg
[30] https://www.e-education.psu.edu/meteo3/sites/www.e-education.psu.edu.meteo3/files/images/lesson1/few_clouds0107.jpg
[31] https://www.e-education.psu.edu/meteo3/sites/www.e-education.psu.edu.meteo3/files/images/lesson1/scattered_clouds0107.jpg
[32] https://www.e-education.psu.edu/meteo3/sites/www.e-education.psu.edu.meteo3/files/images/lesson1/broken_ps0107.jpg
[33] https://www.e-education.psu.edu/meteo3/sites/www.e-education.psu.edu.meteo3/files/images/lesson1/broken_mc0107.jpg
[34] https://www.e-education.psu.edu/meteo3/sites/www.e-education.psu.edu.meteo3/files/images/lesson1/compass_points0109.jpg
[35] https://www.e-education.psu.edu/meteo3/sites/www.e-education.psu.edu.meteo3/files/images/lesson1/calm_stations.png
[36] https://www.e-education.psu.edu/meteo3/sites/www.e-education.psu.edu.meteo3/files/images/lesson1/irene_annotated0109.png
[37] https://www.e-education.psu.edu/meteo3/sites/www.e-education.psu.edu.meteo3/files/images/lesson1/sample_station_pressure_tendency.png
[38] https://en.wikipedia.org/wiki/Lies,_damned_lies,_and_statistics
[39] http://w2.weather.gov/climate/
[40] https://www.e-education.psu.edu/meteo3/sites/www.e-education.psu.edu.meteo3/files/images/lesson1/climate_report0402_normal.gif
[41] https://www.e-education.psu.edu/meteo3/sites/www.e-education.psu.edu.meteo3/files/images/lesson1/climate_report0402_norm_period.gif
[42] https://www.e-education.psu.edu/meteo3/sites/www.e-education.psu.edu.meteo3/files/images/lesson1/climate_report0402_por.gif
[43] https://www.e-education.psu.edu/meteo3/sites/www.e-education.psu.edu.meteo3/files/images/lesson1/climate_report0402_records.gif
[44] https://commons.wikimedia.org/wiki/File:Great_Blue_Hill_Weather_Station_Milton_MA_03.jpg
[45] https://commons.wikimedia.org/wiki/User:Jameslwoodward
[46] https://creativecommons.org/licenses/by-sa/3.0/
[47] https://www.e-education.psu.edu/meteo3/sites/www.e-education.psu.edu.meteo3/files/images/lesson1/sce_feb_2015.png
[48] https://www.e-education.psu.edu/meteo3/sites/www.e-education.psu.edu.meteo3/files/images/lesson2/alaska_ps0208.png
[49] https://www.e-education.psu.edu/meteo3/sites/www.e-education.psu.edu.meteo3/files/images/lesson2/mountnittany0202.gif
[50] https://www.e-education.psu.edu/meteo3/sites/www.e-education.psu.edu.meteo3/files/images/lesson1/hawaii_orbit.gif
[51] https://www.youtube.com/embed/5E1vXpVgNPw?rel=0
[52] https://www.e-education.psu.edu/meteo3/sites/www.e-education.psu.edu.meteo3/files/transcripts/virtual_hawaii_transcript.docx
[53] https://www.e-education.psu.edu/meteo3/sites/www.e-education.psu.edu.meteo3/files/images/lesson2/hawaii_color0205.jpg
[54] https://www.e-education.psu.edu/meteo3/sites/www.e-education.psu.edu.meteo3/files/images/lesson1/201705011500_T_annotate.jpg
[55] https://www.e-education.psu.edu/meteo3/sites/www.e-education.psu.edu.meteo3/files/images/lesson1/rtma_tmp2m_conus.png
[56] https://www.e-education.psu.edu/meteo3/sites/www.e-education.psu.edu.meteo3/files/images/lesson2/keyskill1_0205.gif
[57] https://www.e-education.psu.edu/meteo3/sites/www.e-education.psu.edu.meteo3/files/images/lesson2/keyskill2_0205.gif
[58] https://www.e-education.psu.edu/meteo3/sites/www.e-education.psu.edu.meteo3/files/images/lesson2/keyskill3_0205.gif
[59] https://en.wikipedia.org/wiki/March_2017_North_American_blizzard
[60] https://www.e-education.psu.edu/meteo3/sites/www.e-education.psu.edu.meteo3/files/images/lesson1/201705181900_N.gif
[61] https://www.e-education.psu.edu/meteo3/sites/www.e-education.psu.edu.meteo3/files/images/lesson1/201705181900_N_kansas.jpg