The goal of this exercise is to practice creating GUIs a little bit more. Your task is to implement a rudimentary calculator application for just addition and subtraction that should look like the image below:
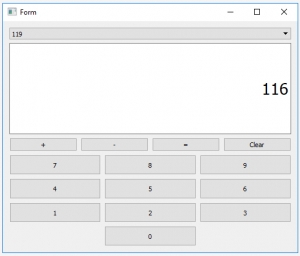
The buttons 0… 9 are for entering the digits into the line input field at the top. The buttons + and - are for selecting the next mathematical operation and performing the previously selected one. The = button is for performing the previously selected operation and printing out the result, and the “Clear” button is for resetting everything and setting the content of the central line edit widget to 0. At the top of the calculator we have a combo box that will list all intermediate results and, on selection of one of the entries, will place that number in the line edit widget to realize a simple memory function.
Here is what you will have to do:
- Create the GUI for the calculator with QT Designer using the “Widget” template. This calculator app is very simple so we will use QWidget for the main window, not QMainWindow. Make sure you use intuitive object names for the child widgets you add to the form. (See Sections 2.6.2 and 2.7.2)
- Compile the .ui file created in QT Designer into a .py file (Sections 2.6.2 and 2.7.2).
- Set up a main script file for this project and put in the code to start the application and set up the main QWidget with the help of the .py file created in step 2 (Sections 2.6.1 and 2.7.3).
Hint 1: To produce the layout shown in the figure above, the horizontal and vertical size policies for the 10 digit buttons have been set to “Expanding” in QT Designer to make them fill up the available space in both dimensions. Furthermore, the font size for the line edit widget has been increased to 20 and the horizontal alignment has been set to “AlignRight”.
This is the main part we want you to practice with this exercise. You should now be able to run the program and have the GUI show up as in the image above but without anything happening when you click the buttons. If you want, you can continue and actually implement the functionality of the calculator yourself following the steps below, or just look at the solution code showing you how this can be done.
- Set up three global variables: intermediateResult for storing the most recent intermediate result (initialized to zero); lastOperation for storing the last mathematical operation picked (initialized to None); and numberEntered for keeping track of whether or not there have already been digits entered for a new number after the last time the +, -, = or Clear buttons have been pressed (initialized to False).
- Implement the event handler functions for the buttons 0 … 9 and connect them to the corresponding signals. When one of these buttons is pressed, the digit should either be appended to the text in the line edit widget or, if its content is “0” or numberEntered is still False, replace its content. Since what needs to happen here is the same for all the buttons, just using different numbers, it is highly recommended that you define an auxiliary function that takes the number as a parameter and is called from the different event handler functions for the buttons.
- Implement an auxiliary function that takes care of the evaluation of the previously picked operation when, e.g., the = button is clicked. If lastOperation contains an operation (so is not None), a new intermediate result needs to be calculated by applying this operation to the current intermediate result and the number in the line edit widget. The new result should appear in the line edit widget. If lastOperation is None, then intermediateResult needs to be set to the current text content of the line input widget. Create the event handler function for the = button and connect it to this auxiliary function.
- Implement and connect the event handler functions for the buttons + and - . These need to call the auxiliary function from the previous step and then set lastOperation to a string value representing the new operation that was just picked, either "+" or "-".
- Implement and connect the event handler for the “Clear” button. Clicking it means that the global variables need be re-initialized as in step 4 and the text content of the line edit widget needs to be set back to “0”.
- Implement the combo box functionality: whenever a calculation is performed by the auxiliary function from step 6, you now also need to add the result to the item list of the memory combo box. Furthermore, you need to implement and connect the event handler for when a different value from the combo box is picked and make this the new text content of the line edit field. The signal of the combo box you need to connect to for this is called “activated”.